DOMESTIKA COURSE – ISLAMIC ART – COMPLETING THE PROJECT
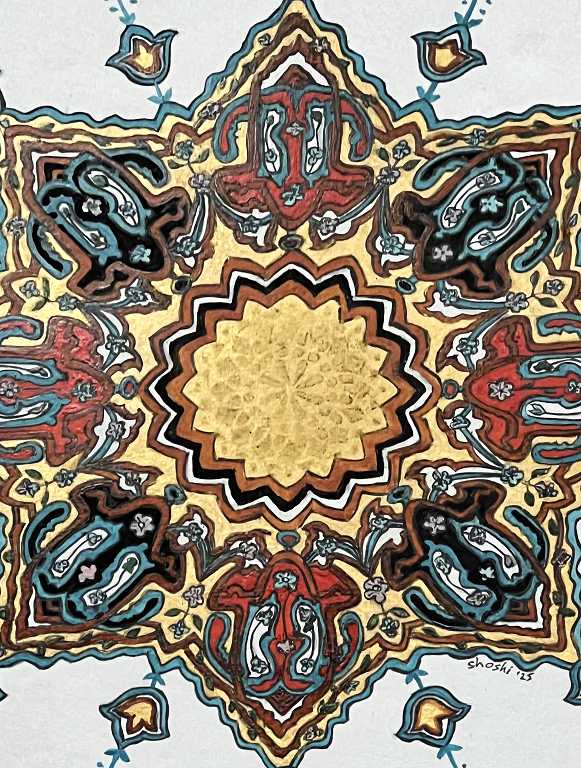
This particular Arabesque motif is called a shamsa.
Etymology
I am fascinated by the origins and relationships of words, and looked up the etymology of shamsa. This immediately rang a bell with me, because of its similarity to the Hebrew word shemesh, meaning “sun.” The word shamsa means “little sun” – shamseh in Farsi (Persian) and shums in Arabic. These are all cognate languages (i.e. they all come from the same linguistic root, in this case, the Semitic root). Shamsa is also a popular girl’s name in Muslim communities – rather sweet to call one’s daughter a little ray of sunshine – or as my hubby pointed out, “Little Miss Sunshine”!
How to recognise a shamsa
This is basically a circular design, and usually based on an eight-pointed star grid, and frequently has “sun rays” radiating from it. They are often highly decorated and illuminated with gold, and are frequently found as the frontispiece in early Qu’ran manuscripts, and embellishments on various objects, as well as featuring in the centres of architectural domes. Within the shape there is ample opportunity for adding the beautiful organic shapes and spirals of the traditional biomorphic art.
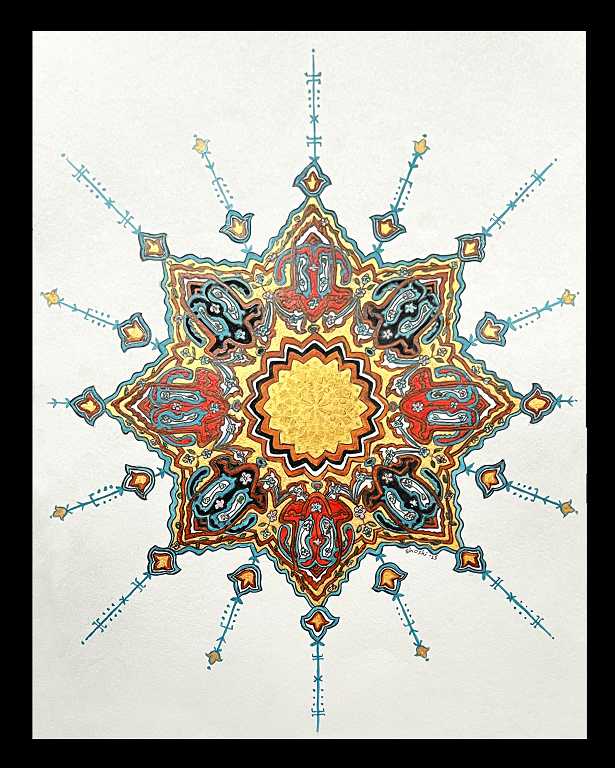
The completion of our shamsa project
After painting with colour and gold, the final stage of our drawing in this course was to add the traditional sun rays. They give a lovely finish to the project, and also serve to fill the blank space around the design. Here is my completed project.
Adding a stencilled design to the centre
The original had some Arabic calligraphy in the centre. We were not taught how to do this in the course and anyway it wasn’t something I wanted to do. Esra just left the centre of the design blank, and filled it with gold. My hubby thought I ought to put something in there but I didn’t really know what. Anyway, it would be hard to paint over the shiny gold.
I looked through my collection of stencils and found this circular one. I taped it in place and carefully went over the holes with an embossing pen. This is filled with sticky clear ink which is used for heat embossing with embossing powder. It can also be used to apply Perfect Pearls in their powder form. You apply the embossing ink and then sprinkle on the powder, and brush away the excess. My first attempt was with this “Perfect Gold” powder. (Perfect Pearls are powdered coloured mica mixed with gum arabic.)
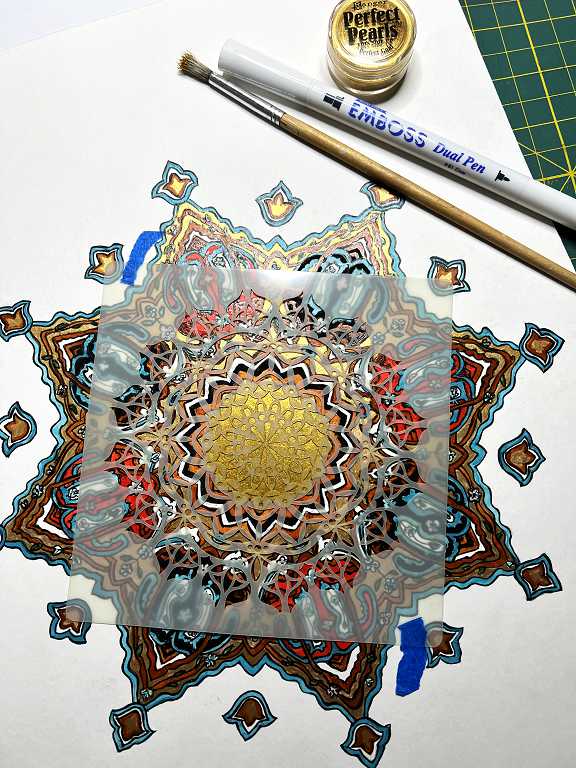
The results were underwhelming! I did it again, this time using a different gold, “Heirloom Gold” which is darker. It’s still very subtle, but visible in certain lights.
In future I may take a different approach. I could use gold embossing powder which when melted with a heat gun, has a shiny, slightly raised metallic finish. Gilding wax is another alternative. I could also stencil the design with moulding paste before painting, to give a raised effect… I now have quite a collection of different gold media in the form of waxes, powders, paints, inks and markers and each one is a slightly different shade of gold, and with a different finish. I like the idea of gold-on-gold, with just the faint suggestion of a pattern which adds something without detracting from the overall design.
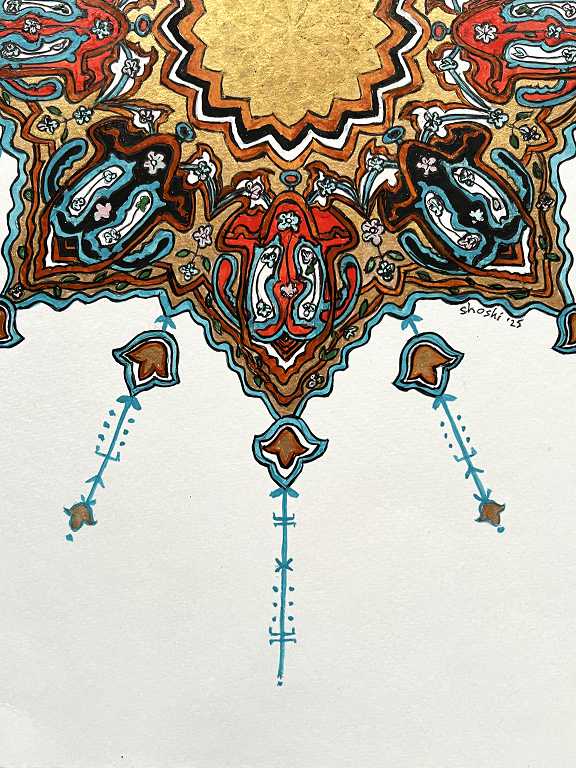
Adding the sun rays
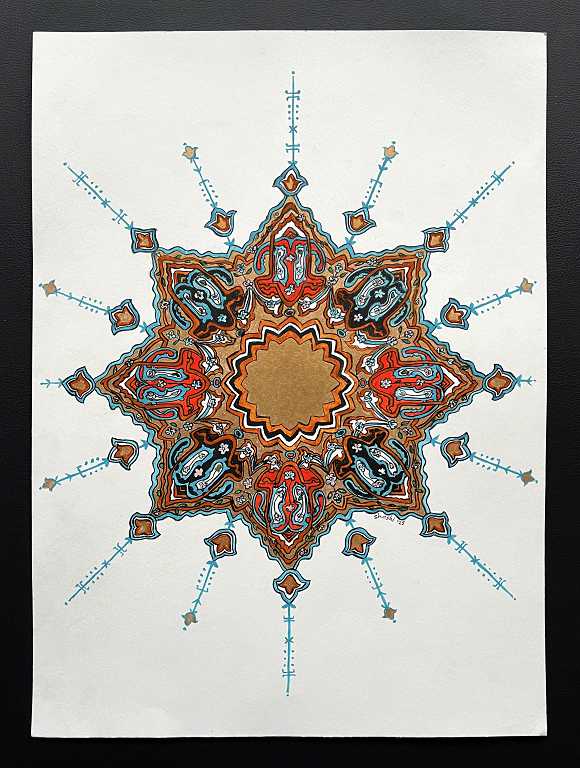
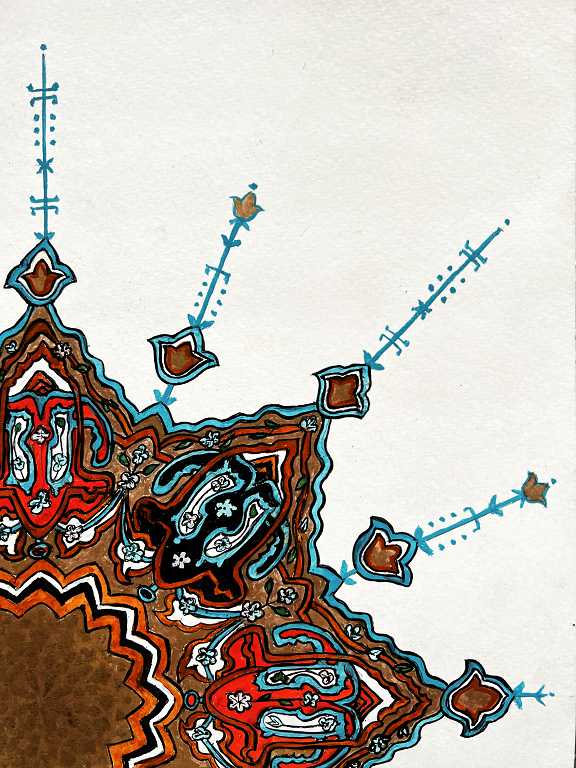
I thoroughly enjoyed this step. They are quite simple to do, and I used the brush-and-ink technique, choosing the same blue in the completed design. The small embellishments are all traditional.
Here is the finished project once more.
My thoughts on completion of the project
Even though my design departed quite a bit from Esra’s, I am pleased with the result. I had thought that I probably wouldn’t pursue this particular branch of Islamic art, but having done this project, I’m thinking again. There are so many beautiful designs.
One thing Esra recommends is to work on tea-dyed paper, and having seen some of the vintage examples, I can see how this improves the look of the design rather than the stark white of our modern papers.
I am keen to do some larger floral motifs in this Arabesque style, and try some different techniques and materials. Esra encouraged us to make this art our own. There is no need slavishly to copy the designs of the past, and it is good to develop one’s own personal style and preferences.
Summary
This has been a very interesting course. There were several things which would prevent me from giving it the full 5* rating. Esra is undoubtedly a skilled artist in this style, but the way she presented it wasn’t that easy to follow. The overhead camera shots were good, but too far away to see much detail, and the closer ones were from an angle. This made it very difficult to follow along exactly with her design, and the accompanying pdfs weren’t that helpful, either. This is why my own design departed so much from what she was teaching us. This isn’t a problem because as she said, it’s good to develop your own style, but I would have preferred this to have been through choice, and not because I couldn’t follow what she was doing.
Her method of tracing and transferring the design was over-complicated and needed a lot of careful lining up on the drawing at each stage. I have learnt a better method elsewhere which requires no lining up until the tracing is complete. All that is required is to be able to fold the single sheet of tracing paper accurately along the lines as required.
The transfer of the tracing was a bit messy. I used the burnishing method rather than going over each line with a sharp pencil which would have given a cleaner result but it would have taken much longer. I developed my own method which worked for me. After transferring the tracing, I removed quite a bit of the graphite with a kneaded eraser, and then went over the whole thing with a fine grey permanent fineliner pen which resembled a pencil line, but which was permanent, and clean. After erasing the remaining pencil lines, it was dark enough to see, but light enough that the painting would cover it. This worked very well for me, so I shall use this is the method in future, both for Arabesque and geometric patterns.
Discovering my best methods took time, which made this project take very much longer than it could have done. It’s all part of the learning process, and in future, using my preferred methods, the procedure should be a lot speedier.
Everyone has their own methods, and Esra has done her best to share hers with her students. Most people seem to be thrilled with it, and have achieved great results. I found a lot of the course quite frustrating but I’m very glad to have done it, because I have learnt so much in the process. I am therefore grateful to Esra, and have a great sense of achievement now, and looking forward to developing my skills further in this beautiful art form.