STUDIO TOUR
I thought it was about time that I took some up-to-date photos of my studio. I did try and tidy up before I took them, but it is difficult to make it look really tidy when there’s so much stuff! Believe me, it is organised, though, and I can generally find things.
History
I was very much more active before I got ME back in 2007, and was always dashing about doing this and that, but I really don’t miss all that now – it’s like another life. I think everyone’s life consists of different times and seasons, and my attitude to getting ill was (once I’d come to terms with the radical change in my lifestyle, being so much more limited), don’t hanker after what you can no longer do – do something else instead! It was through getting ME that I discovered the online art community and my creativity took off big-time. In the early years I wasn’t able to do so much but I’m now definitely better than I was.
I have always been creative, but when I discovered stuff online and all the different materials and techniques available, I realised I’d been struggling on my own and didn’t really know what I was doing. In the early days, I was working in the sitting room, out of one box, which then developed into more boxes and my poor hubby was constantly carrying stuff up and down the stairs for me!! Eventually I set up a kind of studio in my office upstairs but the combination of studio and office never really worked, and it was endlessly frustrating.
When we moved to our current house in 2013, I was able to plan the room from scratch, and the builder and I designed it together. Quite a lot of work needed to be done, with a new kitchen and bathroom, and improving the flat for Mum being the main things. The builder said that creating my studio was the most fun part of the whole build, as he didn’t usually get the opportunity to be creative in this way, and to bring my dream to reality.
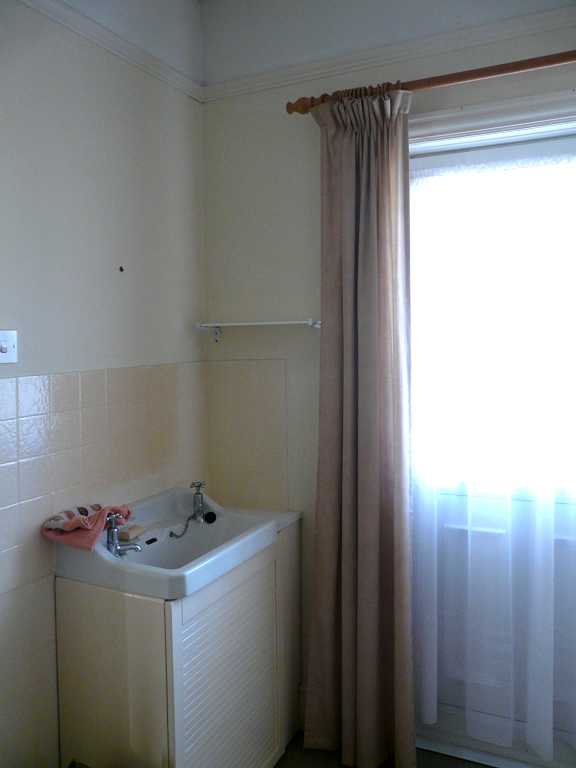
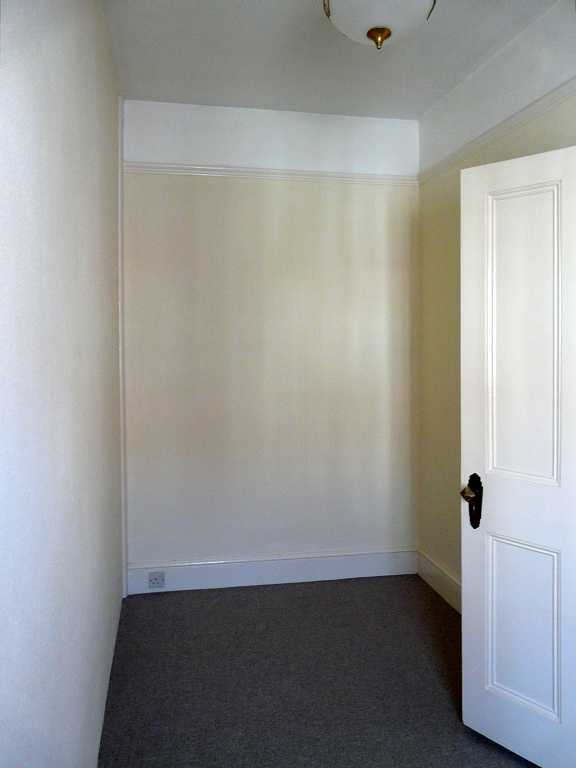
It was a bedroom originally, with a smaller area sectioned off just inside the door from the landing, which was described as a “dressing room” in the agent’s particulars. There was a basin in the corner, and the builder put the sink from the old kitchen in there for me, and the rest of that small section is now my office – my big desk just fitted in! This is how it looked, the day we completed the purchase.
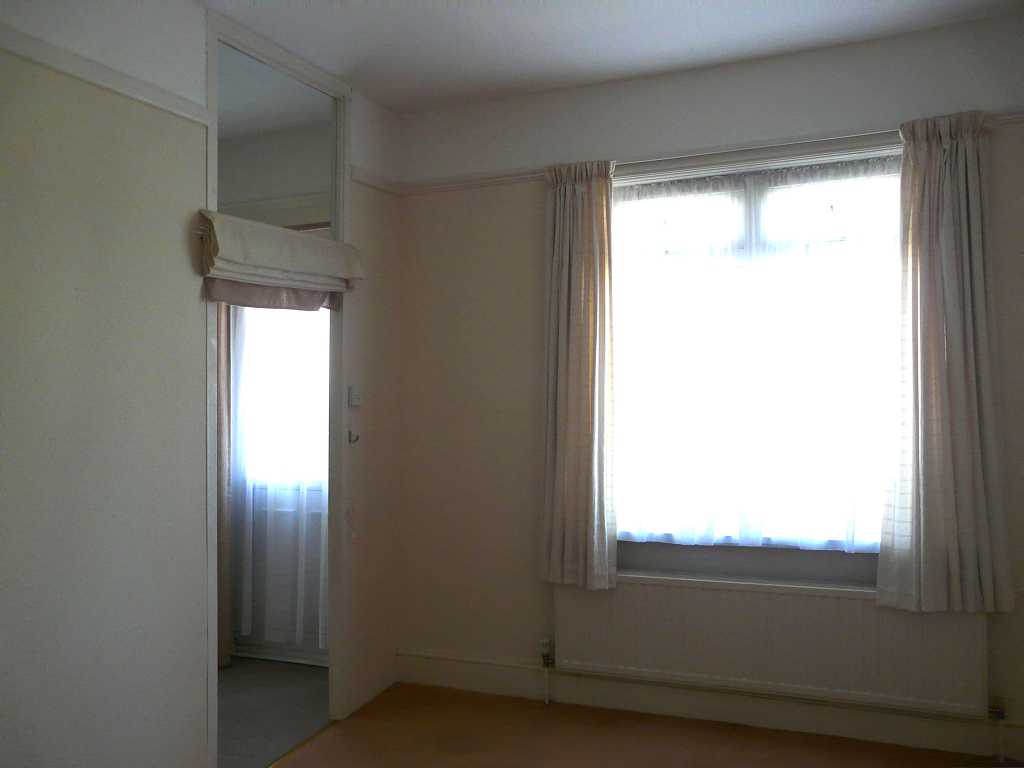
The window faces north so the light is good.
It works very well for me now, although there are always frustrations in every set-up – I don’t think anyone has the absolutely perfect studio! The electric lighting I had installed doesn’t work so well unfortunately – wherever I go, I cast shadows which is a pain, particularly for photography so I try to do that in the daylight, or with lamps. I do so many different things that the room has to be fairly versatile. I have designed it so that there are different zones for different things, and with the curved worktop sweeping around three sides of the room (the fourth side being storage only), it helps with the feeling of being fluid between the different activity zones.
Here is how it looks today.
The tour begins!
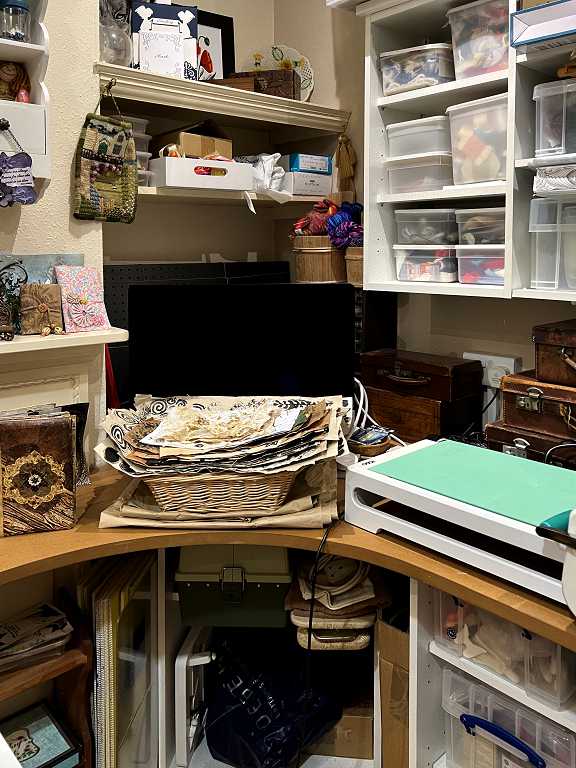
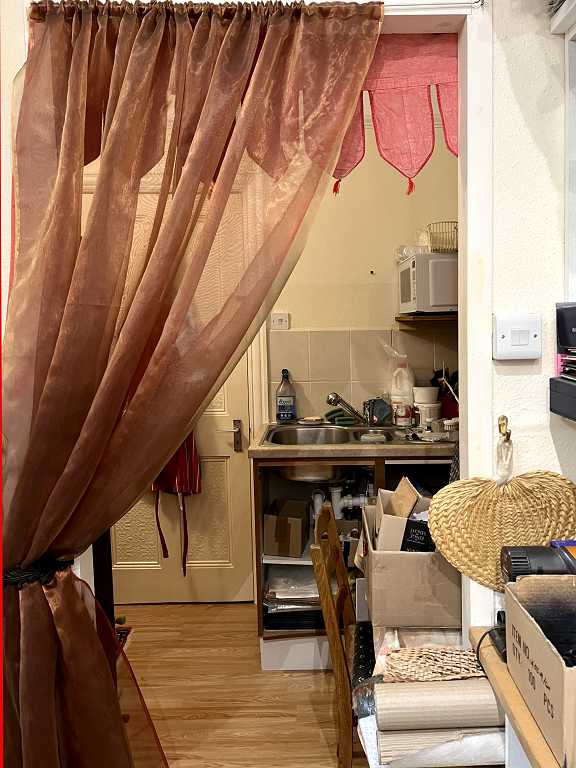
Coming in from the landing and looking to the left, you can see the sink that the builder installed to replace the basin. This sink was taken from the old kitchen. They also installed a microwave for me and I occasionally use this for small quantities of fibre dyeing. I put Mum’s wooden table in front of the balcony door and this is now where I do my gel printing. It is extremely handy having running water close by. I also use this table for any other particularly messy or wet activities like bulk tea-dyeing of paper. On the right-hand side of the table, at the back, is the paper drying rack I made from square wire mesh panels. The paper tray on top holds my paper for gel printing. In the box in front are all my texture makers. There are boxes of copy paper and dyeing materials under the table. All this has to be moved when the window cleaner comes – he is coming tomorrow so before bed tonight I am going to have to pull it out!
Beside the table is the doorway into the studio proper. I have decorated this with a chiffon curtain and an Indian toran.
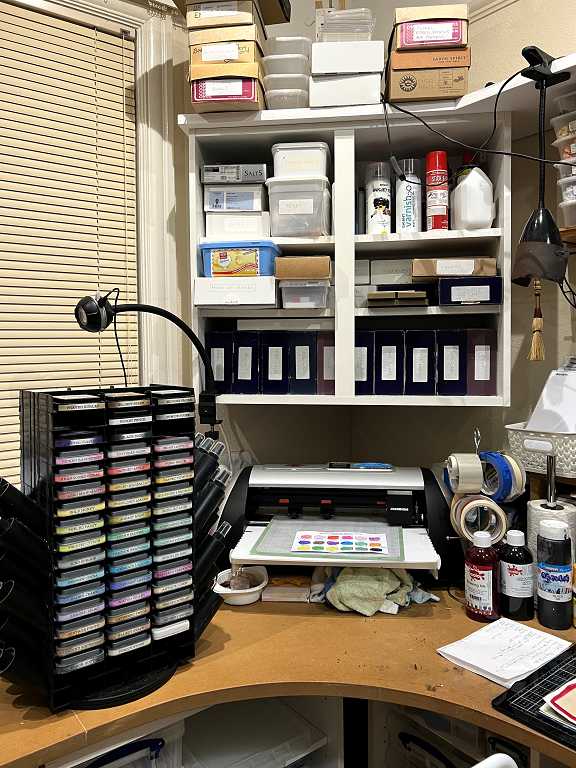
This is where the continuous work surface begins, at first quite narrow to enable you to get through the doorway. The wall units are my mixed media storage, and underneath and to the right is my “hot” area. The surface is protected by ultra-heat-proof mats. I have my laminator, multicooker for various processes, soldering iron and hot knife – these things aren’t used very often.

The shelves underneath contain paints, brushes, and other equipment for mixed media, and in the slot on the left are larger rolls of paper, wallpaper sample books etc.
The worktop opens up in size at this point as we move towards the window.
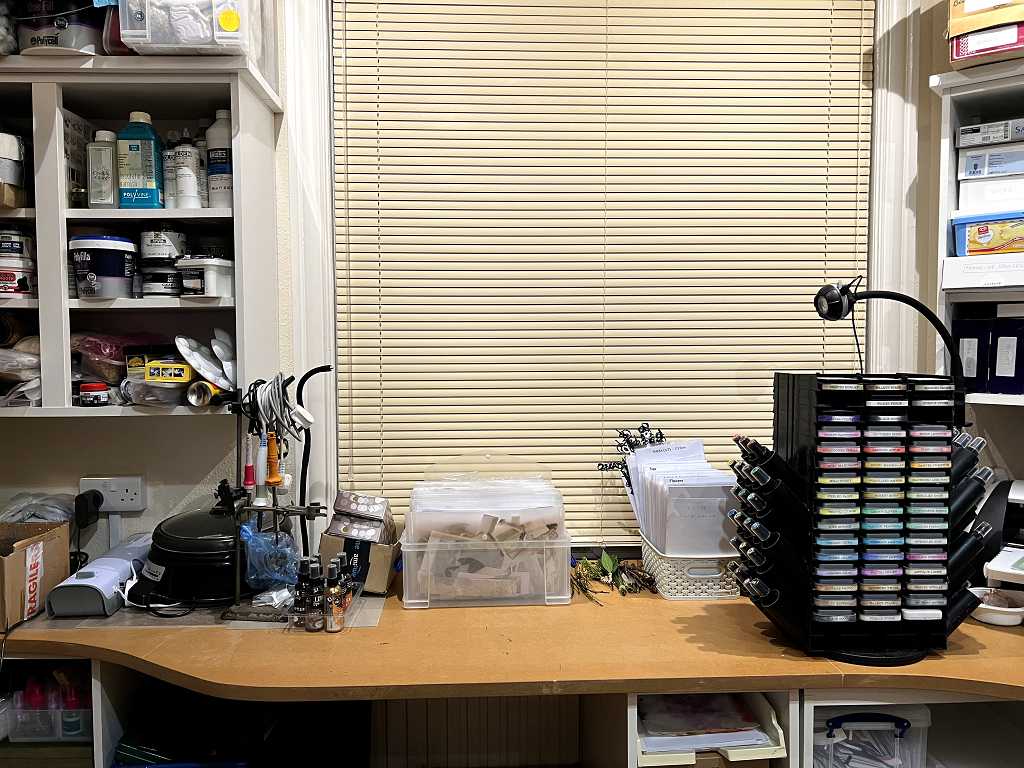
This is usually where I take photos during daylight hours. It’s also a secondary work area to my main work area, and at the back are the box of polywallets containing my gel prints and other papers, and my baskets of dies and card-making equipment, and in pride of place, the storage unit for my ink pads and spray inks on its revolving base. The shelves underneath contain laminating pouches, boxes of finished cards, scrap paper, re-inkers and other supplies. The space to the left is where the first pull-out unit would normally be. I said to the builder that since I can only sit in one place at a time, it would make sense to fill the spaces underneath with mobile units, in order to provide more storage and avoid wasting space; they are on castors and when they are pulled out, they not only provide space to sit, but also another surface to put things on. All the units, both floor and wall, are bog-standard kitchen units without doors. The fixed floor units provide support for the work surface which is made of sealed MDF.
The work surface curves around the corner. The wall unit above has smaller boxes containing all those bits and pieces such as brads, tags, clips, wire, jewellery findings… you name it! The boxes on top are mostly empty. I also have my aerosol cans of spray adhesive, fixative, varnish etc. Underneath, on the work surface across the corner, is my electronic cutting machine.
Moving on, we come to the main work area.

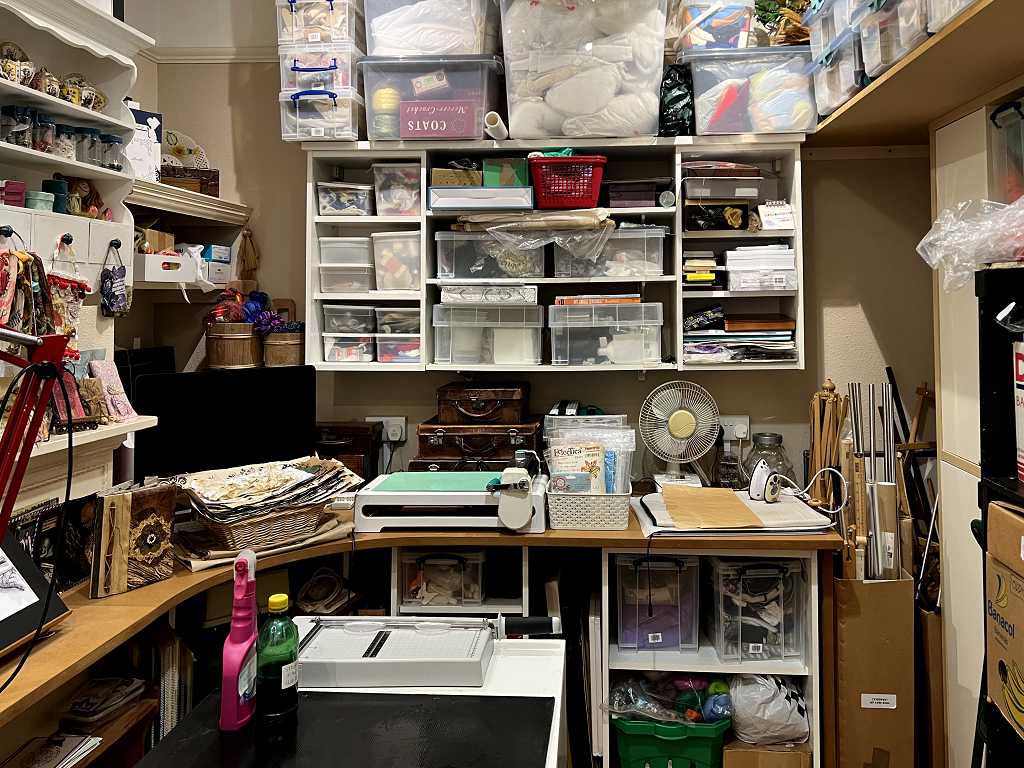
On the higher wooden shelf are gilding flakes, alcohol inks (in the carousel), another carousel of large blending brushes, and punches on the rail along the wall behind. Underneath is a hanging rail with clips, now empty – this is where I used to store my rubber stamps in hanging bags until I got too many. This space isn’t very well utilised at the moment. On the lower shelf are two baskets of stamps, the rest being in another basket on the other side of the room, still waiting to be organised. To the right is a spotty fabric caddy for storing all my useful tools in, like scissors. It sits on a circle cutter that I bought ages ago and which never worked properly, but as a revolving base, it’s ideal! To the right of that are ink blending brushes and a couple of pipe racks I inherited from Dad, which contain pliers, tweezers and fine scissors. In the spice rack on the wall above are all my Distress Stains (in the original dauber tops – the new sprays are in the revolving ink pad storage unit), and other stuff like stamp cleaners, Glossy Accents etc. My two heat tools are hanging on the side of the next wall unit.
Under the shelf is a small black wooden drawer unit inherited from Dad, which contains glitter, gilding wax, a few small punches and other bits and pieces.
In front of that, I’ve got a clear plastic caddy that holds pens, rulers and other tools in frequent use. On the right, I’ve got a compartmentalised wooden box I also inherited from Dad, which contains my DIY ink blending pads and glue sticks and liquid glue. The green thing is my Cuttlebug die cutter/embossing machine. Just in view, the turquoise box contains my Cropadile hole puncher/eyelet tool. In front of the glass media mat (with my work in progress on it – altered book), there are various bottles of inks, acrylic paints and gel medium in frequent use, a mug rack with tapes, kitchen roll, a rack and an empty tin full of paintbrushes, and spray bottles for water and alcohol. To the right of the glass media mat I’ve got a Stanley knife and a dry marker eraser which I use for pressing down on my stamp platform. Under the wall unit is a metal rack designed for storing baking trays, in which I store my ATG double-sided tape gun, paper trimmer, stamp platform, and envelope board. Beyond that are large envelopes containing stuff like waxed paper, shiny paper, instructions, labels… and on the far right, my large purple score board.
In the wall unit above are various stamping tools, some empty small plastic drawer units which I no longer use, and pizza boxes (with ore stacked on top of the unit) containing ink-stained paper towels, feathers, doilies, used postage stamps, and all sorts of other bits and pieces.
Under the work surface in this main work area is another space for a pull-out unit. To the right, also underneath, in the floor unit, are boxes of cardstock, envelopes and other stationery.
In the centre of the room, I have got the two pull-out units back to back, with a plastic-covered corrugated plastic board on top (my “wet” board – very useful!). This is providing a very useful extra surface for working on larger projects, or for spreading things out to dry etc. The two bottles contain coffee for coffee-dyeing paper, and beyond is my guillotine paper cutter.
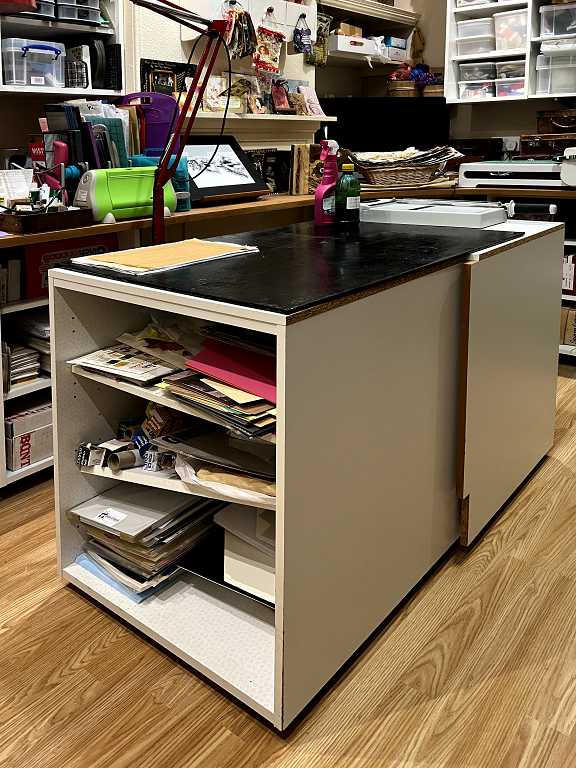
On the shelves (collapsing!) in the first one are piles of different papers and cardstock, much of it recycled. In the other pull-out unit I’ve got boxes of adhesives, teabags, office stationery etc.
Moving on around the room, the chimney breast houses my “gallery” where I display some of the things I have made, and also gifts from other creative people. Some of these have also found a home on the white shelf to the right of the chimney breast, under which are boxes of cut paper flowers, and the white box which is full of ribbons.
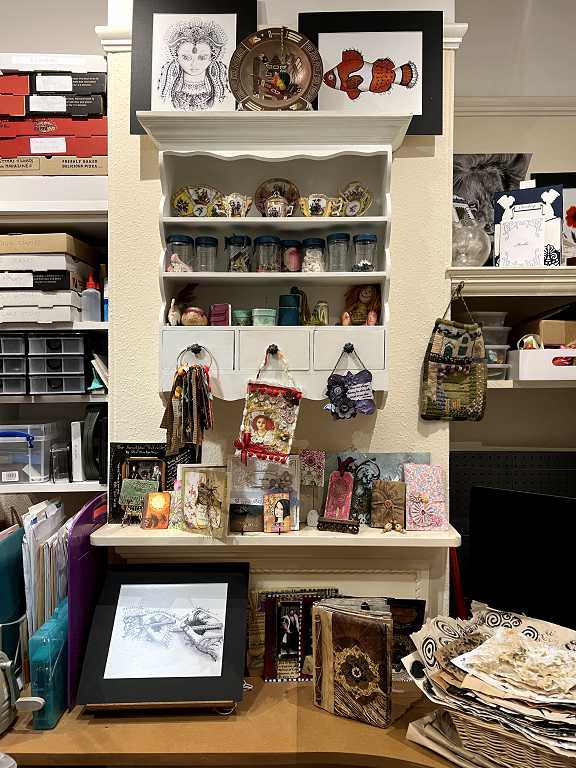
The basket at bottom-right is full of large pieces of paper with experimental mark-making.
Across the corner, this is officially my sewing corner. At the moment I’ve got the iMac there, because I’m not using it much these days. It used to live under the window near the cutting machine, but since I’ve upgraded the software for that, I am having to use the Windows laptop when I want to cut anything. Behind the iMac is my sewing machine, which doesn’t see the light of day much at the moment, so if I want to do any sewing I’m going to have to move the computer!
Beside the sewing machine, to the right of the iMac, is a metal cabinet with plastic drawers that I inherited from Mum. It still has her sewing things in it! I don’t really use it but didn’t want to part with it. There are two wooden buckets on top with fancy yarns in them, and to the right I’ve got two beautiful wooden boxes, also inherited from Mum, as are the vintage leather suitcases further to the right. These contain lots of braids and trimmings, lace and ribbons – it’s such fun just rummaging through those!
The large machine in front is my ToDo foiling/die cuttng/embossing machine. This also used to live in front of the window. As it doesn’t get used very much at the moment, it’s migrated over to this area of the room that is not being used so much. There are times and seasons for everything, and when I need to do another batch of foiling or sewing, these machines will get pulled out again!
Underneath the corner, the large green and white plastic box is my wonderful old fishing box that I’ve had since I was about 20! It has trays that open up when you lift the two lids, and these trays contain needles, pins, sewing tools… the bottom section is full of larger things like my decent sewing shears and other equipment. There’s also a small sleeve board for ironing but I don’t tend to use that much now I’ve got an ironing mat. The white platform is the quilting table for the sewing machine.
Standing back and getting a general view of the far side of the room, you can see how much storage space I’ve got on the high shelves. I’ve got a lot of Really Useful Boxes (yes, they are really called that!) – the clear boxes with the blue handles which keep the lids closed. On the top shelf are all my sewing materials – interfacing wadding, stuffing, felt, netting etc., and a big box of crochet cottons, and also my embroidery threads. On the shelves of the unit, the plastic boxes on the left contain buttons, ribbons, tape, elastic, more lace etc. The boxes in the centre hold various containers, soap making stuff (I’m not doing that now so I should really get rid of all that). The shelves on the right are my drawing materials – pens, papers, drawing tools (set square, compasses, curves etc.), and n the dark-coloured floral box on the top shelf of the unit are all my gold embroidery threads and beads.
There is another pull-out unit under the end of the work surface, so I can sit and draw there if I want. To the right of the foiling machine is a basket of stamps which require organising and proper storage. At the end, at the bottom of the pile is my light panel for tracing, on top of which are some papers, and my ironing mat, and my dear little miniature iron which is so useful. Mostly it gets used for pressing paper flat, or for melting Tyvek etc. I have a large piece of folded baking parchment there too, to protect the iron when I use it for meltable stuff.
In the shelves underneath are more sewing things – sewing and knitting patterns, felt making and UFOs (UnFinished Objects). Yup. Far too many of those.
In the space at the end of the work surface are a couple of tall cardboard boxes with bits of loom (one day I shall do some weaving again…) wooden skein winder made for me by Dad (very precious!), easles, dowels etc. It’s a bit of a glory-hole, really, and a bit difficult to access!
Moving on to the final wall of the room. No work surface here, just major storage.
The white unit on the left was originally in my bathroom before the builders gutted it and remodelled the whole thing. It fits nicely in the studio, and the shelves inside house my fabrics and some weaving threads, and some canvases and frames. The open shelves between the cupboards contain embroidery and spinning equipment and various speciality fabrics, all in boxes. Propped up against this unit is my essential little step-ladder, without which I would never be able to reach anything!
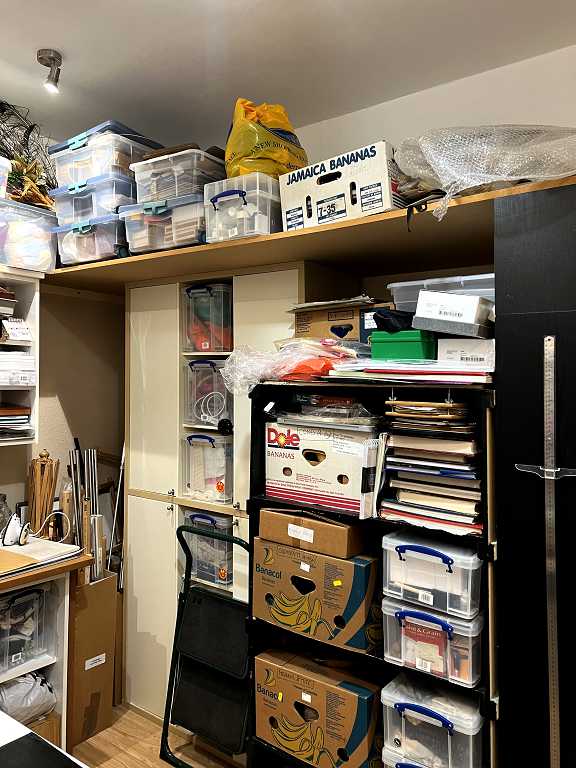
On the top shelf, running the whole length of the wall, and which is lovely and deep, I’ve got further boxes of stuff that doesn’t get used much, including empty plastic containers and boxes. The bubble wrap on the right covers a pile of mount board, and bags of stuff for making wheelchair spoke guards, and there’s also a large artist’s portfolio there for when I need to take any large pieces anywhere. On top of the black shelves it’s mostly empty boxes and cardboard.
The black shelves to the right are the last section of the original three that I had in our old house. These came out of a shop that was closing down. The shelves are very deep and useful for the large storage boxes I have. The Really Useful Boxes on the right go the full depth of the shelves, and contain rolls of wrapping paper, and fresh supplies of such things as marker pens, baby wipes, kitchen paper etc. The banana boxes contain knitting wools. Behind the knitting wools are more Really Useful Boxes containing decorating equipment, DIY tools, and lots of teabags waiting to be prepared for use in projects.
On the top right shelf of the black unit is a pile of large books which won’t go in the book-case. These also serve as heavy weights for flattening things. There are also some blank albums and books for altering, and on top is my flower press.
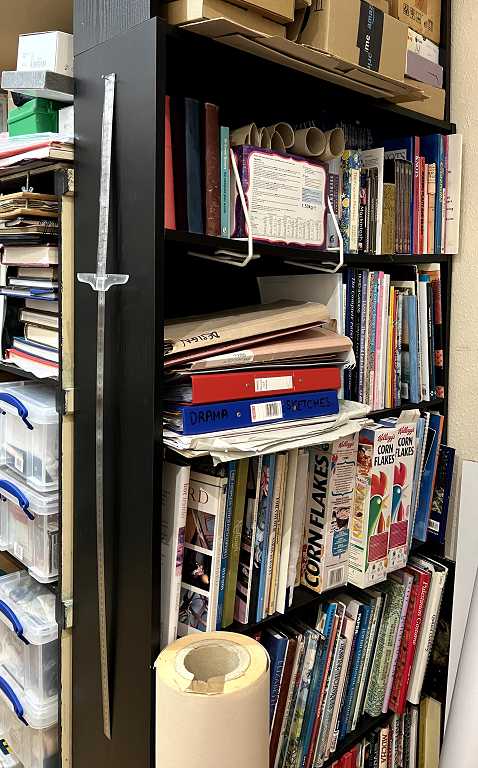
The black panel on the far right of the picture is the end of the book case. Hanging on a nail is my extra-long metal ruler and a T-ruler.
The book case is opposite the mixed media storage section, and it is by the door out of the studio. The top shelves contain mostly empty cardboard boxes, cereal boxes and flat cardboard. Most of the books are art books and some other books which are too big to go on the book shelves in the office. The pile of folders and ring binders contain design ideas and stencils, and instructions for the cutting machine. The large paper roll in front is unprinted newspaper which the removal men left behind on a previous house move many years ago – I phoned them to tell them they’d left it, and they said keep it! It’s been very useful for drafting patterns and making larger drawings in the past, and these days I am using it on the gel plate. I’ve used loads of it over the years and the roll never seems to get any smaller! It also weighs an absolute ton.
There are numerous power points all around the room so I’m never short of places to plug things in. The electrician did an excellent job. I just wish we’d done a bit better with the lighting…
That concludes the studio tour. Looking back through the doorway you can see the sink and the door back onto the landing, with my aprons hanging on the door to keep me clean while I make a mess in my wonderful room!
The office
Going back through the doorway and looking left, we come to the office (originally the “dressing room.”) This is quite a narrow space but all my stuff fits in as if made to measure, and everything is within easy reach. Again, there are plenty of power points here. The room can be pretty dark at the desk end but I’ve got a good spotlight. I have my old laptop permanently in here, on the side desk. We had to get a Wi-Fi booster because that corner is the one dead space in the house! Internet access is essential in the office.
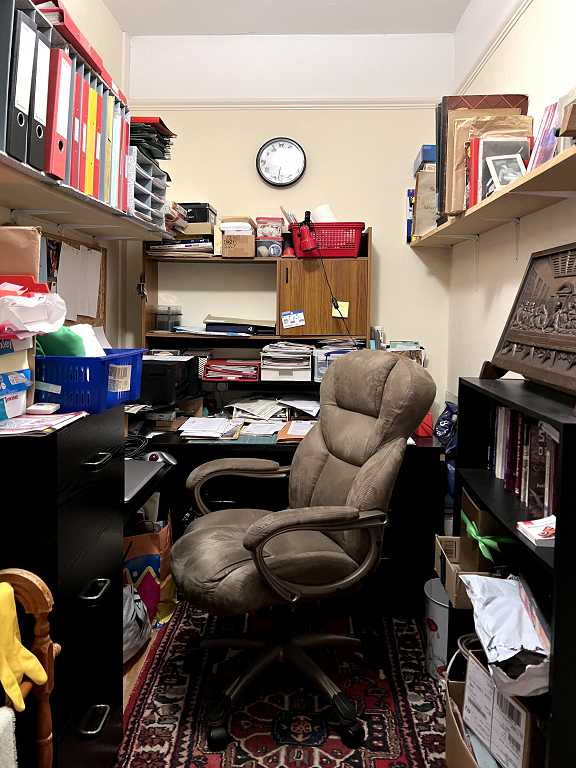
I’m afraid to say there’s a lot of junk in this room, and one day I really need to have a good clear-out. I did do a bit a few months ago. I used to run a Bible study group in our old house, in the days of overhead projectors etc., and I’ve got a lot of printed material from those days, mostly updated and digitised on the computer since, for later groups, so I don’t really need to keep all those ring binders. On the bottom two shelves of the book case on the right I used to have folders stuffed with DVDs and CDs but a few months ago I cleared all these and digitised them, which has saved a lot of space. The things on those shelves now are spare polywallets for storage, new boxes of acrlic paints, and my DIY foam stamp-making stuff.
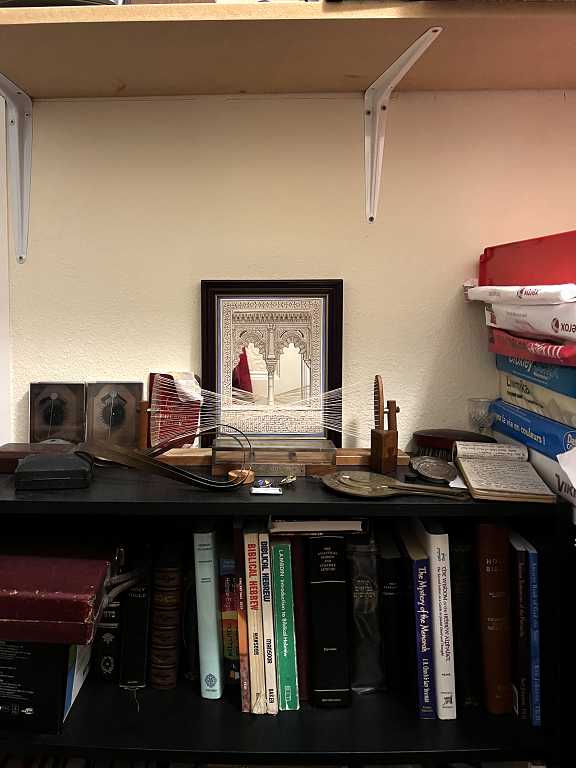
On top of that book case is one of my great treasures. It is a bronze casting of The Last Supper, made by an apprentice in my grandfather’s engineering works, probably back in the 1930s. The detail is extraordinary. He would have carved a wooden former that was pressed into mould-maker’s sand, and the molten bronze poured in. You can even see the disciples’ toenails! Grandpa made the wooden stand for it. I was delighted that nobody else in the family wanted this when the time came to sort out his things, so it came to me. I had always greatly admired it.
The other book case contains mostly my Christian and Hebrew study books. On the filing cabinet to the right are packs of printer paper and card. On the top of the book case are more very precious treasures. None of this has any intrinsic value but they are all items which belonged to Dad and they all hold great significance for me. I love to have them on display, and when I spoke at his funeral, I structured my talk around these items which speak of various stages of his life. I made a display of them on a table at the side for people to look at afterwards. He was an extraordinary man with a great scientific brain, always questing for information and learning new things, and creating little experiments just because things interested him so much. As I was growing up, I was his “gofer” so was very much involved with all these things, none of which Mum understood at all and probably thought were a complete waste of time! We had a lot of fun.
When we first viewed the house and decided it was where we wanted to live, I knew that this room with its subdivision would be my studio and office. It is ideal in every way. In the old house, trying to combine office and studio just didn’t work. In this case, having the division means extra wall space in each section for storage, and somehow, psychologically, it is better separating the work aspects of my life from the fun aspects. I can easily go from studio to office if I want to print something out for art, and I can answer the phone at my desk, just a few paces away from my creative space. It couldn’t be better.
Conclusion
At last… they say.
So we have come to the end of my studio tour. Don’t say it – I KNOW I’ve got far too much stuff lol! Because people know I do a lot of things, I am often given various materials by people who no longer need them, or perhaps after a relative has died – a lot of my sewing and embroidery stuff came to me that way. I’m a bit of a hoarder, I confess it – in that way I am very like Dad, who never liked to throw anything away! I do a lot of different things, and go through phases when I major on one particular thing. Just because there is stuff that isn’t currently being used, doesn’t mean that it never will be. Also, I am often able to provide my hubby with things that he needs for his various projects, and I’m always saying to him not to go buying things before asking me because I might well have something that would do.
I love my room, and am so grateful to have it, and am never happier than when I’m in there creating art. OK, it would be nice if it was three times the size, but then I suppose I’d fill it with three times the amount of stuff…
Jesus told His disciples (and by implication those of us, their spiritual successors who have also put their faith in Him), “Let not your heart be troubled; you believe in God, believe also in Me. In My Father’s house are many mansions; if it were not so, I would have told you. I go to prepare a place for you. And if I go and prepare a place for you, I will come again and receive you to Myself; that where I am, there you may be also.” (John 14:1-3.) I am hoping He has prepared a nice big mansion for me, because I’m going to need a super-big studio to last for all Eternity!!
Come, Lord Jesus. However much I love my beautiful studio and home, and the good life He has given me, I can’t wait for the fulfilment of this promise…