
Background
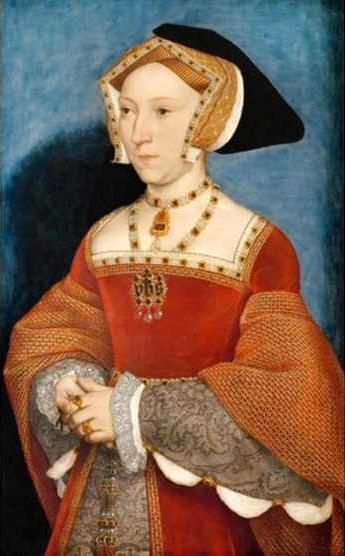
Two types of hood, or head-dress, were popular during the Tudor period; the gable, or English hood, and the French hood. The gable hood was favoured by Jane Seymour, Henry VIII’s third wife, and shown worn here in Holbein’s portrait of her:
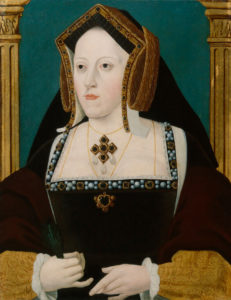
The gable hood was also favoured by Henry’s first wife, Catherine of Aragon, as shown in this 18th-century copy of an original portrait, now lost.
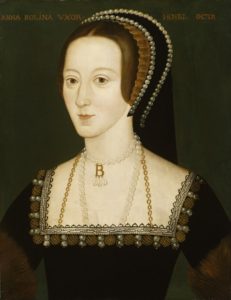
I personally do not like this hood; I think it is ugly and cumbersome, and had I lived in that period, I would certainly have favoured the more attractive French hood! This was favoured by Anne Boleyn, Henry’s second wife.
Making the French hood
While I was waiting for the main fabric to arrive, I made a start on this. My intention was to make the French hood from the same material as the main part of the dress.
I have been looking at various YouTube videos and websites, and found one site that gave a tutorial for making an authentic French hood, as far as could be gleaned from contemporary portraits, there being no French hoods surviving from the period. For my purposes, however, this was over-complicated, and I have no interest in absolute historical accuracy – it’s the look I am after, and I am more than happy to use modern materials and techniques to achieve that end.
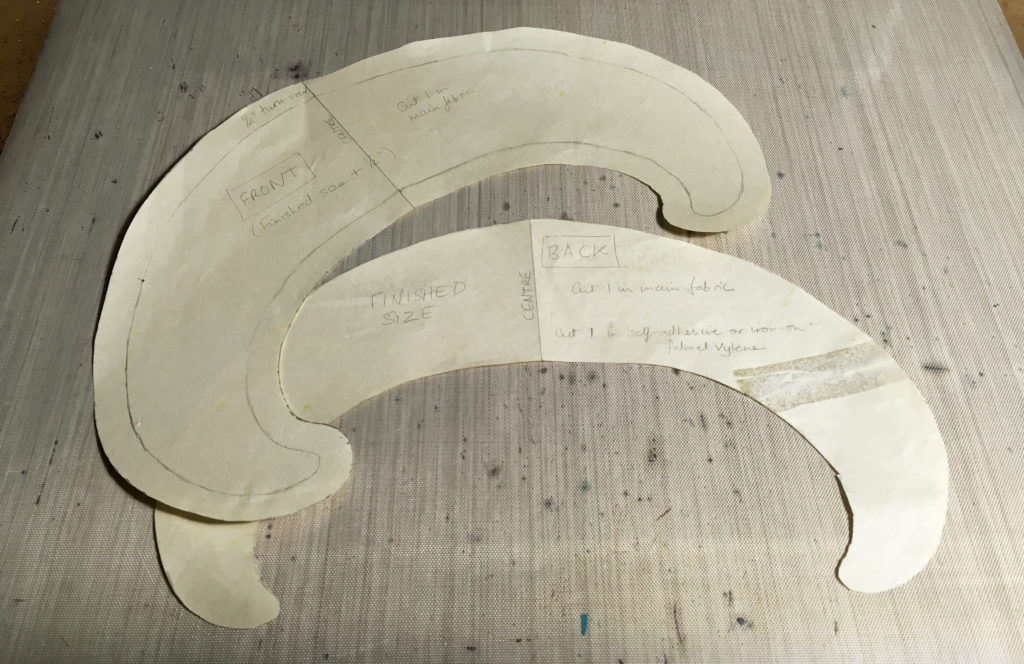
The first step was to draft the pattern. This proved quite difficult, as it has to end up as a three-dimensional shape. It involved a bit of trial and error but I achieved a satisfactory result in the end.
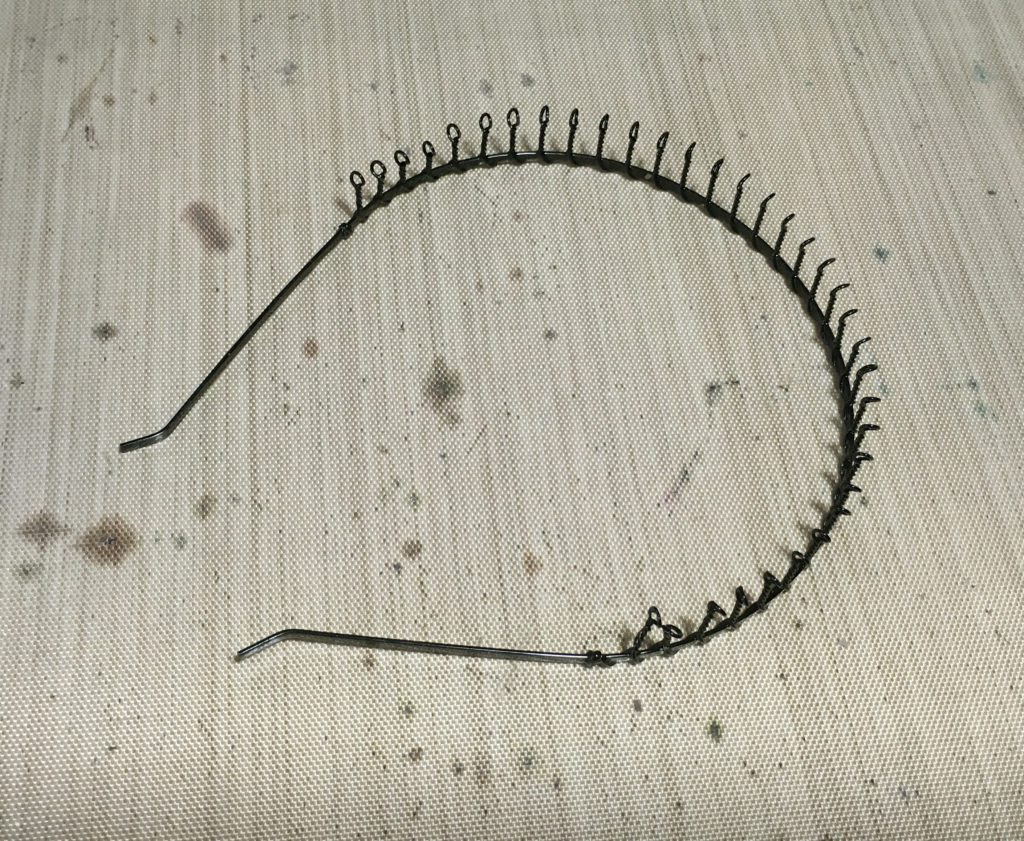
The method I am using to keep it firm on my head is to attach it to a wire hairband base. I bought a few of these ages ago, thinking I would get round to decorating them. I already own one which has small stones on it, and it works a treat, so it seemed logical to use this type of hairband as a base for any sort of hair decoration I might decide to make. It is sprung, and has wire prongs which grip your hair, and it’s very stable and comfortable when worn.
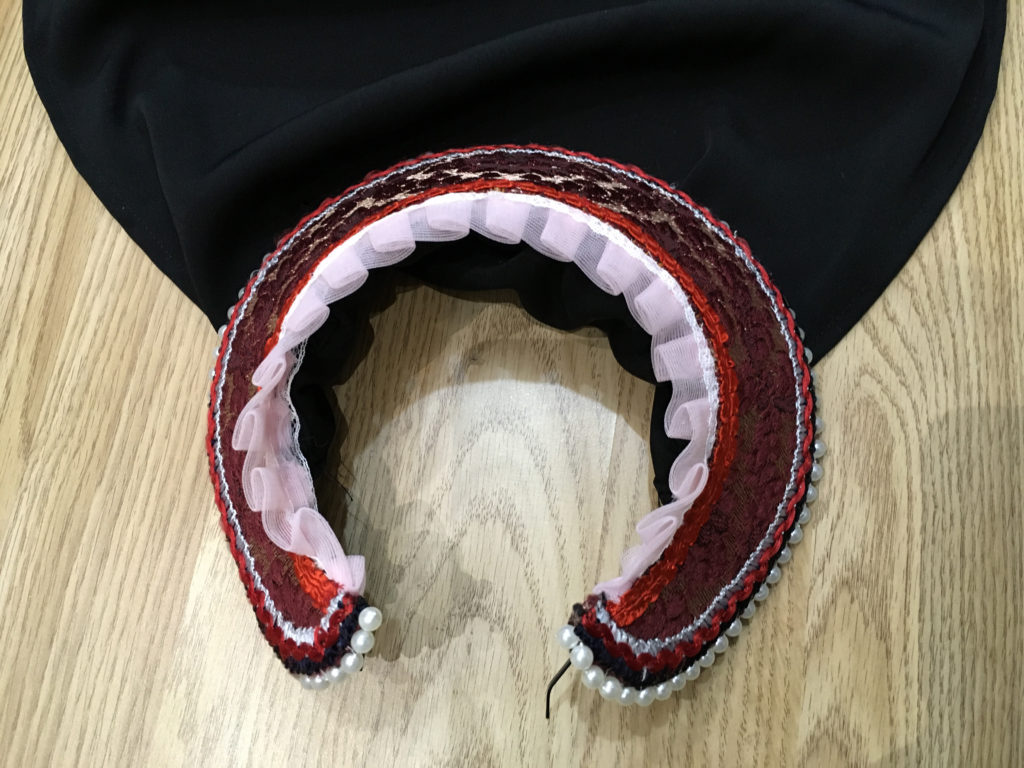
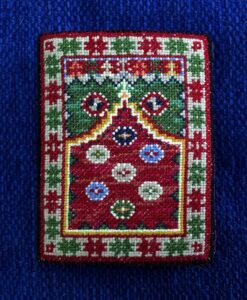
I measured around the length of the hairband base and cut an initial draft pattern from this, but it proved too short. I wanted to extend the ends of the headdress beyond the hairband towards the front, which gives a nice finish, so I re-drew the pattern and cut it out, and tweaked it a little until I was satisfied. This is the exact size of the headdress. This part of the headdress, the most prominent and visible part which gives the French hood its style, is known as the “paste” – this word possibly derives from the paste used to stiffen the fabric, or possibly from the French word passé meaning “border,” the decorative border on this part of the hood.
Once this was done, I traced around this pattern piece and added a 1/2 inch turning all around.
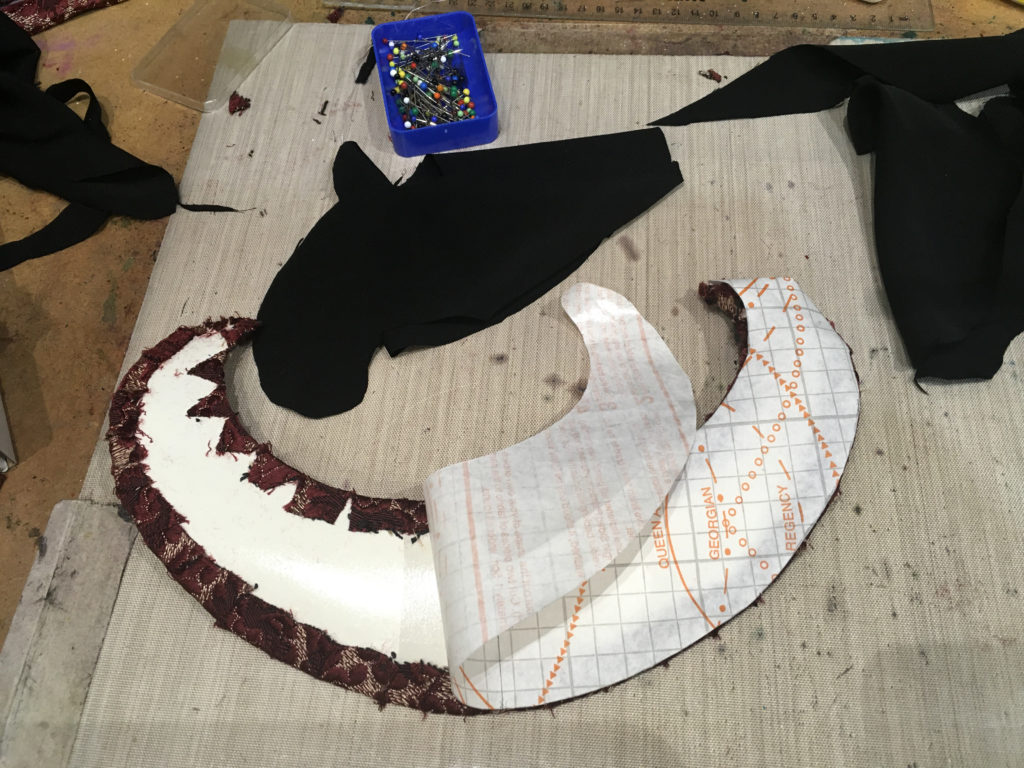
I used the first pattern piece to trace onto some double-sided adhesive pelmet Vylene. I was hoping this would give the piece enough stability, but if it proved to be not firm enough, I intended to cut a cardboard piece to the size of the finished headpiece, and sandwich this between the front and reverse pieces of fabric.
This is the pelmet Vylene piece cut out and ready to be stuck down onto the reverse side of the front piece of fabric.

Once the main fabric arrived, and I had made the gown, I was free to cut out the French hood pieces.
Here is the front, stuck down onto the pelmet Vylene. I was careful to line up the brocade design with the centre of the piece.
I did this by lifting a little of the backing sheet from the pelmet Vylene, and laying it down carefully on the reverse side of the fabric. I was then able to peel back the rest, a little at a time, smoothing the sticky side of the pelmet Vylene down the fabric, until it was all stuck.
I snipped around the turning so that it would lie flat, taking care not to cut right up to the edge of the pelmet Vylene. I did not want any cuts to show, or there to be any danger of it fraying. Once this was done, I was able to peel back the edges of the other backing sheet on the reverse of the double-sided self-adhesive pelmet Vylene, as you can see on the above photo, and carefully stick down the cut flaps of the turning, trying to make sure I got a smooth edge around the piece. This wasn’t very easy, as you can see – there is a bit of fraying at the point of each snip, but all this eventually got covered by the embellishment on the front.
The rest of the second backing sheet was then ready to be removed, and I could stick down the fabric for the back of the headpiece. I repeated the same process. Around the edges of the lining piece, it did not stick, of course, because the sticky surface was already covered by the turning of the front piece.
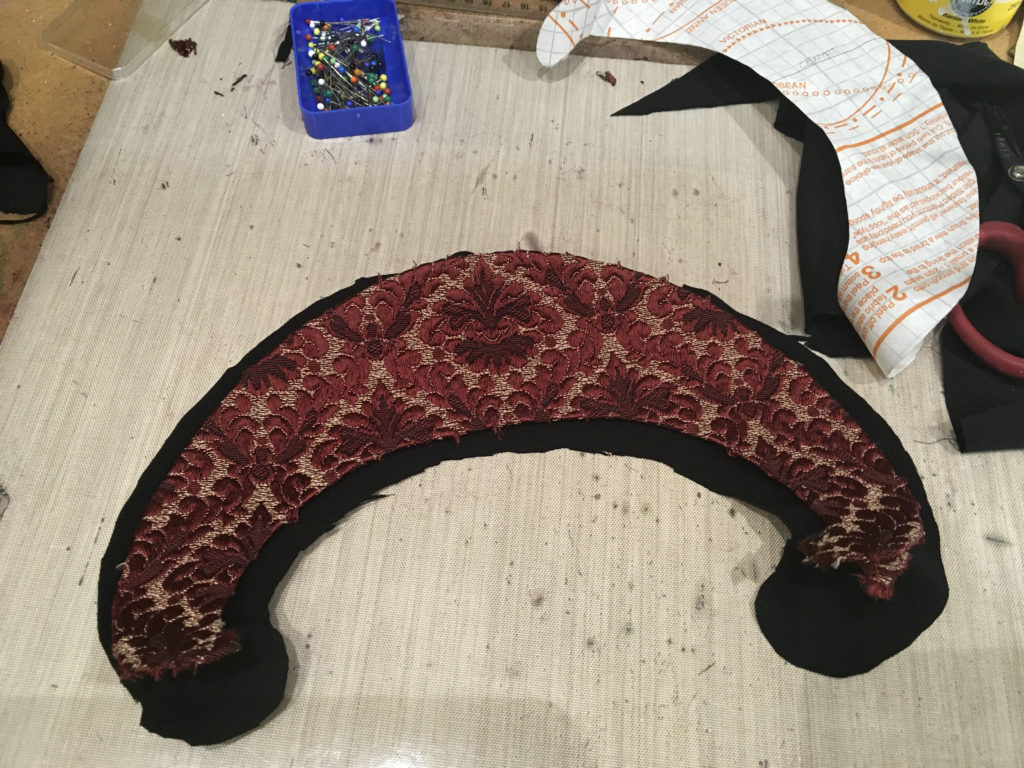
Once it was stuck down, the piece was ready for sewing. I began by snipping the seam allowance as before, and then I slip-stitched the folded-under edge of the back piece to the turning of the front piece, making a neat edge all around.
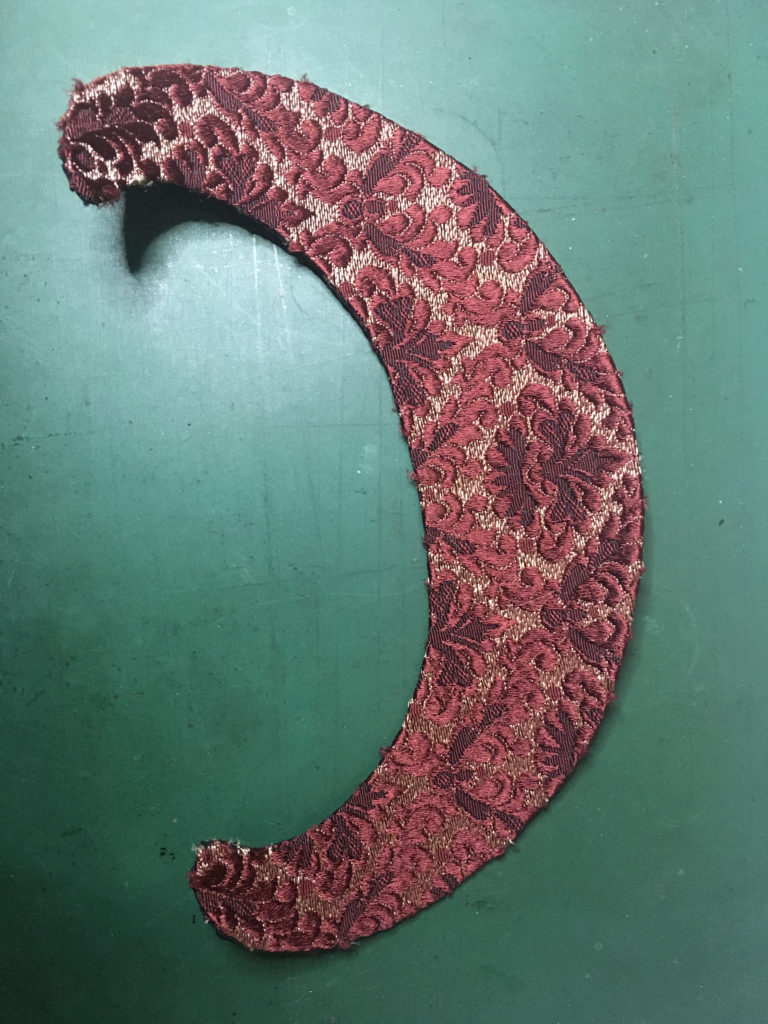
It seemed firm enough. When curved around the hairband, the shape of the piece added rigidity to it, and the addition of braid around the edge at the front would stabilise it further.
At this stage, I decided to attach it to the hairband base. I wanted to delay this step as long as possible, because any sewing thread would constantly get tangled around the prongs of the hairband. However, it had to be done before any embellishment was added, so that the stitches attaching it would be covered. I was careful to centre the piece onto the hairband as accurately as possible. I stitched it on, using a heavy buttonhole thread going between the prongs of the hairband; unfortunately the only colour of this thicker thread I could find was a light brown, but in the end most of it got covered up so it didn’t matter.
The first embellishment to be added was the pearl trim around the edge. I bought this spool of pearl trim from Ebay because I knew I was going to need quite a bit.
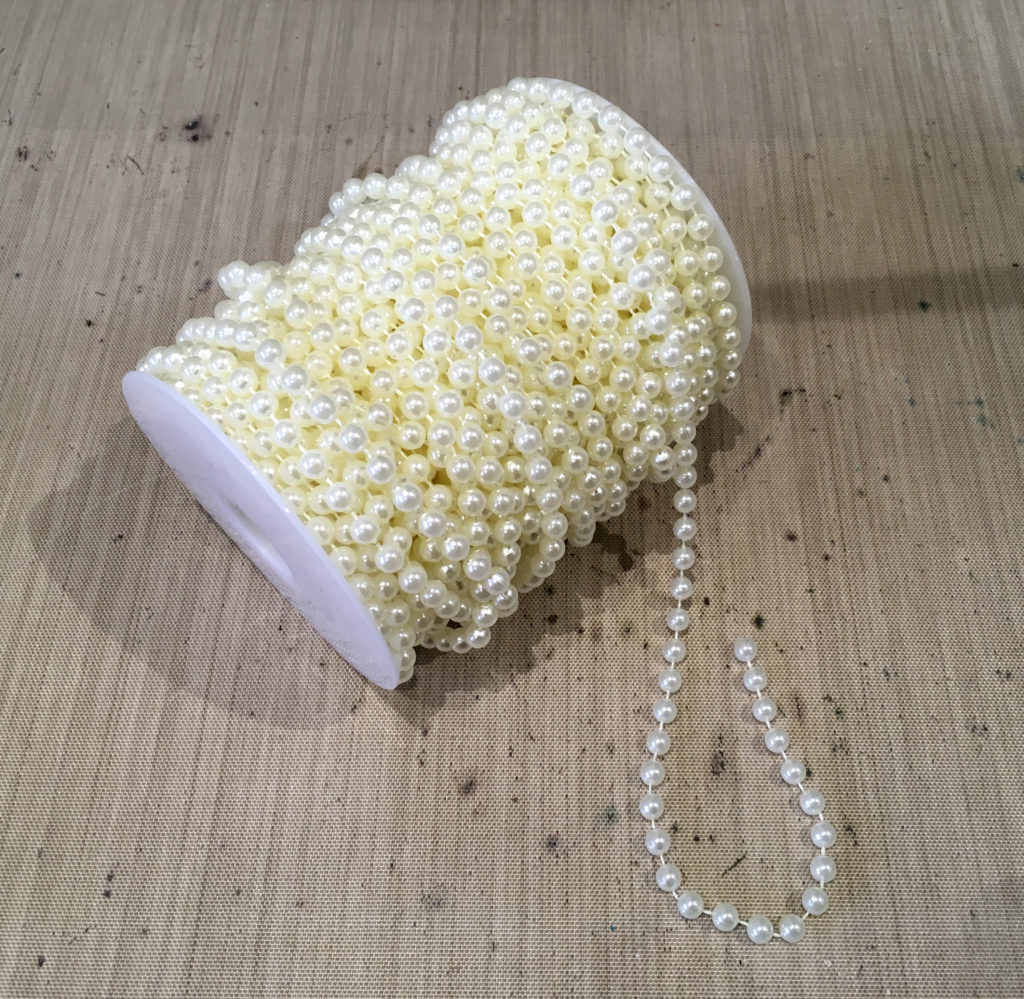
I had thought this might be one of the more difficult parts to complete, but the trim went on surprisingly easily with a stitch between each pearl. The paste of the hood with its double-sided adhesive pelmet Vylene was pretty tough to sew through, but it presented no other problem. I sewed this on first, so that any stitching would be covered up with the braids I would add afterwards.
I was very pleased to discover an ample supply of different braids and trims in my stash which co-ordinated with this project, and I selected a suitable braid to edge the paste, sewing it carefully so that that the stitches would not be visible, and curving the braid as I went. Once this was on, the inner curve seemed to need trimming as well, so I chose a red braid for this.
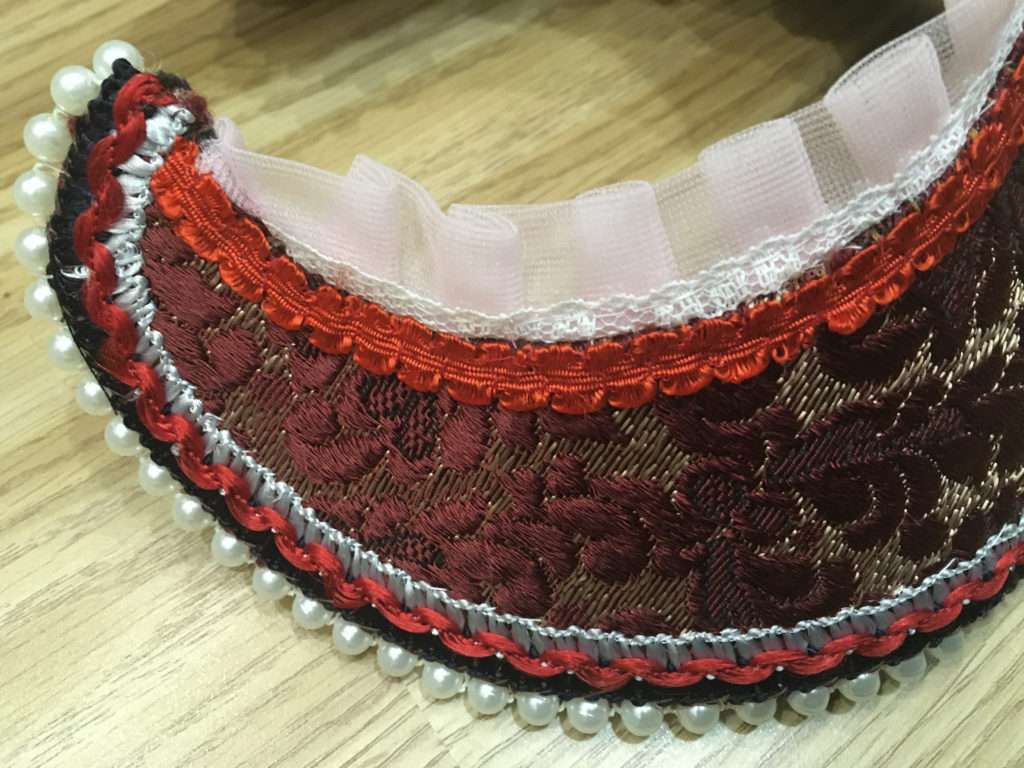
Originally, I wasn’t going to add a crepine – the pleated front edge of the hood, but rootling through my stash, I found several lengths of pleated nylon ribbon trims with lace along one edge, in different colours. These were part of a whole lot of stuff I inherited from an old lady in our first church who had died, and her sister gave me all her sewing stuff. I have had these trims for years and never liked them and thought I would never use them, but kept them “just in case” – if you are a crafter you will know all about that!!! Anyway, most of it is in lemon yellow and pale blue, neither of which was suitable for this project, but there was also a small amount of pink. When I measured it against the paste of the hood, it was exactly the right length! How about that?
I stitched it on so that most of the lace was hidden, with just the very edge of it above the pleated nylon exposed.
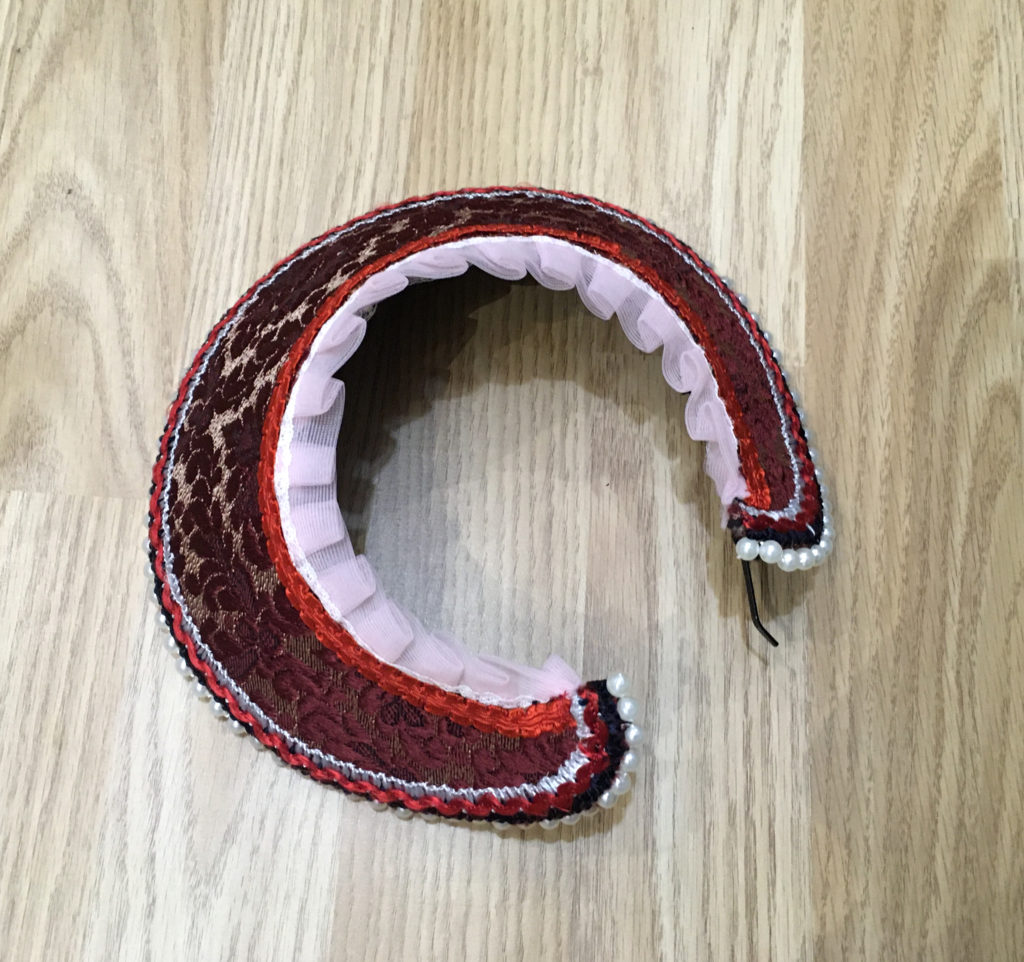
Once the embellishing of the front of the paste was completed, I covered the stitching on the inside with a length of black rick-rack trim.
In this photo you can see the stitching in brown thread around the inner edge, which attaches the paste to the wire hairband.
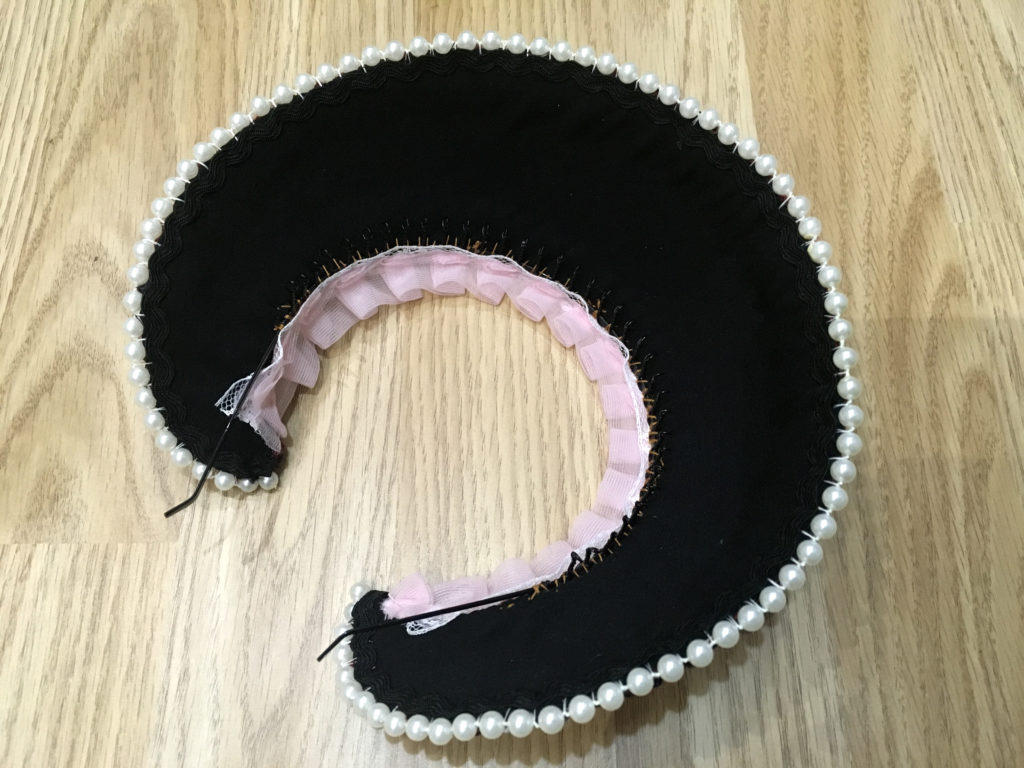
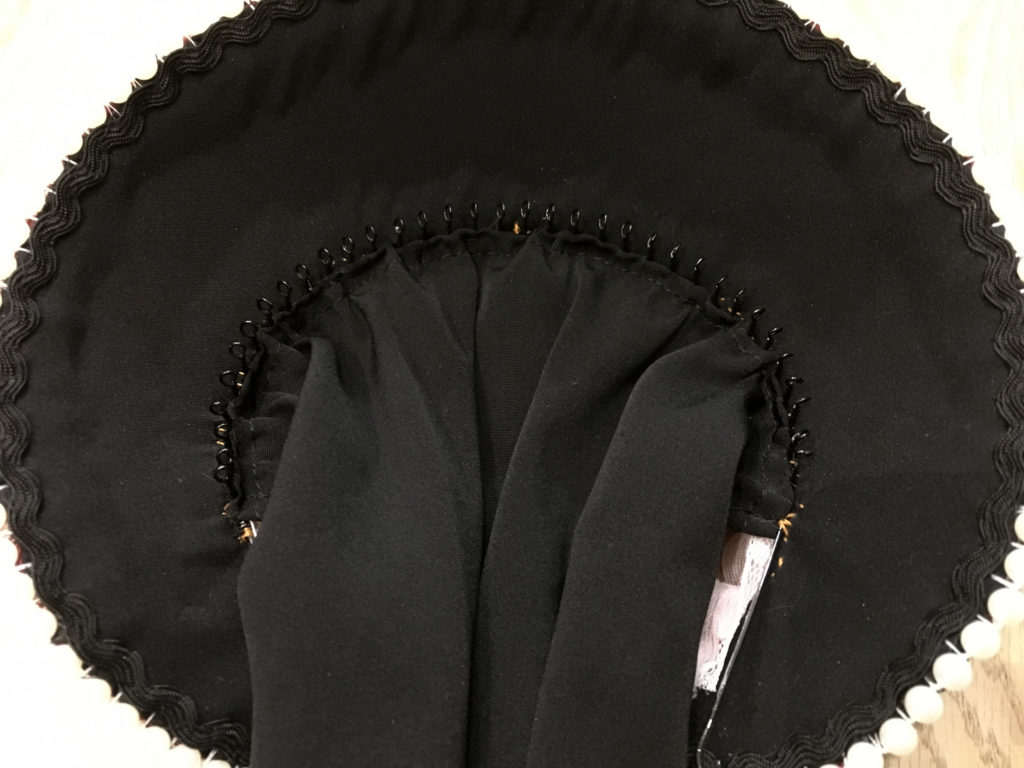
It was now time to add the veil. This was traditionally almost always black, attached to the back of the headpiece and completely covering the hair at the back. (In my case this would have to be quite long, because my hair now reaches nearly to my waist.) The only part of a woman’s hair to be visible was at the front with the French hood; the coif of a gable hood covered the hair at the front. The hair was worn with a centre parting, a style I always favoured when I was younger, but these days it doesn’t seem to work for me because the hair on the top of my head seems to be a lot thinner, and it has not greyed evenly, and it looks awful with a centre parting! So it’s back to my normal style of being swept straight back from my forehead. It looks OK, though.
In my stash I found a length of black synthetic fabric which is quite soft and with a slight satin sheen, and this suited the purpose admirably. I had used some of this to line the paste of the hood. All that was required was for a narrow hem to be sewn all around it, and for it to be attached to the back of the paste.
This turned out to be the most difficult part of all. Part of the problem was visualising how the finished result would appear, so that I got the turned-in hem of the veil on the inside and not on the outside. I thought I had got everything right, and then began the work.
I gathered the top edge of the veil slightly, and pulled up the gathers to fit the inside edge of the paste. It was very difficult to pin in place, so I managed a pin in the centre and one at each end. I had to use a curved needle, and the space was so restricted, and having to stitch between the prongs of the hairband, made the whole operation very difficult indeed. It took me some considerable time but I achieved it in the end.
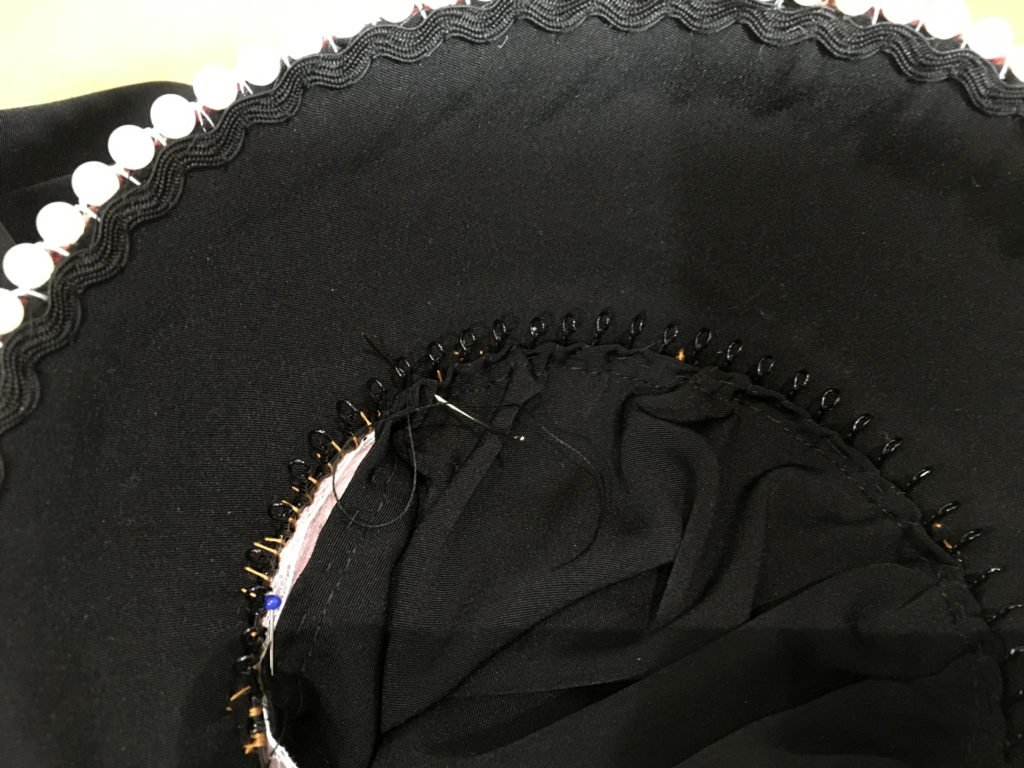
I tried it on, and it felt and looked great. It felt comfortable and secure. Then I took it off, and I thought, “That’s odd… the prongs of the hairband aren’t snagging in my hair!” Then, to my horror, I realised that I had sewn the veil on the wrong side of the prongs, so that when the veil was folded to the back of the paste, it covered them up!! Duh… I was simply NOT going to unpick it and do it again, after the extreme difficulty I had experienced in stitching it into place. It seemed to me that while trying it on, it felt quite secure and wasn’t slipping; it was only when I took it off that I realised that the prongs were not actually engaging with my hair. That being said, it showed that the prongs weren’t actually necessary after all, to hold the hood in place, so I have decided to leave it as it is.
The completed French hood.
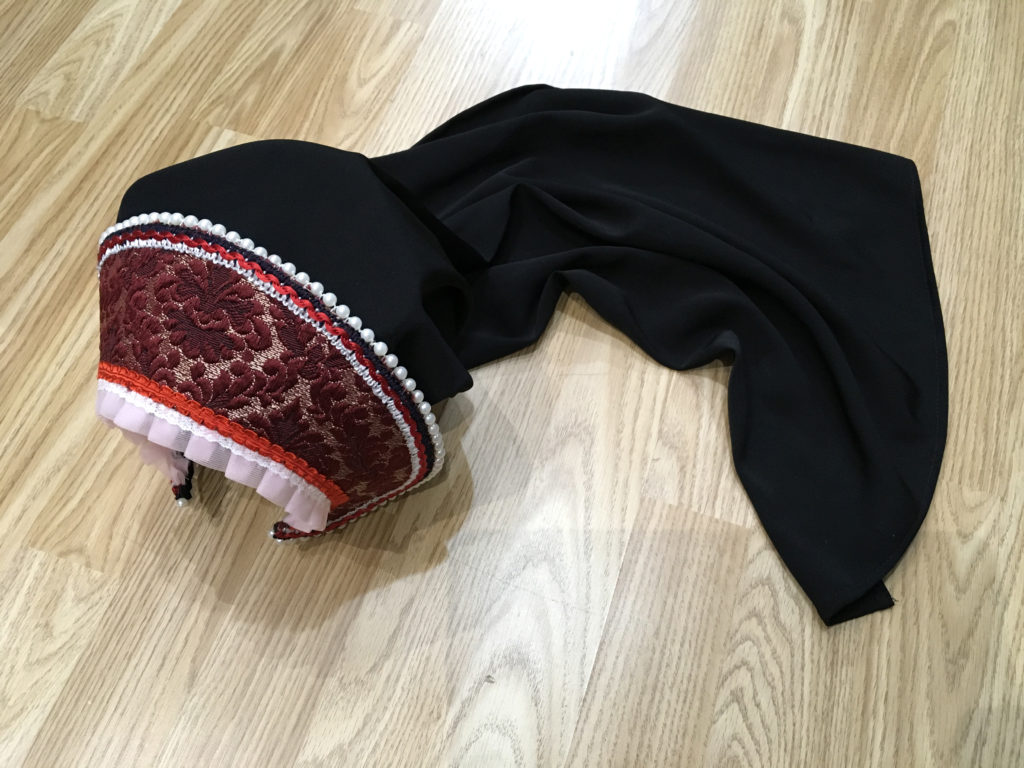
The final step in this project will be the embellishment of the bodice and sleeves of the gown, and to sort the jewellery. It is now Wednesday night. We have an afternoon commitment tomorrow so my time will be limited, and I am always busy with various domestic jobs on Friday morning, so I will need to get some serious skates on and a hardened nose firmly flattened against an extremely gritty grindstone in order to get it finished by Friday night! We will be leaving fairly early on Saturday morning in order to meet our friends for lunch in Cornwall, and to spend the afternoon with them, before departing for the Tudor banquet in the evening.
Skin of my teeth time… if that’s not too many mixed metaphors! It’s a good thing I stay up into the small hours…

how big of a strand? the pattern I got says 60 individual beads. HAHAA yeah no