What’s On Your Workdesk this Wednesday?
Another week when I have had the most tremendous amount of fun in the studio. I just wish I had more time to spend in there.
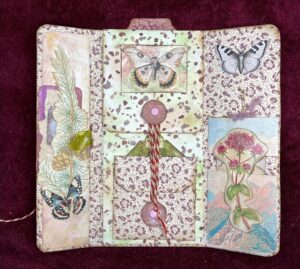
Stamp storage
This week I returned to my new storage project, using the plastic baskets purchased from the Range. The die storage is complete (until I buy new dies!) but I had not made a start on the stamps, which are a much bigger prospect.
Over the years I have accumulated quite a few, some of which have never been used. Years ago I unmounted my original wooden block stamps and mounted them on Cut’n Dry foam, and there are still a few unmounted rubber stamps that require the same treatment. In the early days I’d been led to believe that rubber stamps were much better quality than clear ones, but whether I was misinformed or whether the clear stamps have improved in quality, I don’t know – all I do know is that most people these days seem to be using clear stamps, and getting good results from them. I like the way you can see exactly where you are placing them. I’ve now accumulated quite a few.
When I had fewer stamps, I had a really good storage system, suspending them in ziplock baggies from a rail above the desk. (Picture taken in 2016.)
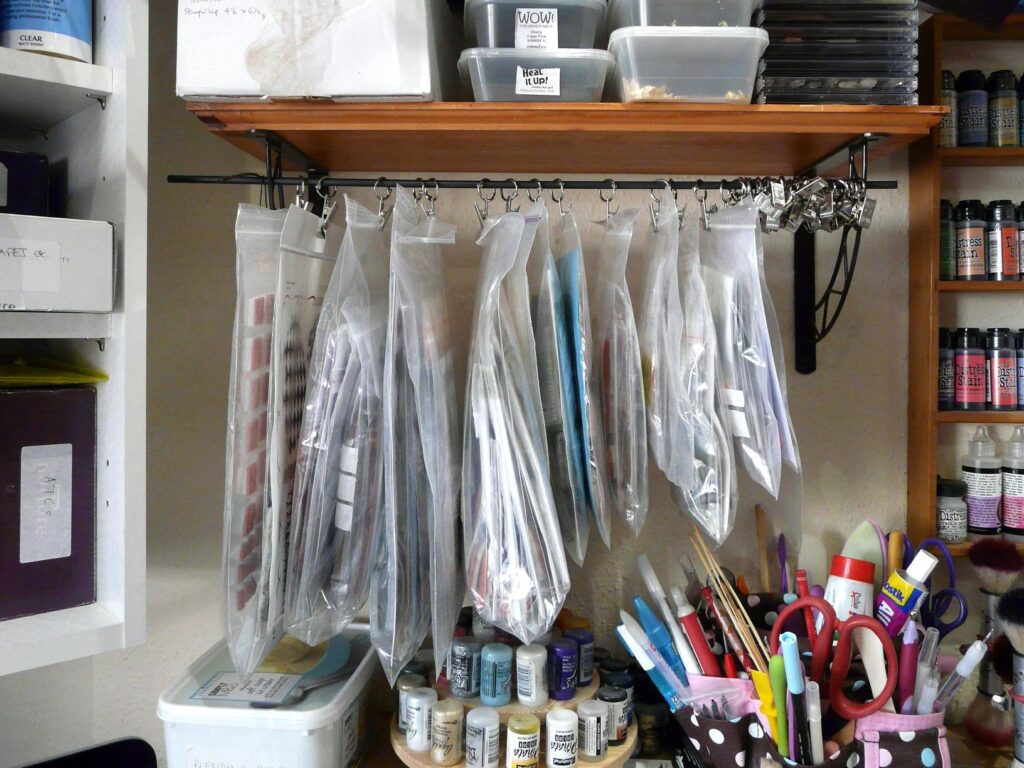
The trouble is, I got more stamps and they would no longer fit in the space.
A couple of years ago I bought a large zipped case for storing stamps, but soon discovered that it wasn’t going to work for me. The rubber stamps were too thick and it was really only suitable for clear stamps. It wasn’t big enough to house them all.
Then I was given a DoCrafts zipped case by a friend. This was full of clear stamps with no identifying labels. I think she bought this in a charity shop; it is probably worth far more than she would have paid for it. I weeded out quite a few that I would never need, and put some of my other clear stamps in there, but there wasn’t room for them all.

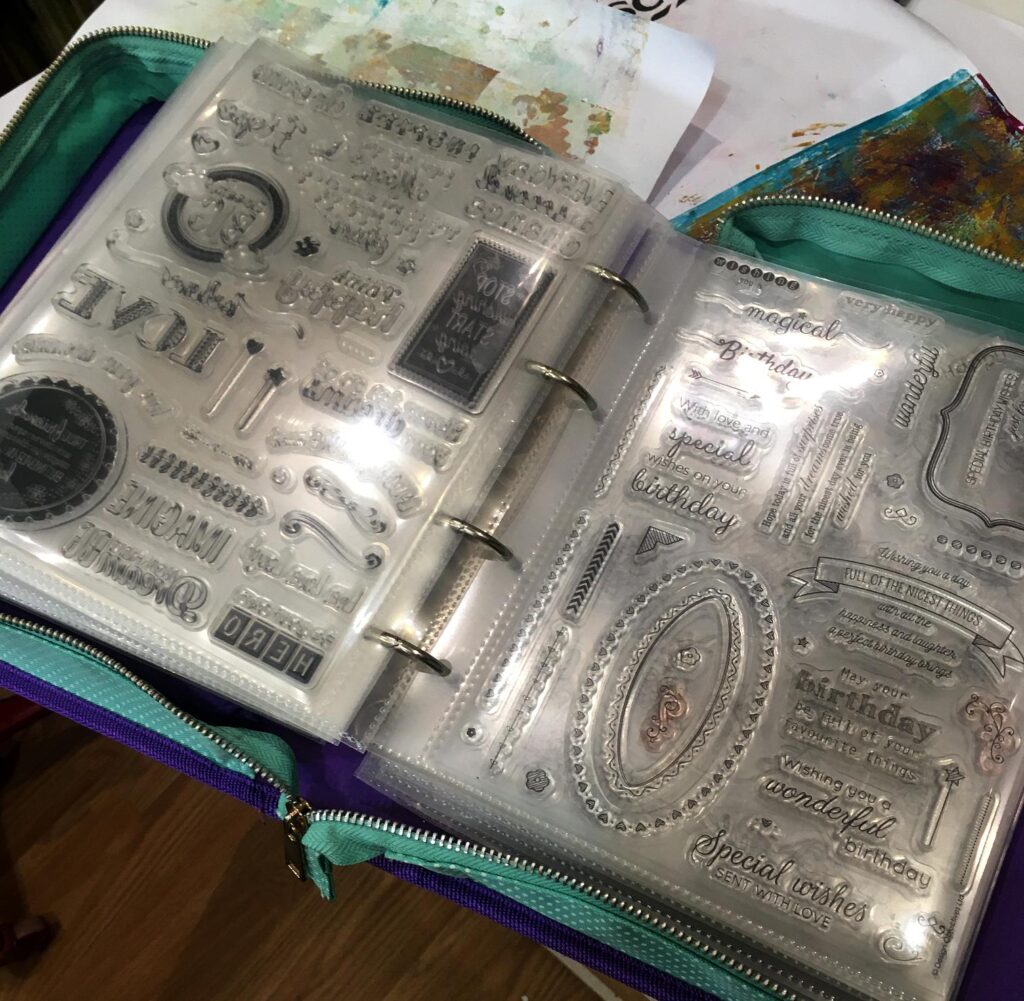
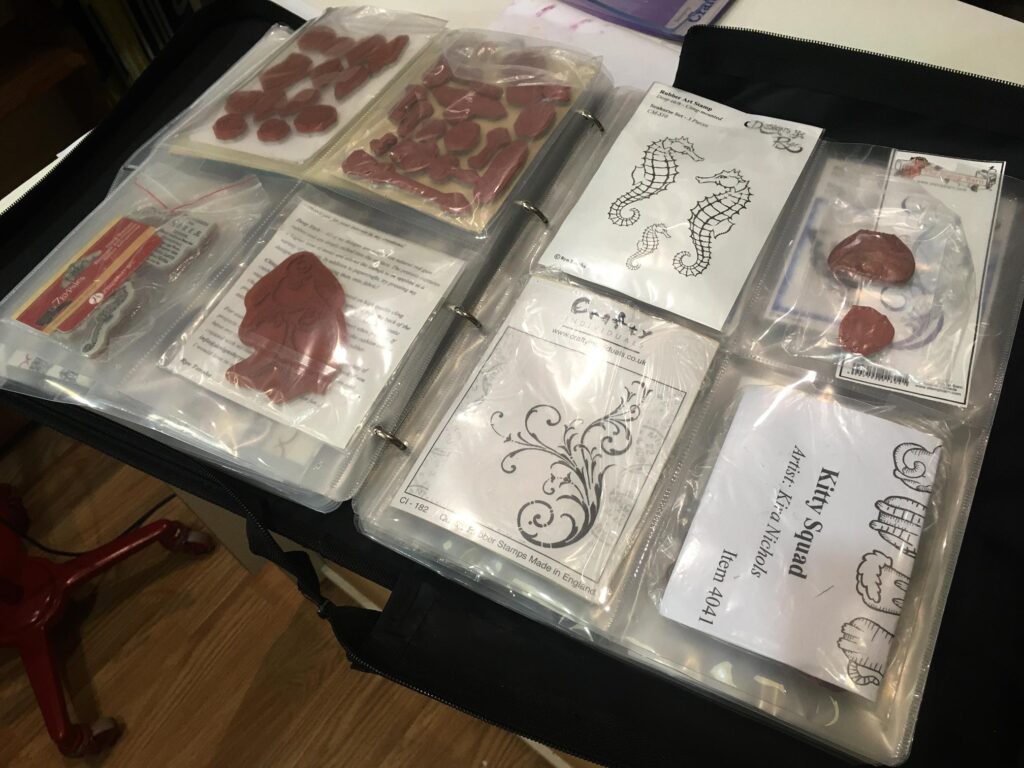
I have stamps in several different places and they are all muddled up, to the extent that I really don’t know what I’d got. They are in these two folders, and the remaining ones from the hanging rail are now being stored temporarily in one of the new baskets from the Range. Definitely time for some reorganising.
Sorting through the DoCrafts folder and searching for images online, I realise the stamps are all DoCrafts and were probably originally purchased together with the folder. There are hundreds of stamps in there, mostly in sets. I am trying to identify the sets online so that I can write on the pouch inserts exactly what they are. I’ve already discovered that some of them are no longer available but the images are still around.
The die system has worked well, and I thought it could work just as well for the stamps, and it wouldn’t matter whether they were cling-mount rubber, or clear stamps. It will also be much easier to slot more in as the need arises, which would be much more difficult in those folders. I made a start last Wednesday, but had to stop when I ran out of the clear pouches I’d bought, so I’ve ordered some more.
I began with my background stamps. This is as far as I’ve got. The ones waiting to be done are stuck in the front of the basket.
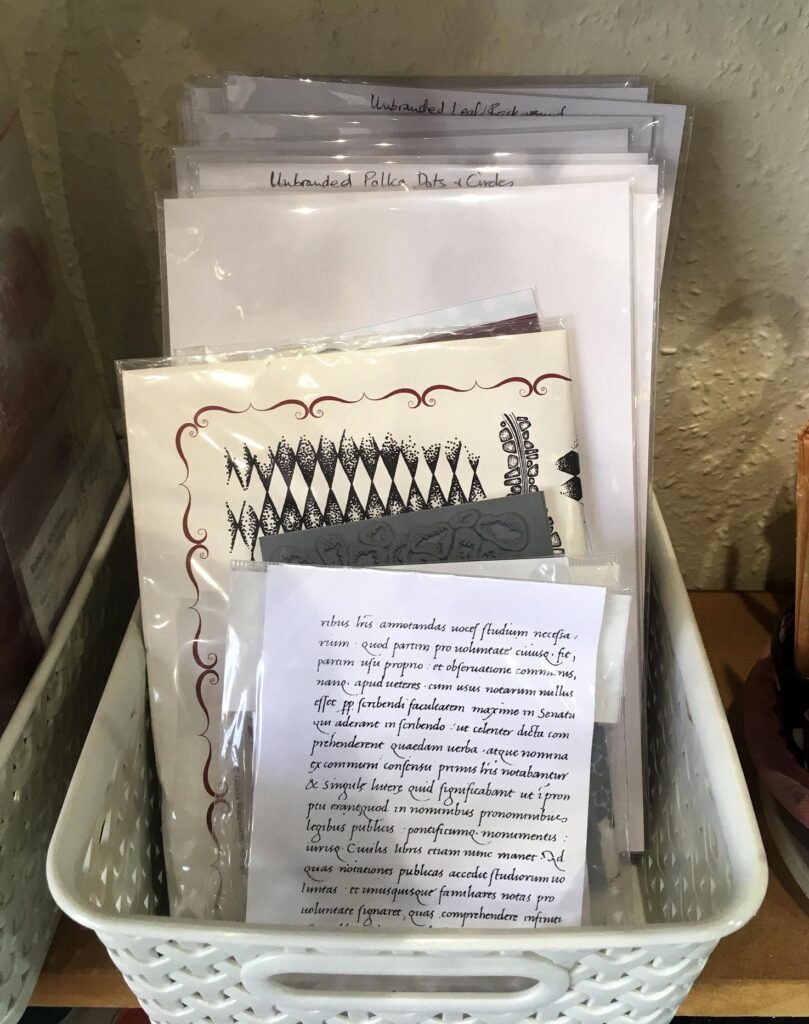
As with the dies, I am cutting an insert piece from heavy cardstock, and putting the stamp(s) on one side, and the original printed packaging label on the other, for ready identification. As before, I shall make laminated dividers to separate each category.
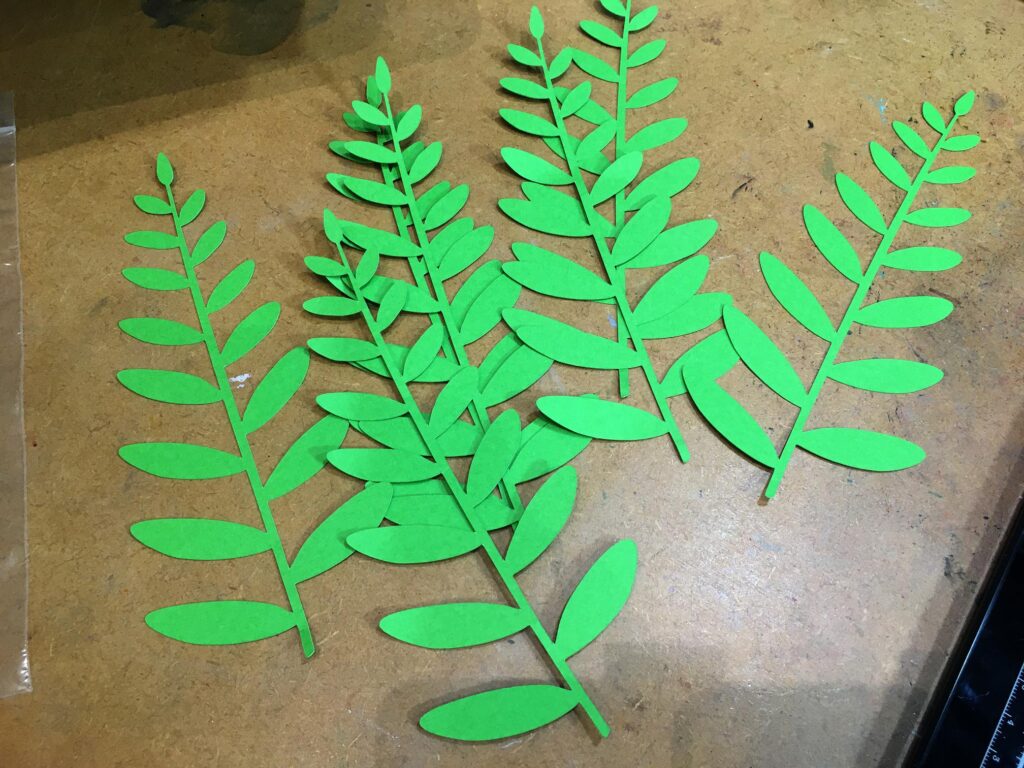
New cutting files on Inkscape
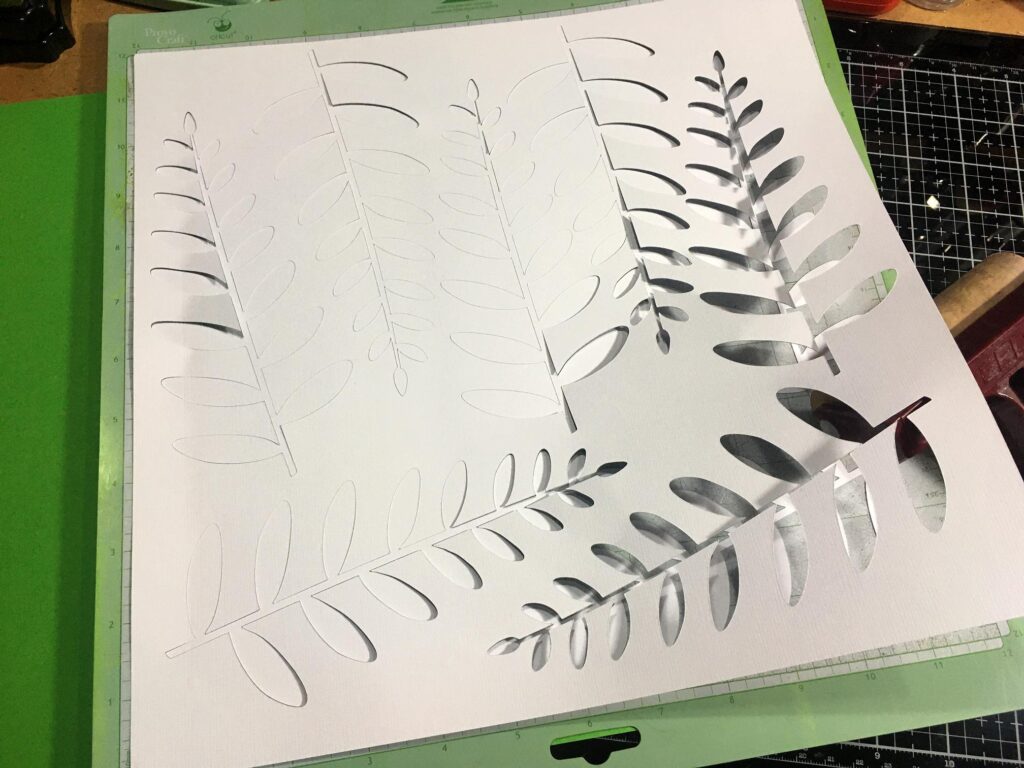
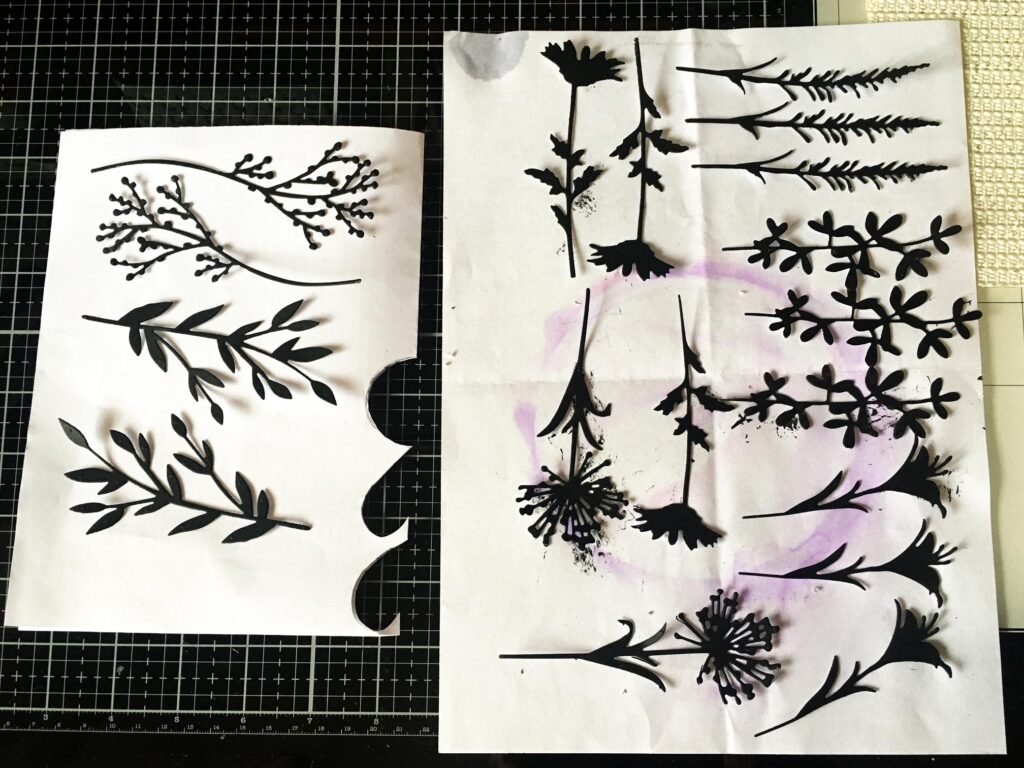
In addition to my recent die cuts, I have been doing some cutting with my Cougar cutting machine. I have designed a large leaf trail on Inkscape, ready for cutting.

It measures 7 inches tall in its original form, but of course I can change the size to anthing I want. I saw a similar die cut on YouTube the other day, and loved what was done with it. You can remove part of the bottom if you want a smaller leaf trail, or some of the leaves. It’s a versatile design.
I also did what I usually do with my cutting files – I made an Inkscape file of a 12 x 12-inch sheet filled with the shape ready to cut as many as possible at once, which saves time and energy. Here is the svg file ready to cut.
![]()
I usually cut these 12 x 12s with white card so that I can colour the shapes how I like, but in this case I’ve cut one sheet of white and another of green which can be inked with darker green to add some dimension. I will also be able to hand-emboss the individual leaves.
I hadn’t used the machine for a while, and I found that since updating Inkscape, the original software which allows the computer to speak to the cutting machine was no longer working. I never really liked it anyway. Some time ago I bought SCAL (Sure Cuts A Lot – brilliant name haha!) which is a lot more user friendly. I had to reinstall this on my laptop because of the recent hard drive failure, and it wouldn’t accept my licence key. When I tried to do a manual registration they said I’d used the licence too many times. I filled in their online form saying I’d had to have a new hard drive, and they reinstated the licence so I was ready to go. However, this means that I can’t install the software on my upstairs laptop because the licence won’t allow me to have it on both computers, so if I want to do any cutting, I have to take the downstairs laptop up with me. This is the one I do my Inkscape work on now anyway. Life does get a bit complicated at times! Add to this the fact that the old software was running on the Mac in the studio and SCAL is on Windows. I’m not really using the Mac much now at all. It’s fantastic for designing because the screen is so big. The system used to be a lot more streamlined, but I do like SCAL.
I got everything set up for cutting. The cutting machine was connected to the laptop with a USB cable. I clicked “Cut” and nothing happened. Dead as a doornail. I spent ages trying to sort out what the problem was, and then I realised that part of the initial download of SCAL included a driver and I hadn’t installed this. After I’d done so, ta-da! It cut like a dream. I am hoping to have no further problems from now on. It’s not really that much of a hardship to take the laptop up with me when I want to do any cutting, and it keeps everything on the one computer which helps with backing up etc. as well.
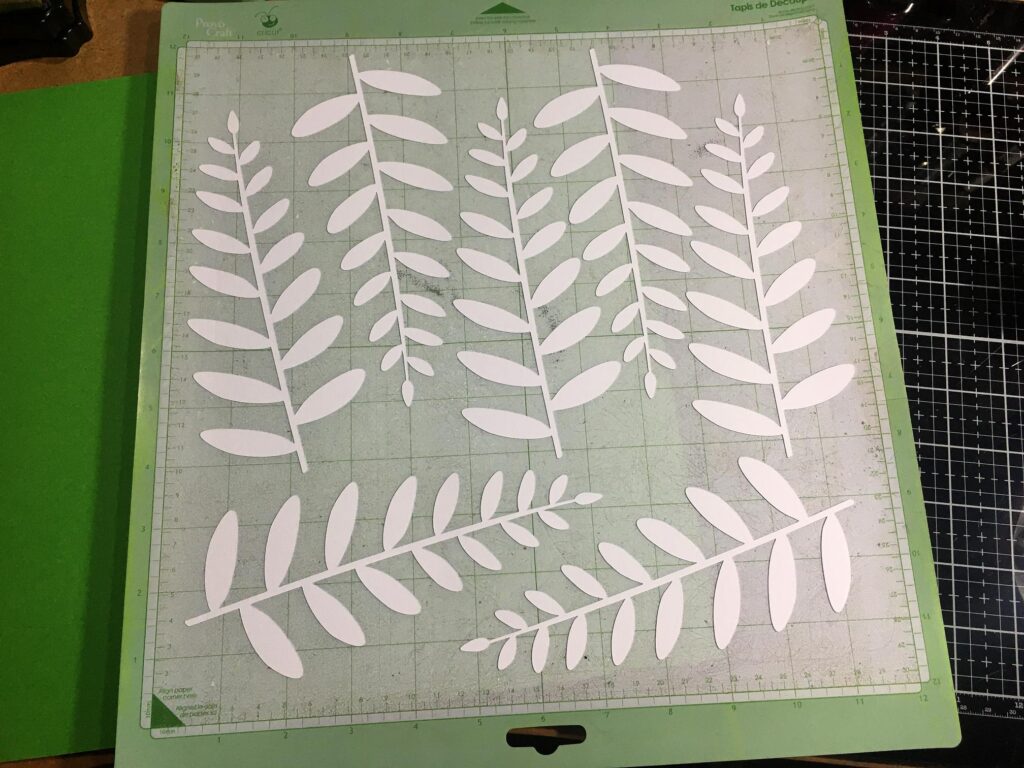
Here is the white sheet of leaf trails just after cutting. I am in the process of weeding the cuts (removing the card from between the shapes).
Here are the white leaf trails still stuck on the mat after weeding.
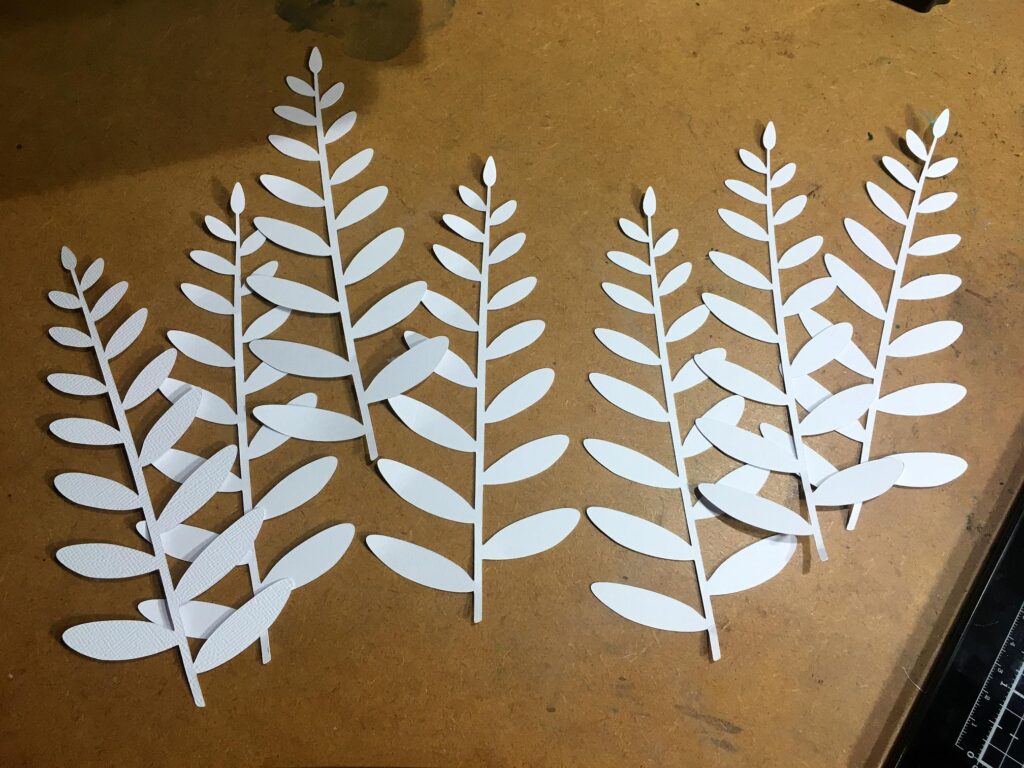
The white leaf trails ready to be filed away. Like the die cuts I did recently, I can easily pull these out for any project I want to use them on. With the new storage system they will be easy to locate.
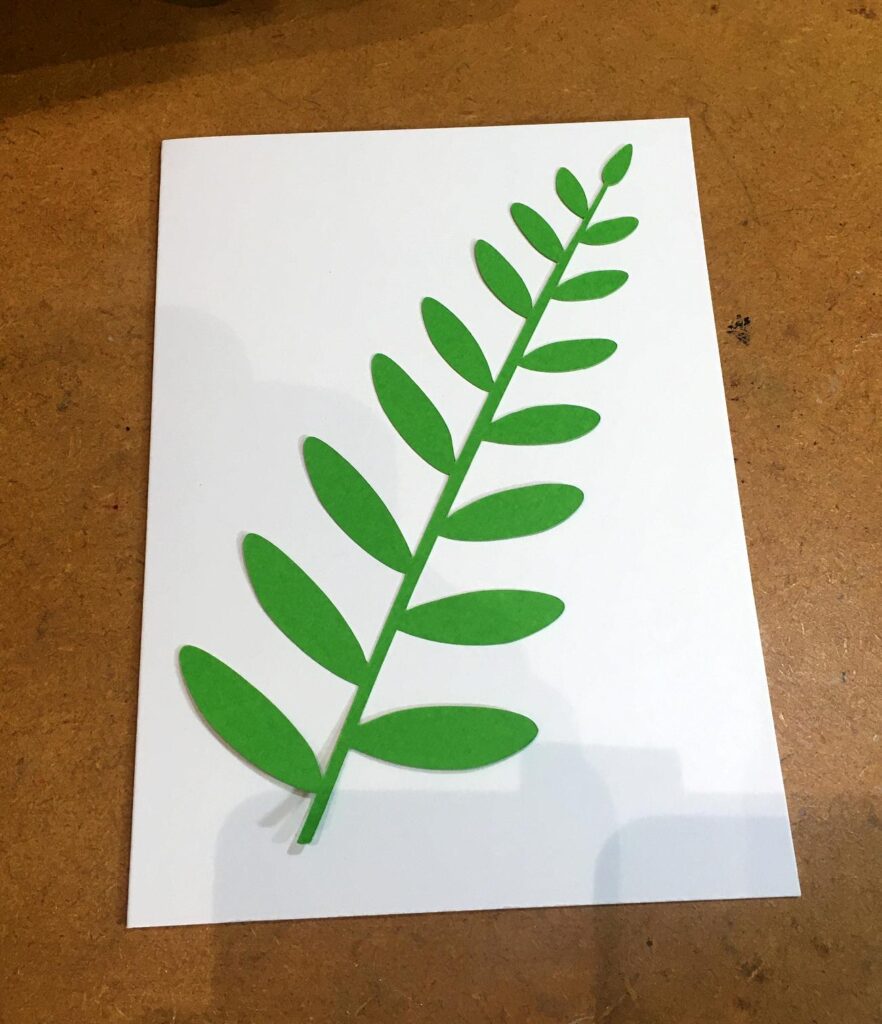
Here is the set of green ones that I cut, using the same 12 x 12 cutting file.
Here is one of the green ones laid on a card base to show how it might be used.
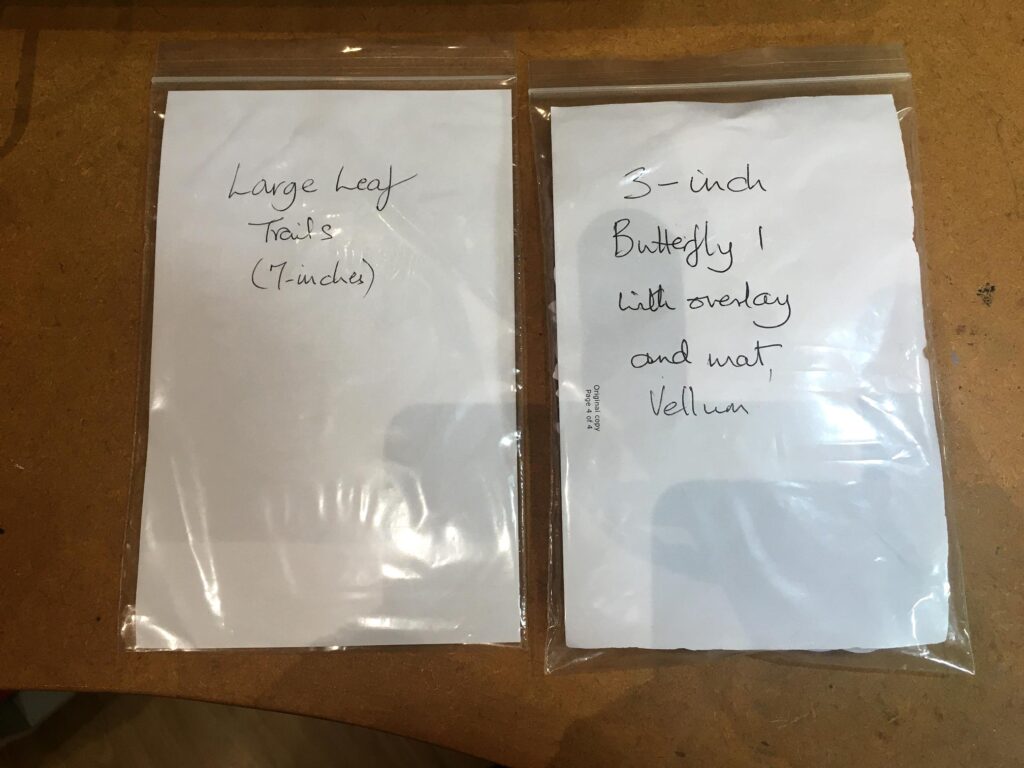
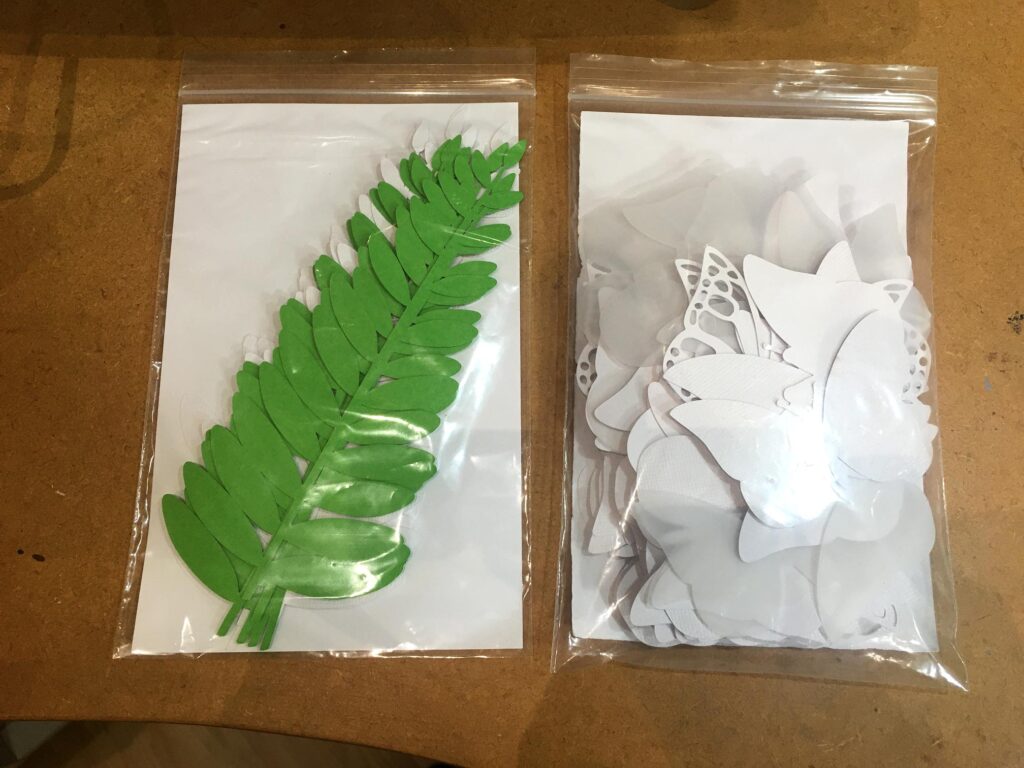
So far, I’m just storing these cuts in baggies with an identifying label but eventually they will go in the same Avery Elle pouches as the dies and stamps. Here they are with some butterflies I cut not long ago.
Gyrocut
This week I’ve made a sticky mat.
I did this with the special sticky mat glue that I got with the Gyrocut. The mat is a clear cutting mat that I bought several years ago to go over my light panel – it doesn’t let quite as much light through as I’d hoped but it’s useable! Anyway, if I want to use it for the light panel in future, I can just turn it over and use the non-sticky side. The sticky side will be protected by a large sheet of acetate.
The stickiness will last for months. If it gets less sticky through dust or tiny fragments of paper left on it after cutting, all you need to do is clean it off periodically with a damp lint-free cloth (a microfibre cloth is ideal) and the stickiness is restored like new. This glue is also going to be brilliant for the cutting machine mat when it required re-sticky-fying.
More on mosaics
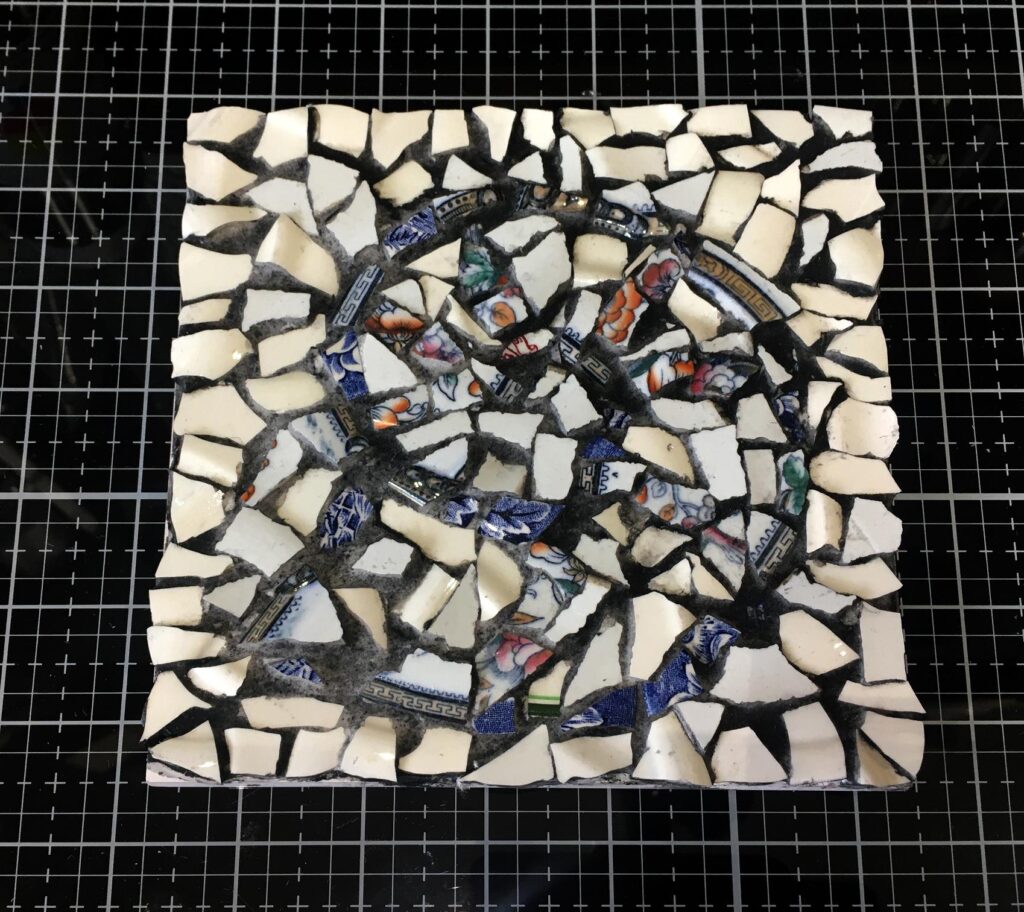
When I shared the mosaic tile I made at the craft workshop last week, I said I wasn’t over-enthusiastic over the result. LLJ said that perhaps a darker shade of grout would make the design stand out more, but obviously I had to deal with whatever was available. I remembered a technique I used in the past on mixed media projects where I wanted the background behind a raised textured surface to be darker to emphasise the design better, and decided to give this a go.
I painted black acrylic over the whole tile, and then over the sink, I took a damp sponge and proceeded to clean the paint off the raised mosaic surface. This worked very well, but it would require more than one coat, to darken it further, and to get a consistent colour.
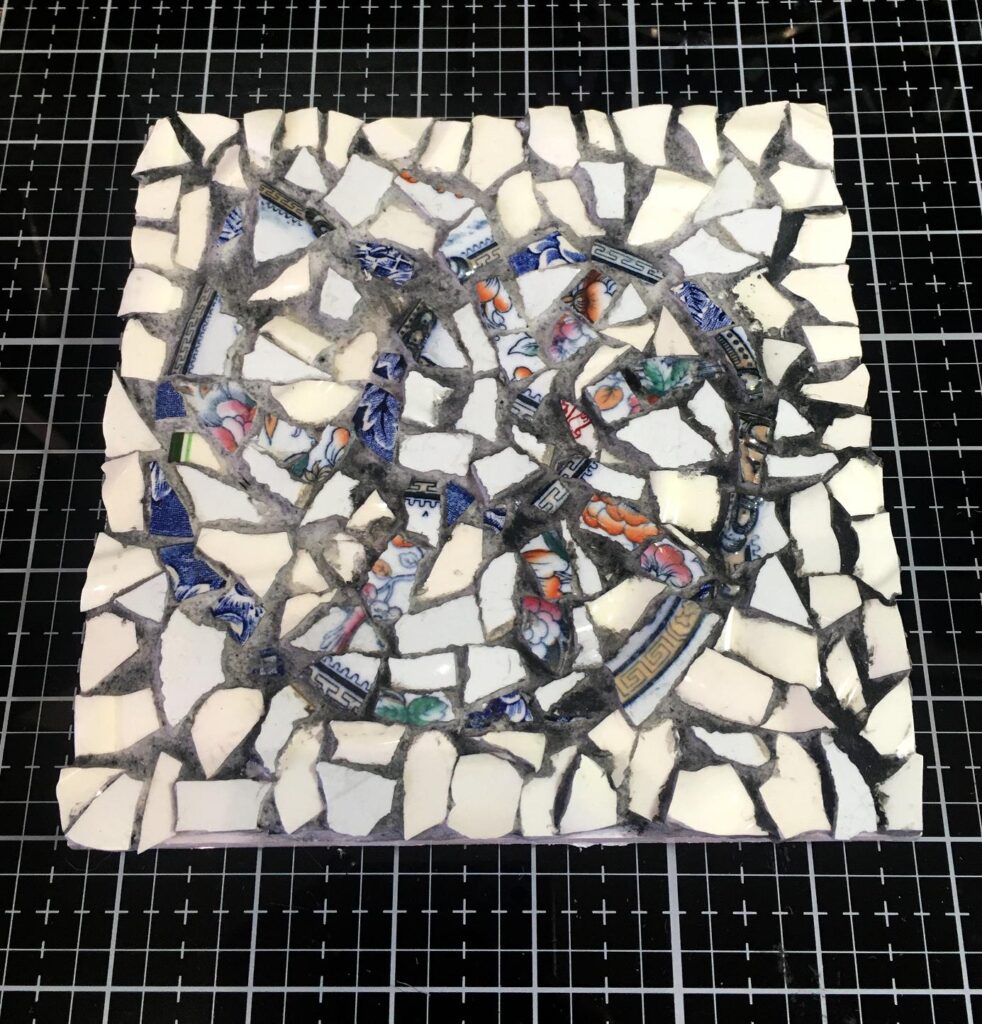
This technique had the added advantage in that it showed up wherever there was glue on the surface of the mosaic pieces. I could then rub this away with my fingers to clean it up.
The following day, I repeated the process.
This time, I thought it was a shame to waste the remaining black acrylic on my palette, so I used it to colour some of my die cuts.
Mosaic tesserae from recycled DVDs part 2
Following on from last week, I’ve now had the opportunity to experiment with making the tesserae from the cut up pieces of DVD.
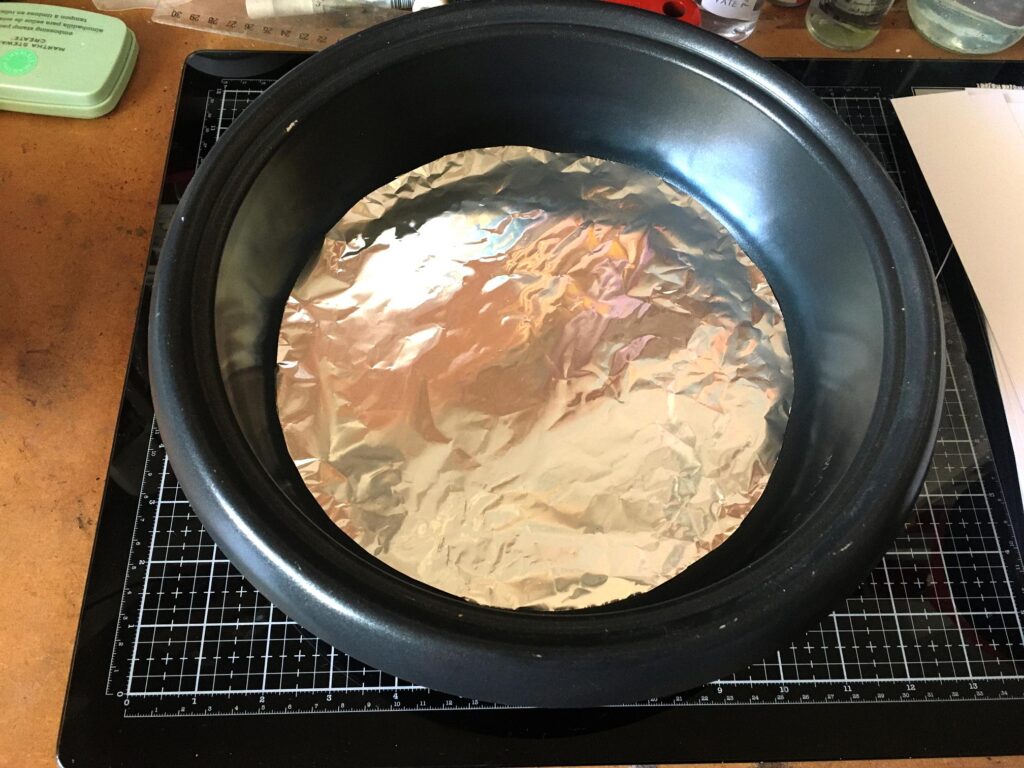
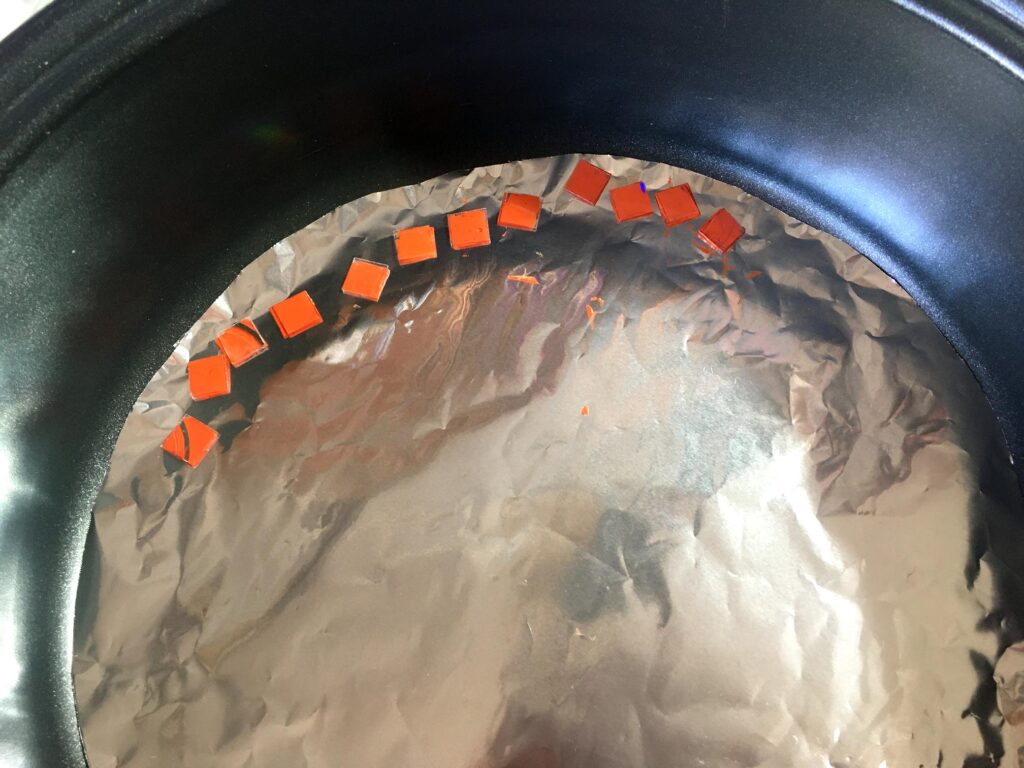
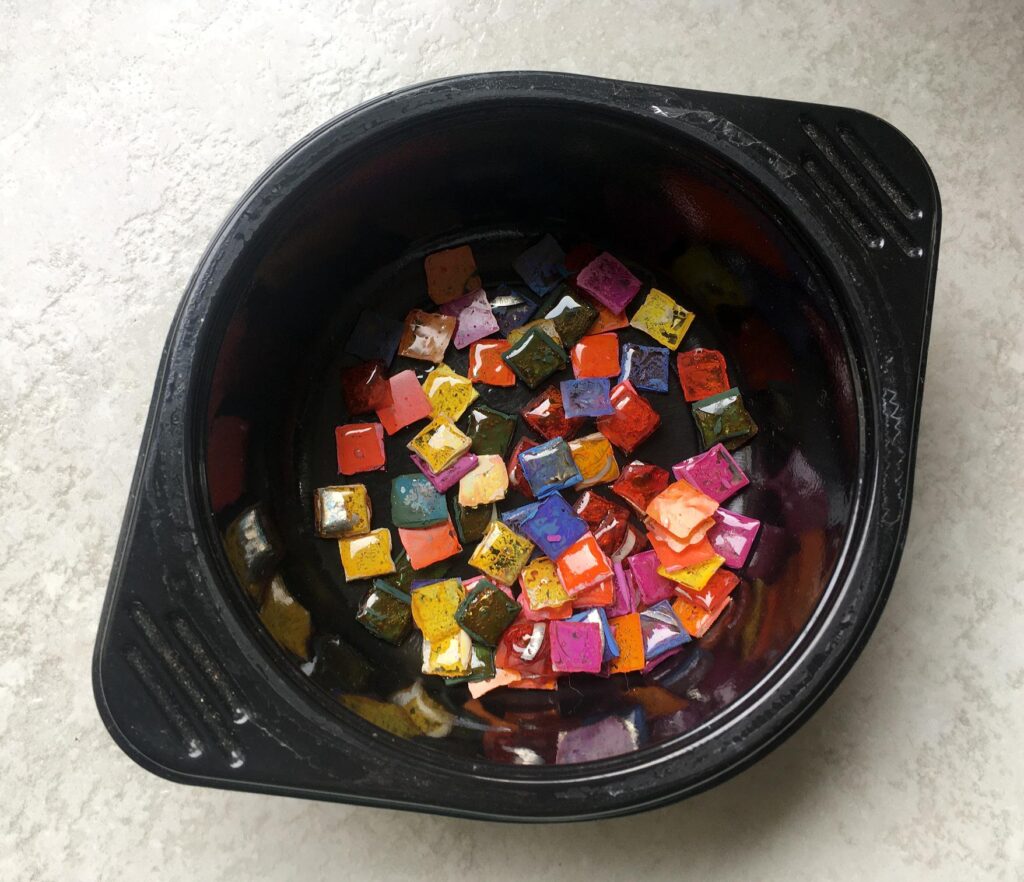
The first step was to cut a circle of kitchen foil to fit in the base of the removable pan from my multi-cooker. This piece of equipment lives in the studio and is never used for cooking.
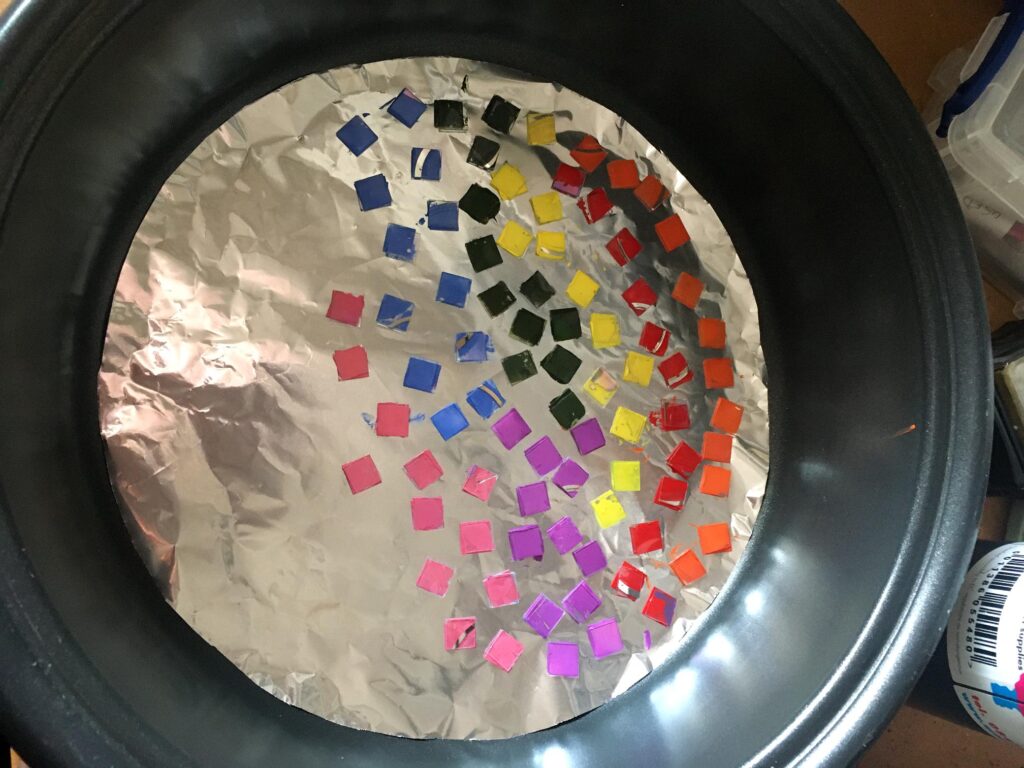
Preparing to paint the tesserae. I did twelve of each colour initially.
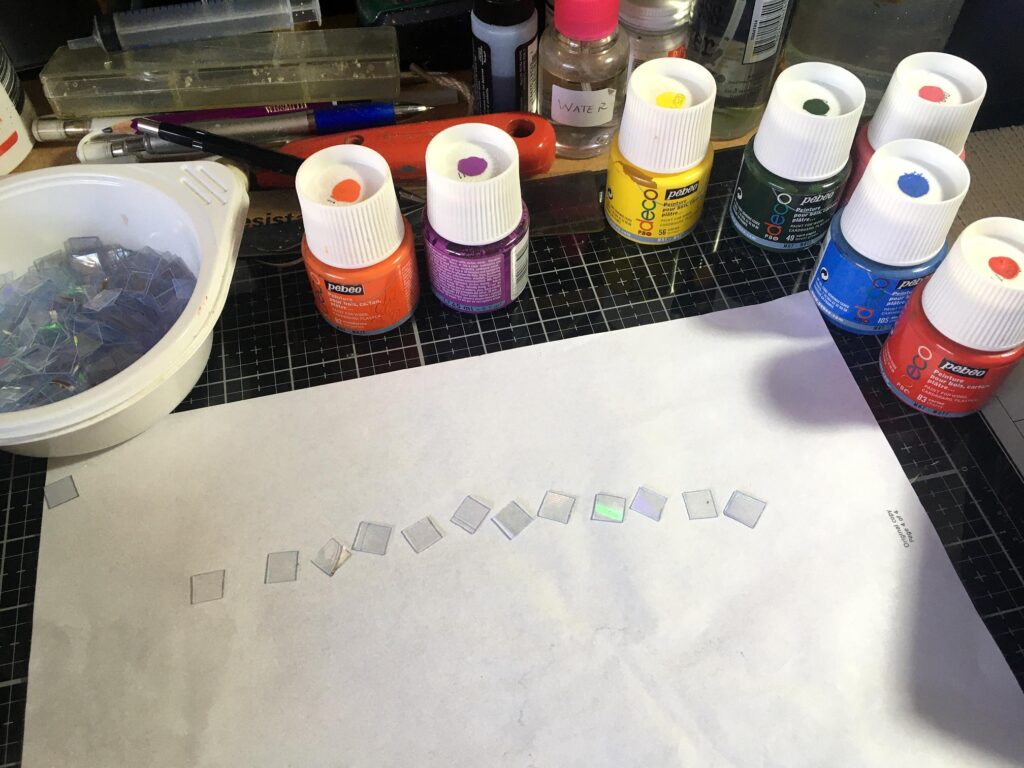
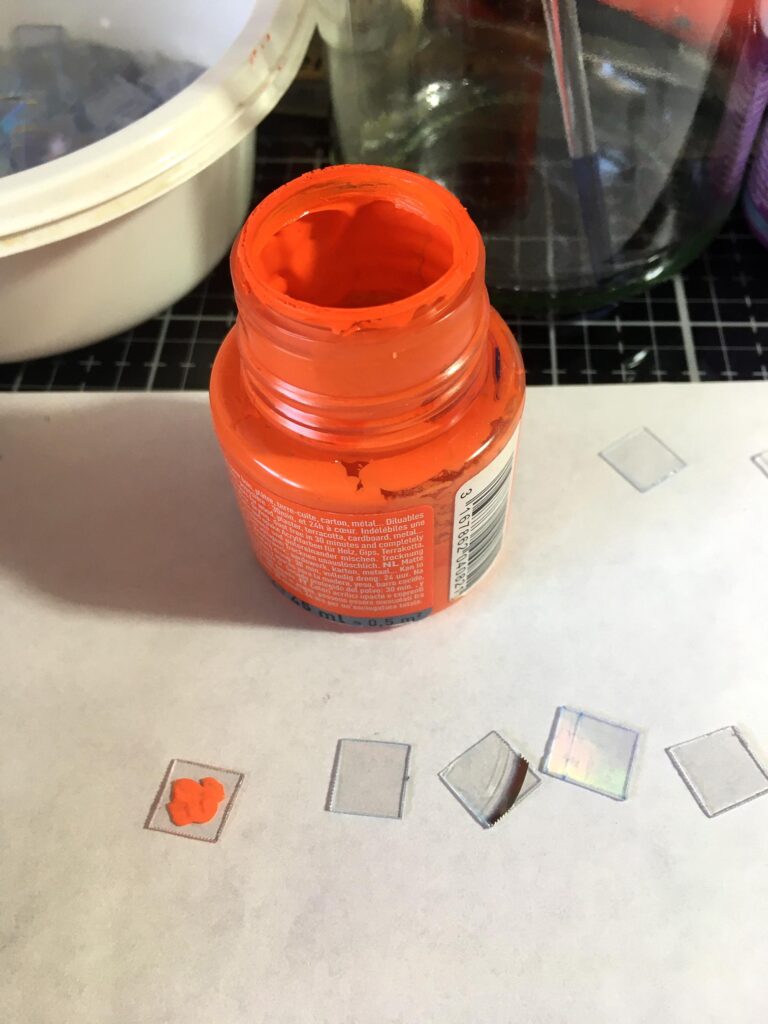
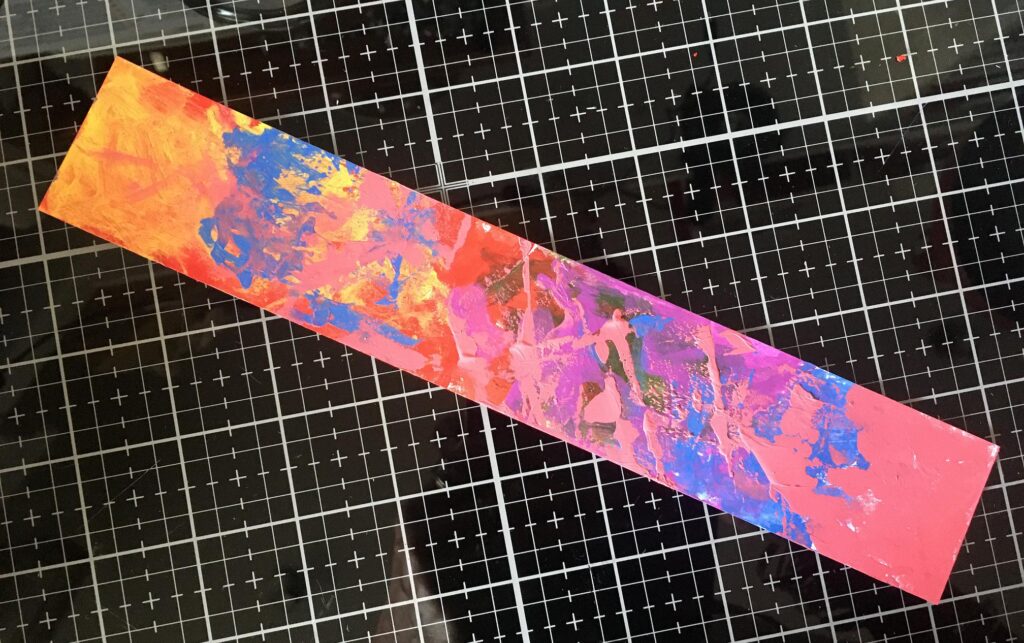
Between each colour, rather than washing the paint out of the brush and wasting it, I took a piece of scrap card and used that to wipe off the excess. I thought it would make an interesting multi-coloured strip to use elsewhere.
After painting one little square, I laid a second one on top and pressed them lightly together, and then transferred them to the multi-cooker.
All the colours in this first experimental batch completed. They had to be left to dry overnight. If the paint isn’t dry, it will bubble up when heated, causing the top tile to dome up. This is actually quite an interesting effect but one doesn’t want it to happen all the time.
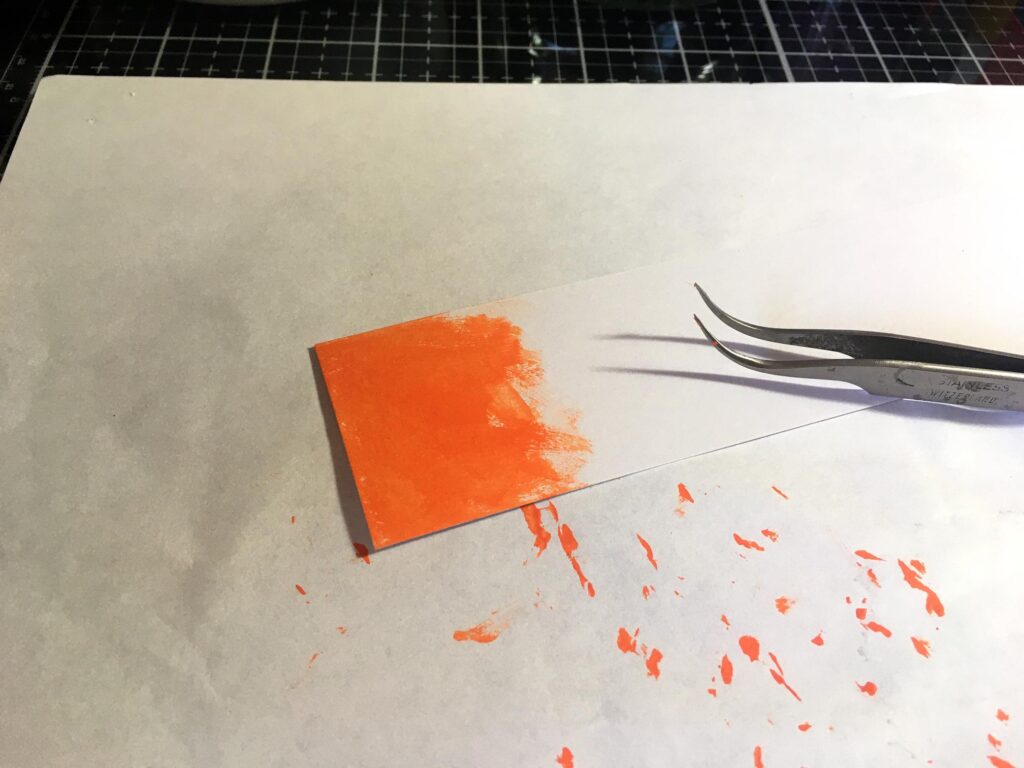
Here’s the completed strip of card from cleaning my brush. I think this is gorgeous!
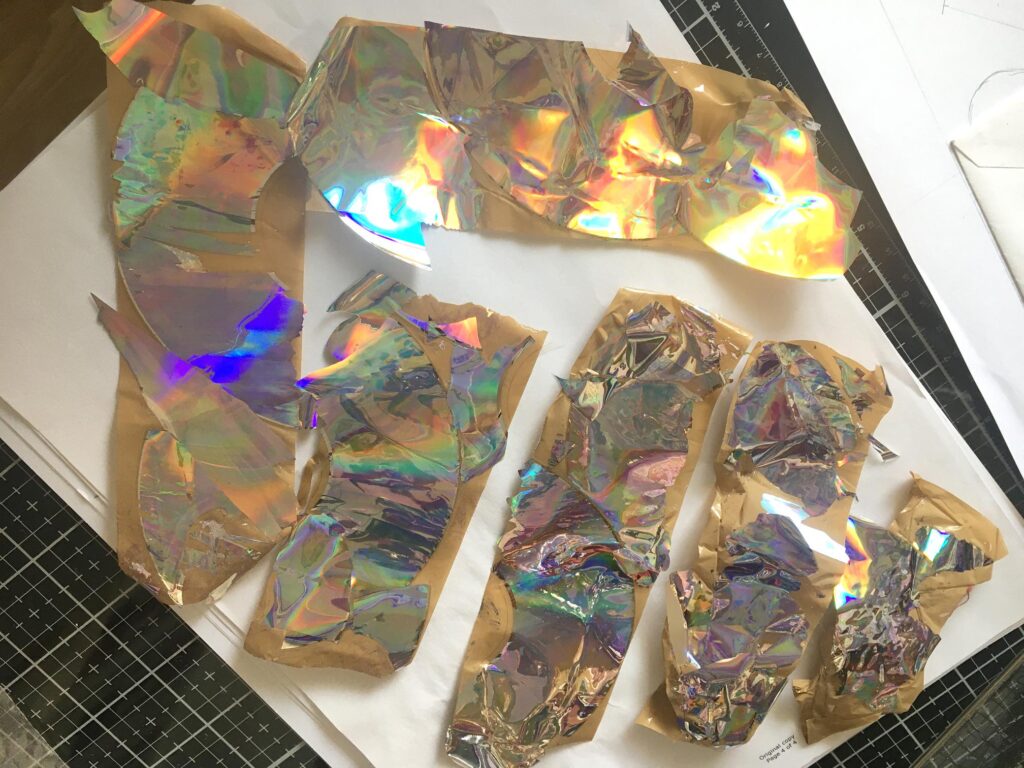
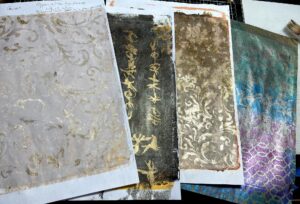
While I was waiting impatiently for the tesserae to dry, the next thing I decided to do while having so much fun in the studio was to see what I could do with the strips of foil off the DVDs which I removed with parcel tape. Just a reminder of what they looked like.
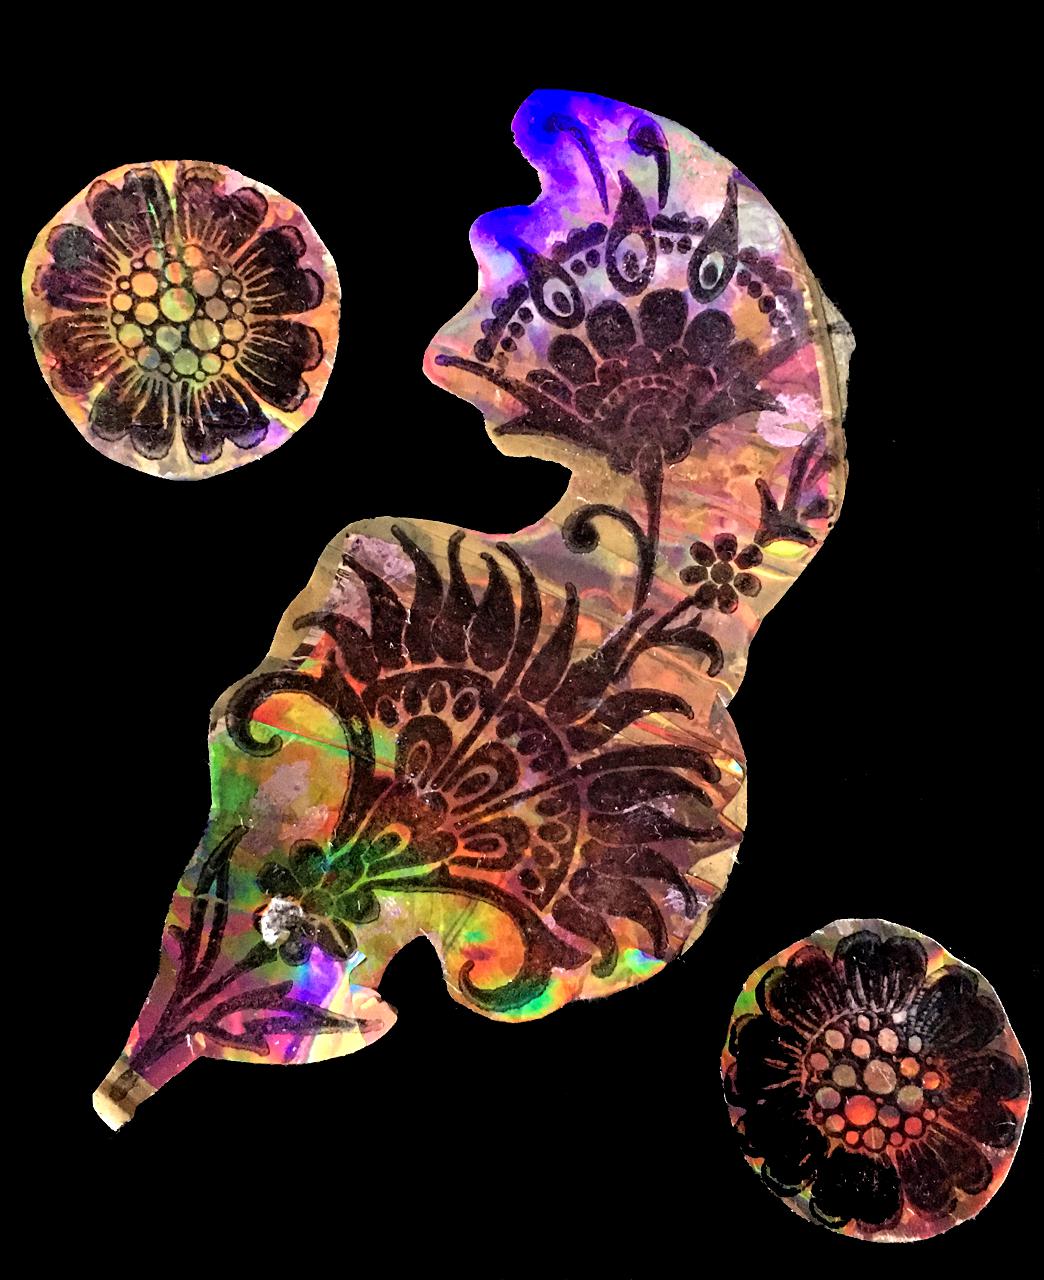
Beginning to sort through my stamps reminded me of some gorgeous ones I’ve got. I took one motif and a few flowers to experiment with. My first attempt was with my new Ranger Distress Archival Ink in Black Soot, but this didn’t work at all – it just rubbed off. I found my original normal archival ink (jet black) and used that, which worked. It was quite difficult stamping this very slippery surface without moving the stamp and blurring the image, and I found the best way was to put a foam mat underneath. After stamping, I heat set it very gently so as not to warp or melt the plastic foil or the underlying tape.
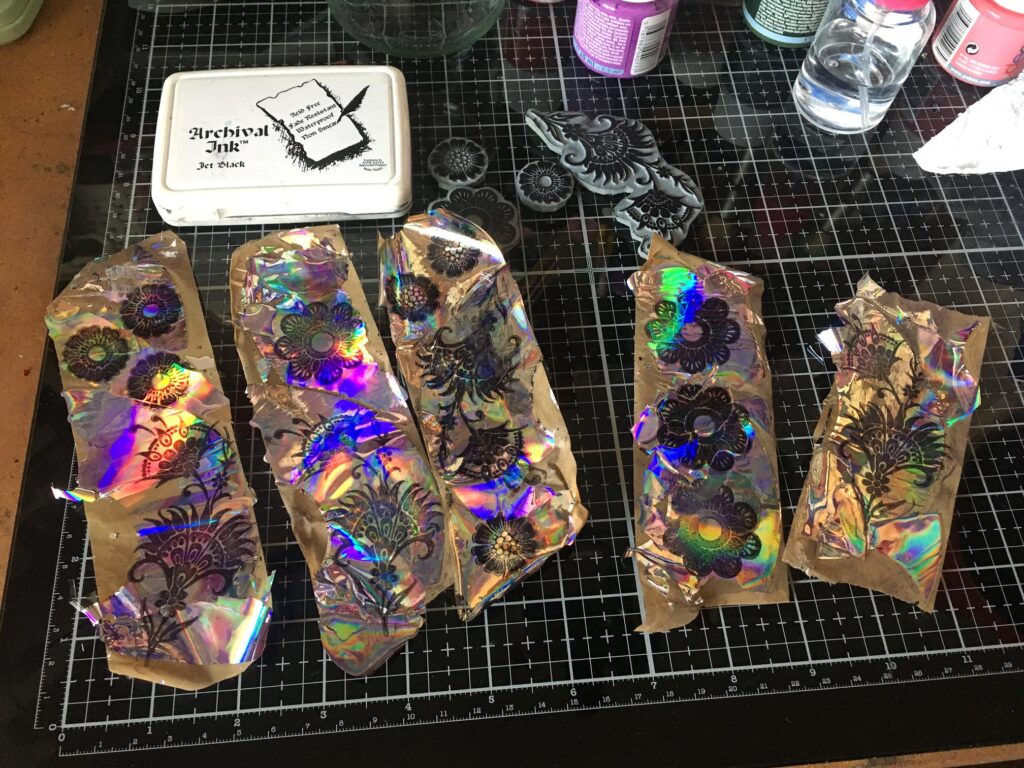
The extraordinary thing is that when you photograph this foil off the discs, all the glorious holographic colours show brilliantly. They don’t look like this in real life – they just look silvery. This is the reverse of what usually happens when you photograph something shiny, reflective or glittery – it usually comes out looking extremely dull; something we’ve all experienced.
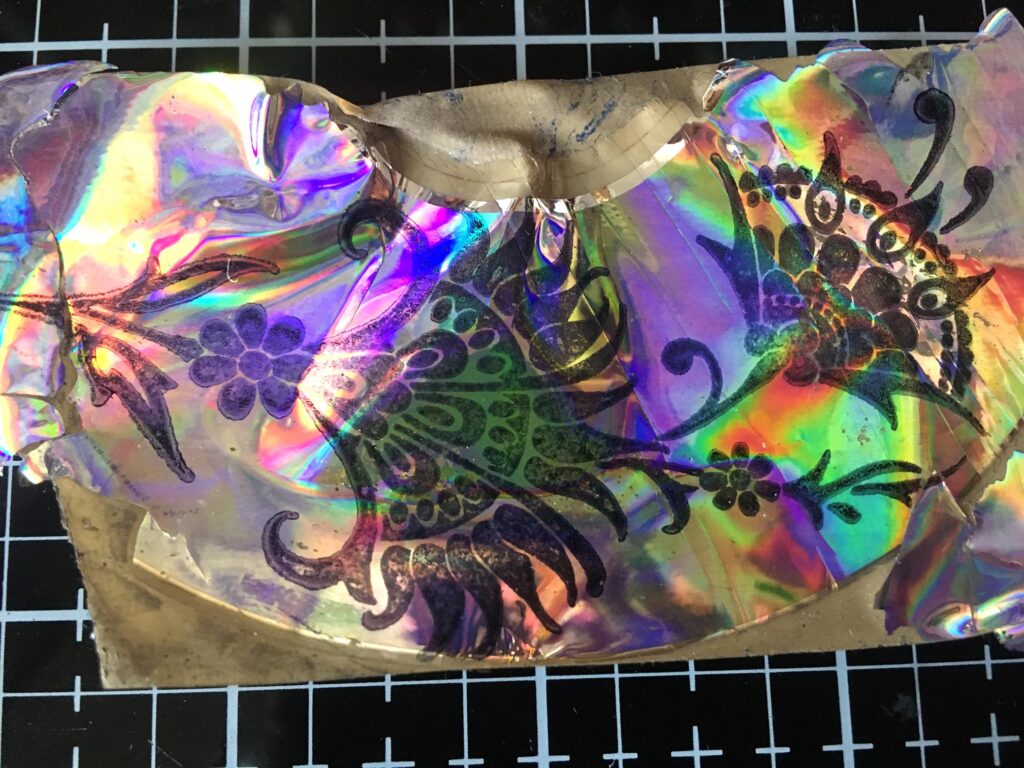
A close-up shot.
I fussy cut them out.
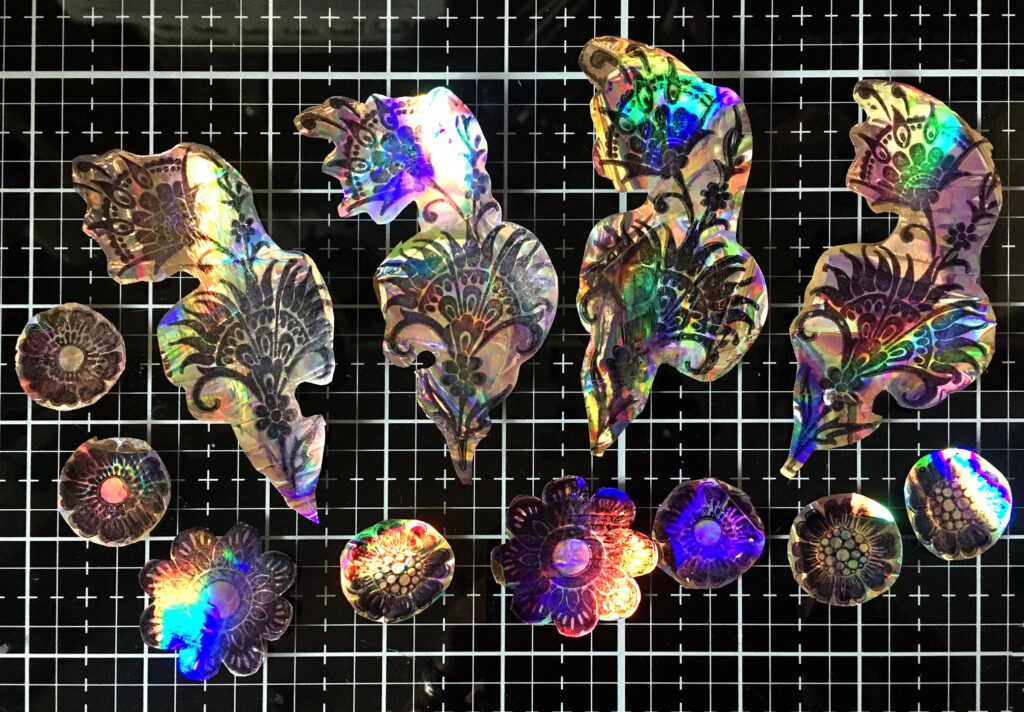
Finally, I selected one large motif and a couple of flowers, and stuck them down onto a piece of black card. When I photographed this, the card came out a bit blotchy so I edited the photo to created a new digital black background.

In order to get the full benefit from these gorgeous results, I intend taking photos of all future examples, and printing them out on gloss photo paper. This way, I will get better colours than the real thing, and I can also make them whatever size I like. I think there’s huge potential in this; the colours are absolutely stunning. I can see them being laminated, or being cut out and mounted as jewellery with a plastic dome or a layer of glossy accents on top for dimension… Too lovely not to use, and all from the waste product of upcycled DVDs! Who knew?
The next day, the tesserae were dry and ready to be baked. Here is the multi-cooker ready to heat up. I put it on the hob because the extractor fan is directly above, and it would deal with any nasty fumes from melting plastic. I didn’t smell a thing.
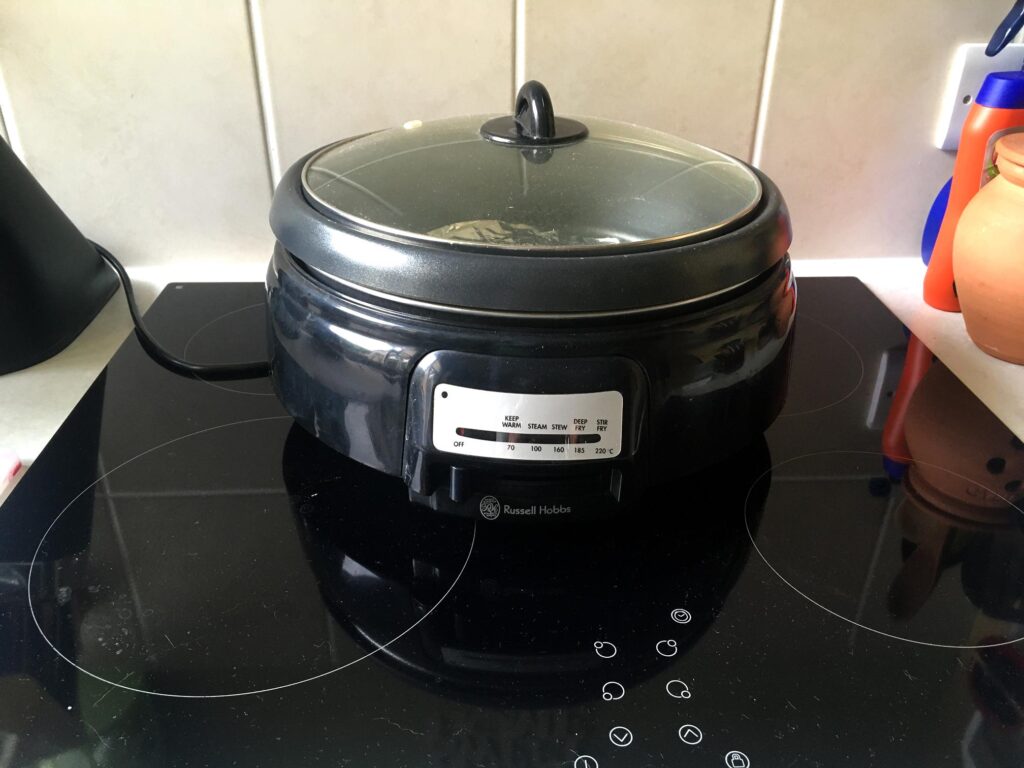
I set it at its highest temperature, which is 220 deg. C. The recommended temperature is 250 deg. for about 15 mins, so I added another five minutes so the total time was 20 minutes at 220 degrees. The multi-cooker is good because you can see through its glass lid how things are going. I could see after about 10 minutes that the edges were starting to get more rounded. They were done at 20 minutes. I turned off the multi-cooker, removed the lid and let them sit for another 15 minutes (actually I left them quite a lot longer than the recommended 15 minutes because I was in the middle of something else in the kitchen). When they were cool enough to handle, I peeled them gently off the foil, which did tear in a few places – I had hoped to be able to use this foil several times but it’s now rather screwed up as well, so I’ll jut use it as a pattern to cut another circle for the next batch.
Here are the results of my first experiment in making mosaic tesserae from recycled DVDs.
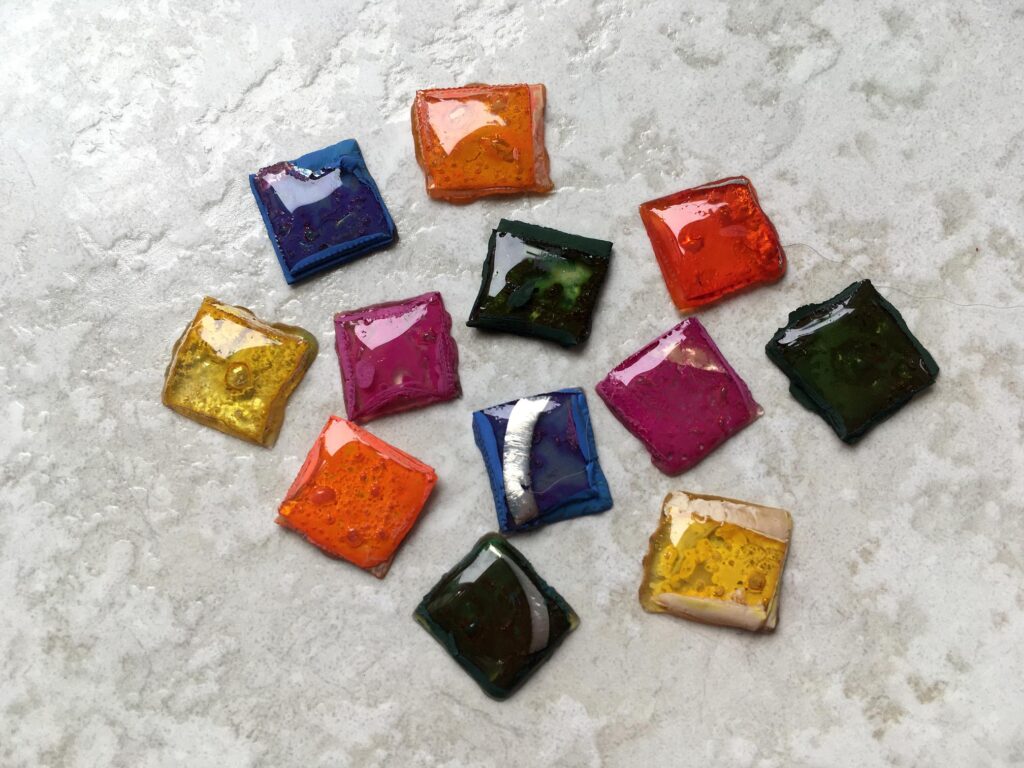
Gorgeous, aren’t they. Quite jewel-like. I’m really excited by these results and can’t wait to do some more. You can see the bits of foil remaining from the DVDs which are now part of the little tiles. I love the texture from the small bubbles and the general irregularity of them. They certainly do not resemble DVDs any longer! I am going to make some larger ones as well, and add some stamping and other elements between the layers.
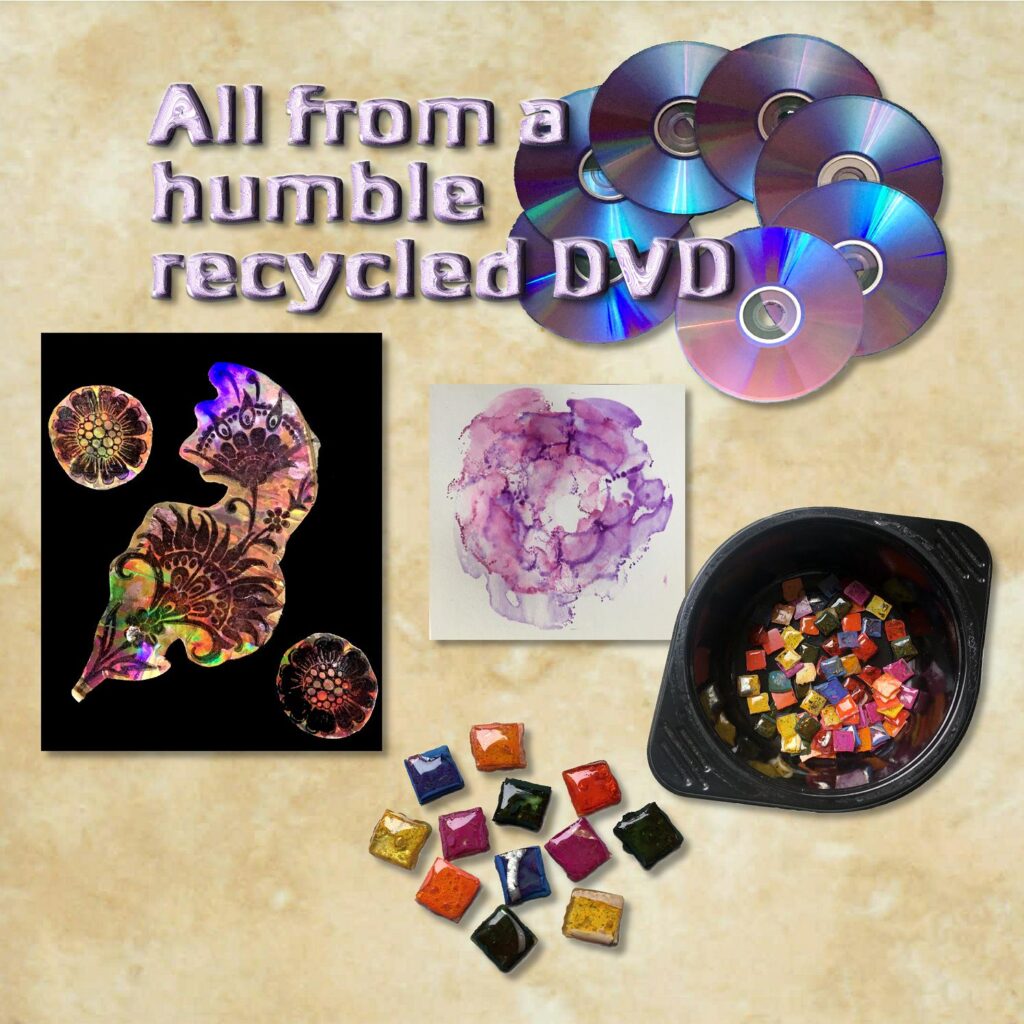
Since completing them I have watched some more YouTube videos on this, and also seen what other amazing things people are doing with recycled CDs and DVDs. It’s a fabulous medium to work with. Up until recently, I’ve always found any ideas for recycling CDs and DVDs to be pretty naff. They just look like tarted up CDs and DVDs. People are now making things out of them that are quite astonishing, and so beautiful.
Kitties
Where Lily likes to be.

Lily is the star this week. She is a highly intelligent kitty. She pricks up her ears at the sound of the word “garden” and will run to the door to be let out! The other day my hubby said he spelt out the word, “G-A-R-D-E-N” and she still understood!! Ruby isn’t quite so quick off the mark but she does understand this magic word, too. They just love being out.
On Monday my hubby was busy out there clearing and trimming back, and planting some more flowers to fill the gaps in my herb bed which has been somewhat neglected this year. He called me out to see a frog that had both the kitties extremely excited – he managed to rescue it and hide it from them to give it a chance!
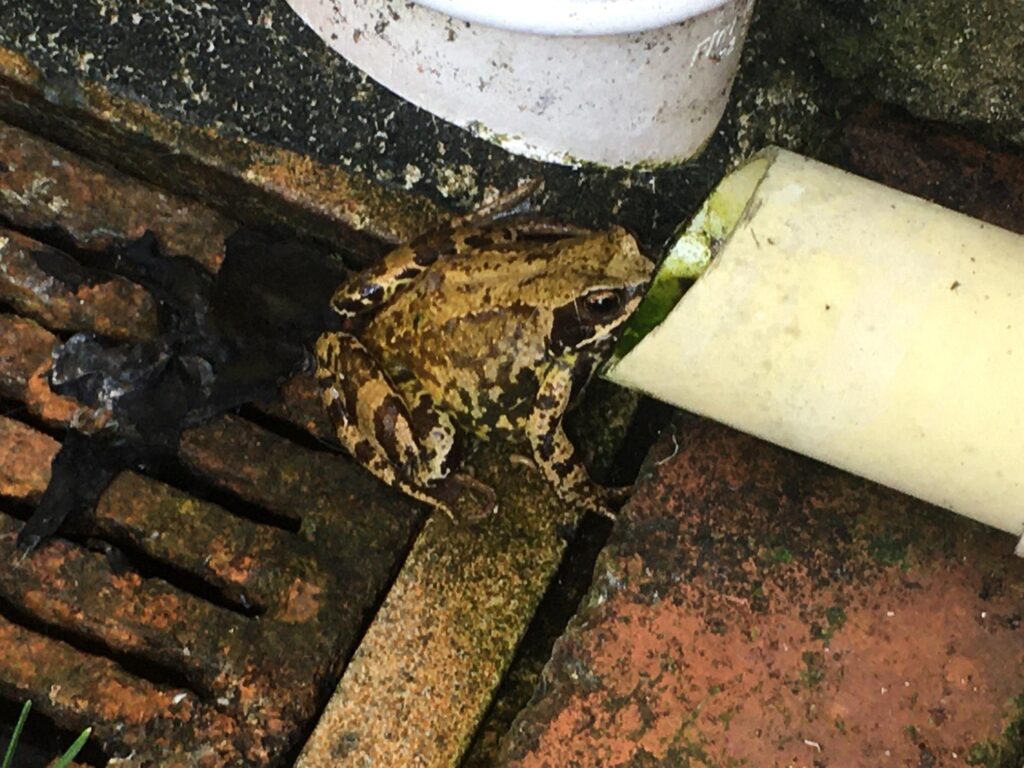
Isn’t it beautifully marked? It is amazingly camouflaged.
Food
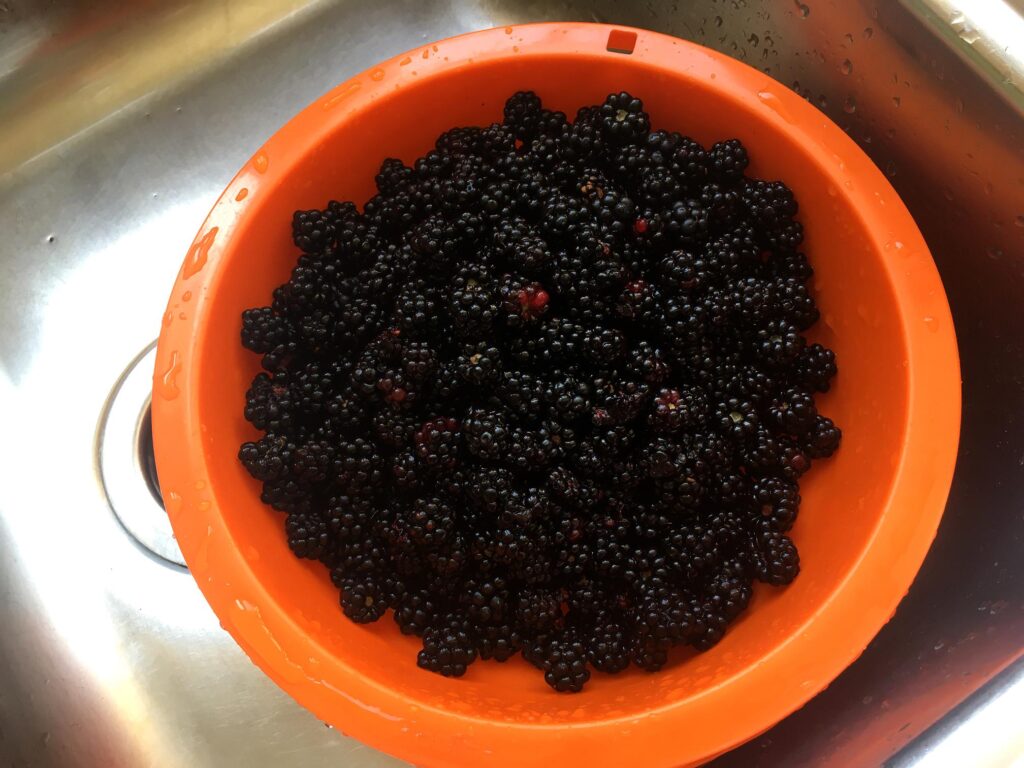
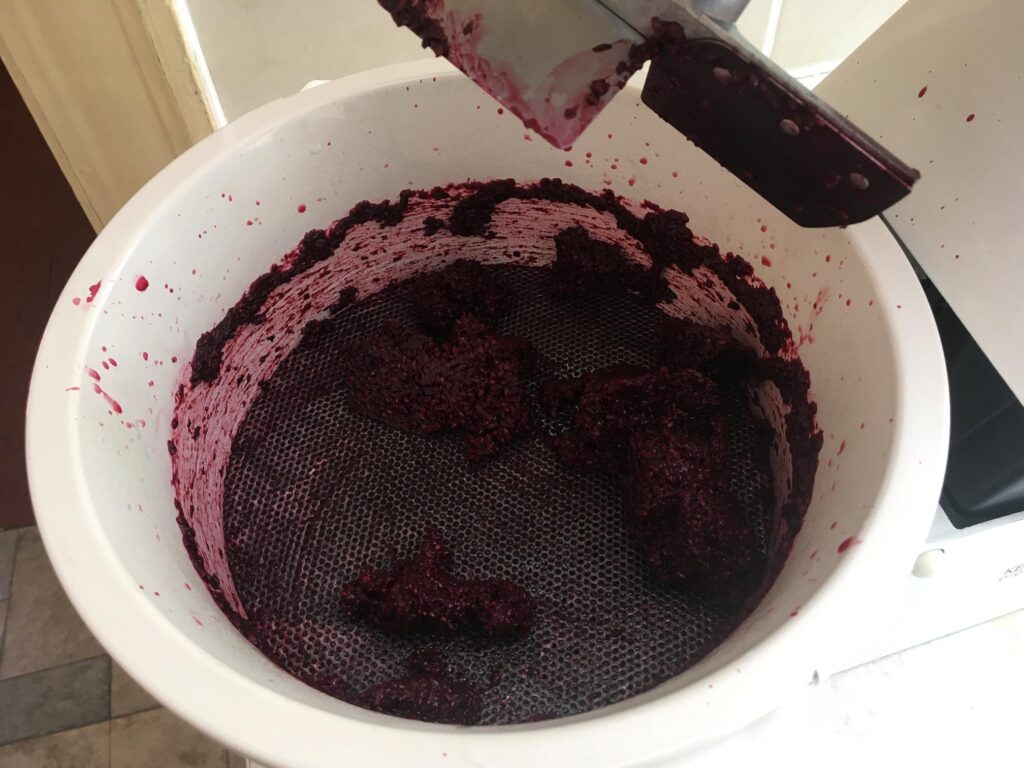
Don’t you just love free food? Especially if it’s both delicious and nutritious. My hubby has been out blackberrying and has come back loaded with delicious berries which are so sweet. We’ve been eating a few raw, and I’ve been sprinkling them on my breakfast, but the bulk of it I have stewed and pureed ready for the freezer.
Fresh from the hedgerows.
I wash them and shake off as much water as possible, then put them in a pan. I don’t add any more water. A light sprinkling of stevia to sweeten them (I don’t cook with sugar but prefer this natural sweetener), put the lid on and put them on a medium heat until I hear some activity. At this point I turn the heat right down and just leave it, and don’t stir it at all, and the fruit gradually stews down.
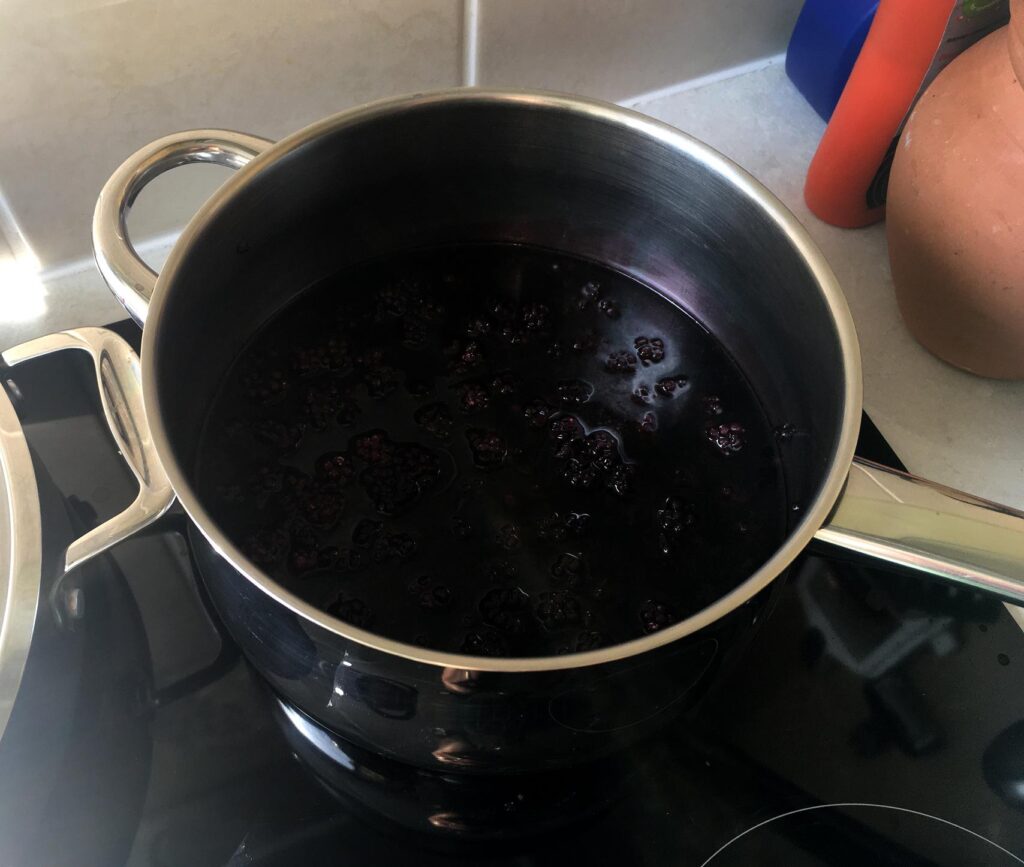
This method is fabulous for rhubarb – you end up with soft chunks in beautiful clear juice.
Once the blackberries were cooked, I pureed them, using the puree attachment on my Kenwood Chef stand mixer.
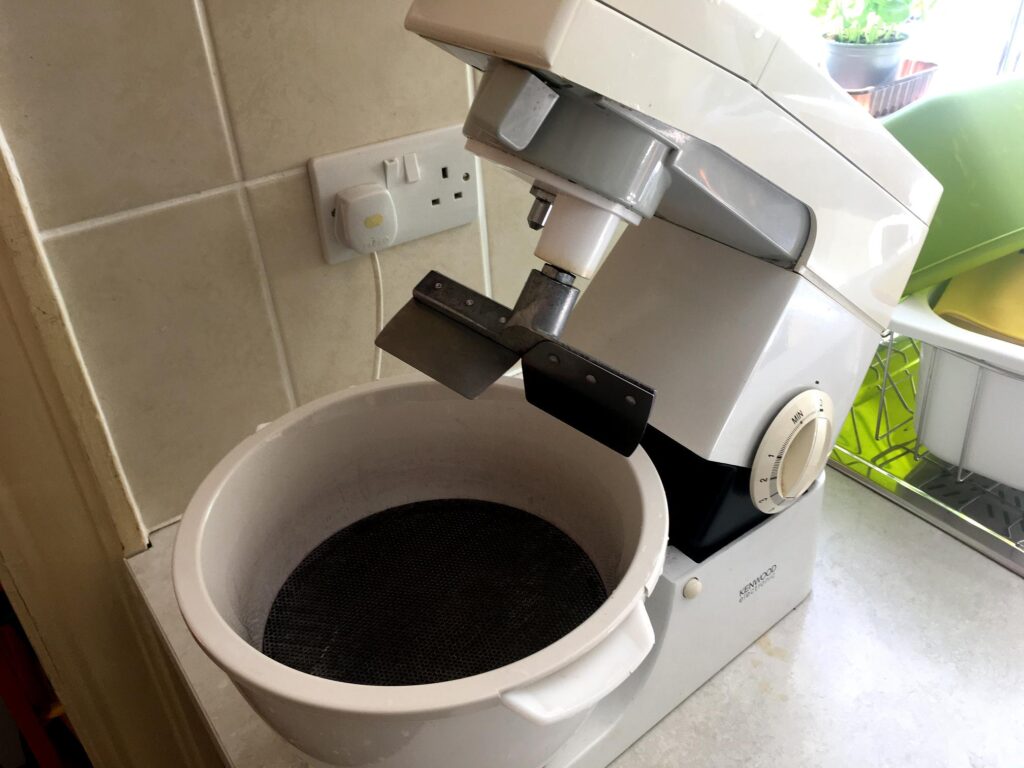
This attachment consists of a deep plastic ring that fits over the bowl, into which you put a metal disc which is pierced with holes. There are two discs, one coarse and one fine, and each has a smooth side and a rough side. You choose which disc and which side you need according to whether the fruit is seedy, has stones, or is fibrous etc. Into the top part you fit the paddle, which revolves slowly around as you run the machine on the slowest speed, pressing down on the disc and forcing the soft part of the fruit through into the bowl, while retaining the seeds etc. on the top. This works extremely efficiently, and beats pressing the fruit through a sieve by hand any day!
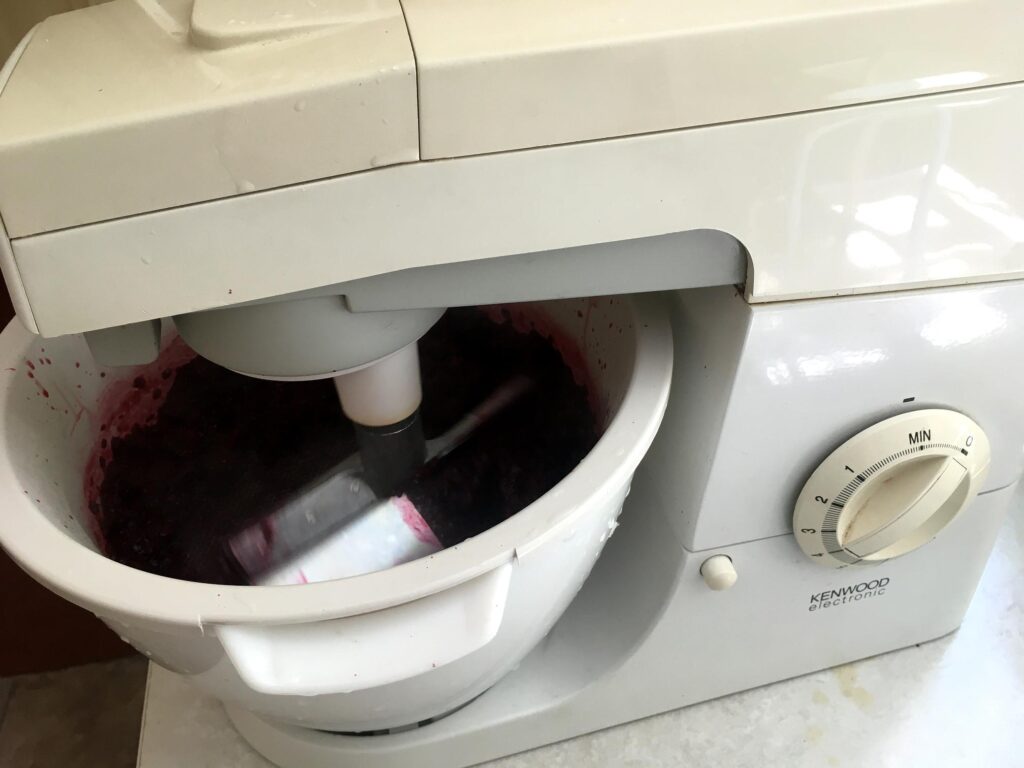
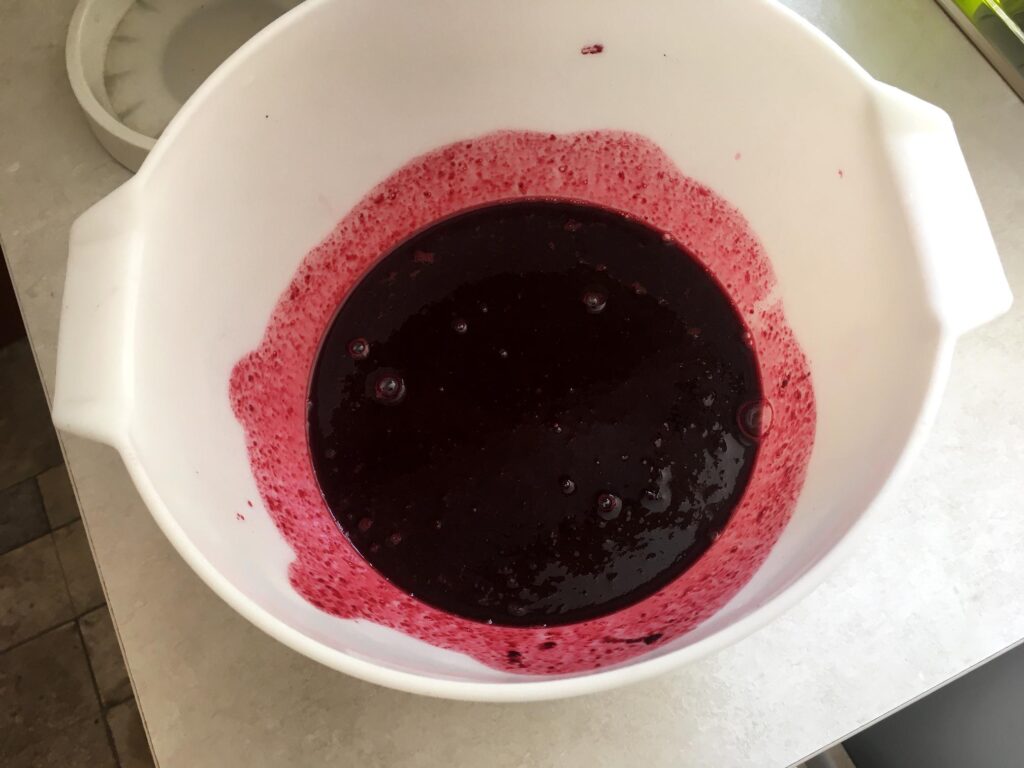
Here is the pulp once the process is complete.
This is the pureed fruit in the bowl. In this case it is quite runny because a lot of juice came out of the fruit during the cooking.
All packaged up and ready for the freezer.
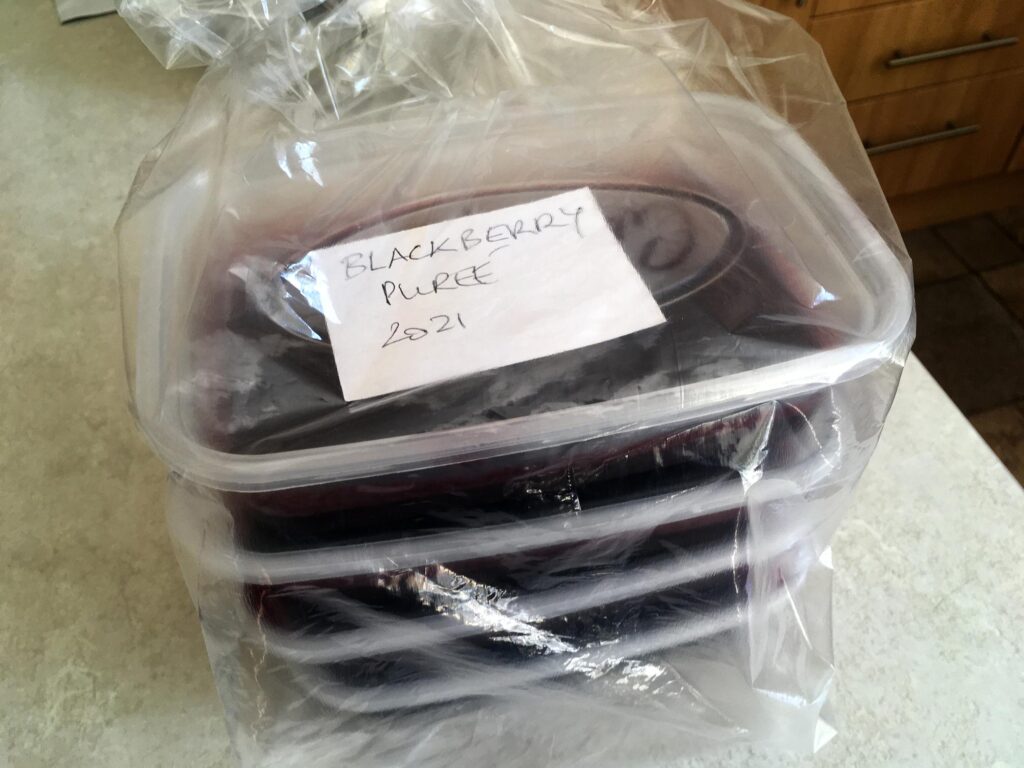
What I do when the food is frozen, is to remove it from the containers and put it in individual bags. This takes up less room in the freezer and also frees up the containers to be used again for something else.
Nutrition
So berry, berry good for you!
Most berries are dark in colour, varying from purple to red or blue. They have numerous small seeds in them, unlike plums and cherries which have a single stone. Some berries are quite soft and easy to eat, like blueberries, but others like blackberries and raspberries, have quite hard seeds. I find these get stuck in my teeth which is a bit of a pain! I do love them, though, so it’s worth it. Blackberries go extremely well with apples (both in season at the same time) but both my hubby and I prefer the blackberries in puree form, so you get the lovely flavour with the apple, without all the seeds. People often make jams and jellies from berries. The jellies in particular can look very attractive, being clear and rich in colour.
I am very fond of berries in the form of a fool – pureed berries mixed with custard. Very smooth!
I usually use my Vitamix (high speed blender) to make fruit purees or smoothies, but for very seedy berries I find that the consistency can turn out a bit gritty, so I prefer the old-fashioned way with my Kenwood stand mixer (see above).
Nutritional value
Berries are high in fibre, vitamin C, and in particular, polyphenols (antioxidants) contained in their colour. Polyphenols reduce and counteract the effects of oxidative stress and inflammation and can repair the damage caused by this. This means that berries are very useful for counteracting many illnesses which are caused by chronic inflammation in the body. The foods which contain the most antioxidants weight for weight are herbs and spices, and berries are a close second. They contain about 10 times the amount of antioxidants found in other fruits and vegetables, and more than 50 times the amount contained in animal-based foods. Go vegan, folks!!
Blackberries are high in vitamin C. In fact, just one cup contains about half of your daily requirement for vitamin C. This vitamin is essential for forming collagen which is present in connective tissue, skin, bone and blood vessels. Vitamin C is also great for fending off colds, and helps wounds heal more quickly.
They are high in fibre which has many great health benefits, including reducing bad cholesterol, feeding the gut microbiome (loads of health benefits from a healthy gut microbiome), stabilising blood glucose levels, and keeping you feeling satisfied for longer. They are also rich in vitamin K which is one of the components in the process of blood clotting, and also helps prevent bone thinning (osteoporosis).
Studies have shown that blackberries have an antibacterial effect particularly in the mouth, and could help prevent the formation of dental cavities.
There are many other health benefits.
Some surprising berries
Did you know that grapes are berries? Dark red or black grapes are best because their skins contain health-promoting polyphenols.
And what about bananas? I remember learning that at school, and thinking how funny it was that a banana is botanically a berry. Obviously bananas, being the colour they are, do not contain the same level of polyphenols as the other berries that we are all familiar with.
Health Update
Last Friday I had a telephone appointment with one of the breast care nurses. I’d received a letter from them enclosing a lot of bumf about alternative support that they offer at the Lodge, run by Macmillan’s. There were leaflets about yoga and relaxation classes and wig fitting and prosthetics and so on. Also enclosed was a sheet of check boxes to tick for loads of things one might be worried about – practical, emotional, financial, physical issues etc. They asked me to complete this in advance of the appointment, but I didn’t need to tick a single box! I’m really not worried about anything. My faith is strong, and half the time I’m too busy enjoying life to be even thinking about cancer. I’m doing really well, which she was pleased to hear. We just discussed any potential difficulties I might experience with the radiotherapy. I still don’t have a date for that. She said to phone any time if I was worried or had a problem.
We also discussed the hormone treatment. I’m getting on average about 3 or 4 hot flushes a day and I can deal with that. I’ve now developed a painful jaw joint (TMJ syndrome) which I had in the early days of my ME. This drug can cause bone and joint pain so I think it must be due to that. The best way to deal with it is to keep it moving so I’m pulling some weird faces while I do my ongoing shoulder exercises!!
Yesterday I had a phone call from the radiotherapy department calling me in for my first treatment tomorrow! She apologised for it being such short notice. Fortunately the things my hubby had booked can be cancelled or postponed. I had been told initially that my appointments would be daily from Monday to Friday, but she said it was fine to start on Thursday. So it will be Thursday, Friday, have the weekend off, then Monday, Tuesday and Wednesday of next week.
And finally…
How to deal with unsolicited phone calls during mealtimes.
We were having lunch, and my mobile rang. I thought it might be the hospital so I answered it. It was someone from one of those companies trying to sell something. I get really fed up with this. Politely but very firmly I told him I don’t accept unsolicited phone calls of this nature, and cut him off. I told my hubby I thought it might have been the hospital, and he said I should have used a silly voice and said, “Is that the doctor? I’ve got this terrible case of diarrhoea. Oh dear, oh dear, it’s all running down my leg. Oh no, it’s gone in my shoe…” He said “That would get rid of them!”

Love, love , love all your CD projects Shoshi – thanks so much for sharing the process. The results are stunning. I like your stamp storage idea, although I have rather too many for that system. Glad you were able to get the software licence sorted. Meow to the kitties, good luck with the radiotherapy. Stay safe and Happy WOYWW. Sarah #?
What a wonderful thing to say to the unsolicited!!! Give him a hug from me for making me laugh out loud!!
What a difference the dark grouting has made to your shell, it really shows it is there.
I was reading about the tent people on your green in town, such a shame.
I am blown away by the small tiles from the DVDs, they will be wonderful to make fresh mosaics from.
Have a fun week, hope your hospital visits don’t wear you out too much.
Had to smile at hubbies idea for unsolicited calls – I have lots of sayings in my head including one where I am a detective investigating a bloody murder (read it somewhere) but most times I just put the phone face down so they are talking to the table.
Love the kitty photo obviously, yes she is a clever kittie.
Whilst reading about your cd stamping and photos I thought of the same idea as you, what a great resource you will have for future things. Love the little tiles, they have turned out really well.
Yesterday we sat on a rock eating ice cream by the beach and saw two ladies with a huge bag having a whale of a time blackberrying. Lots of brambles in that area I see.
Good luck with the treatment, will be thinking of you and include you in prayer tonight.
Hugs, Neet 17 xx
Well, you have some fab things to share this week! The mosaic looks great with the darker grout, really brings out the design and the waste DVD art is just amazing! I have to admit that your clear stamp storage is amazing too, you can see everything so clearly. Very pleasing!
Hugs LLJ 7 xxx
I’ll have to do something with my stamps too – most of the ones that I use are just hanging around and there’s a danger I might loose them! I don’t quite understand what you did with the DVD tiles but they look great! Is that some kind of special Pebeo paint? Maybe I missed that bit. What gives them the domed effect? I do love the holographic look on the packing tape and it was a great idea to stamp on them, and also to print the photos rather than using the real thing to maximise the effect. Looks like you’ve been busy with your blackberries – I’m not sure I would have had the patience to deal with them, but at least you didn’t have to core them and peel them like the apples – that drives me crazy. I can just about manage to peel and core one lot of crumble’s worth at a time. Lily is indeed very intelligent if she recognised garden from the spelling LOL. I often think cats know more than we give them credit for – they just pretend they don’t understand things to fool us – like the meaning of ‘no’. Good that you’ve got your first appointment for the therapy even if at short notice – nothing is more important than that at the moment – hope it goes well with minimal side effects. Take care Shoshi, xx zsuzsa
Oh I love your hubby’s response to the unsolicited caller! That would get them alright! You have been super busy! nd you have such interesting machines! My die cutter is the Big Shot, I have never seen the multi-cooker before, nor the mixer that removes tiny seeds! Awesome! The CD mosaic tiles came out beautifully, and what I great idea to used photos of the stamped foil! Lily and Inky share the love of snuggling up to someone reading, usually Ron in the middle of the night when he’s reading his Kindle, but she often lets me know how she feels about my tablet when she sits right in front of it for scritches. “hey! Why pay attention to that when you could pay attention to me!” Good luck with your treatments! Have a great week, looking forward to seeing how you organize you stamps! Mine are all in binders by subject. Lindart #29
My husband loves blackberry and apple crumble, I would prefer the blackberry purée, but my husband likes them whole. Your CD artwork and squares are amazing. Am glad you have your first appointment, hope it all goes well x Angela #11
I had to chuckle at the call solution – great idea! the blackberry fool looks so yummy . Your recycled cd projects are fantastic, what beautiful colours! I also like all the leaves you’ve cut. I hope you find your ideal stamp storage solution – I don’t really like clear stamps (despite the advantages of being able to see where you stamp) as i am an old school wooden – or more recently, cling – girl and would never un-mount my wooden stamps (I have hundreds) but you are right, I think they’ve improved the material they make them from as they did used to deteriorate in the “old days” All the best for your treatment, Helen #1
Thanks for explanation about the tiles, Shoshi. I thought you used some kind of special paint that made the dome-ing. It looks a bit like resin, actually. Yes, I used lino for the stamps – they are supposed to be “soft” cut but they are anything but! Later I’ve tried carving erasers (you can actually see a pack on my desk) and those were a lot easier to cut. Thanks for your visit! xx
Loving today’s techniques but I am going to pretend I didn’t see you tidying your stamps and dies or I will start to feel guilt again. It’s the Christmas stamps really, I have so many that I don’t use. Great to see the kitties again too. Have a lovely creative woyww, what’s left of it!, Angela x19x
HI Shoshi, I hope your treatments go ok. I adore your experiments this week, your leaves are lovely and the scrap dvd projects are fascinating.
Lily is very clever, understanding the spelling of garden. Zsuzsa is right, the only thing they never understand is “No!” Ours look like butter wouldn’t melt at the moment!
Take care and have a good week
Hugs
Lynnecrafts 4
I really enjoyed your post! The CD tiles are amazing! And what a mixer!
Hope you have a wonderful week!
What a lovely lot of things you have been up to this week it must keep you so busy, I have all my stamps on plastic boxes and keep looking at them and thinking I have enough BUT have just ordered some more stamps lol
Take care and stay safe
Wow -just wow on all your projects! Loved reading all about all of them!
I have all sorts of stamps from clear to real rubber to blocked – and I have then in folders and boxes and drawers – I think I can usually find the one I am looking for!
Loved the comment from your husband – and the church sign.
Happy WOYWW!
Stay safe and keep well!
Susan #23
Calling All Crafters! – My Blog!
Hi again Shoshi! To answer your question about the journal covers, they’re not real! Well, they are real but not from the real book. I first showed it in this post: http://inkydinkydoodle.blogspot.com/2021/08/woyww-635-junk-journal-flip-through-and.html – I just printed the image and glued it on some cardstock. Not very well either, but I’m glad it fooled you! When you hold it in your hands though, you can immediately see that it’s not a real book cover. The binding is with the hidden spine method – loads of videos on YT. There’s one here: https://www.youtube.com/watch?v=gc8DXvDsEjk I used tea-dyed paper for the signatures – I bodged that too – later I had to remove the third signature to make room for the bulk. Clever photography hides all these mistakes! You can see why I don’t do tutorials, can’t you, I usually just wing it and bodge it together as I go along LOL.
Your CD play is amazing – so colurful and fun. I so miss all the blackberries we had at our old house – plus the plum, pear, apple and sloe trees. Such a wealth of goodness . I quite like your ferns too – I think they would make a nice stencil…. just saying….
Best of luck with your treatment!
Happy WOYWW!
Mary Anne (3)
Thanks Mary Anne – so glad you enjoyed my recycled disc project! I agree about the free produce. Our apples are coming in thick and fast now, and my hubby says the blackberries at his favourite place will be ready again now so he will be going for more. I totally agree about the stencil – my thought exactly. I’m going to cut a single one with a bigger border around it and be able to use the positive and negative as a mask and stencil.
I’ve had the first two treatments and so far so good – no ill effects yet! Not the most comfortable position to be in for 20 minutes or so but not too bad. Thanks for your good wishes.
Happy belated WOYWW,
Shoshi #15
I just wanted to return your second post to say good luck with your treatment will be thinking of you,
The DVD-pieces are magnificent, I love those colours! Clear stamps did improve I guess, as I have some oldies and they don’t stamp well (but stick too hard to the acrylic block… can hardly take them off without tearing them…) I don’t have so many stamps though, so my ‘box’ and two files are still working as storage. I hope your first days of radio-treatment went well. Thanks for your visit the other day, enjoy your weekend lovely one. Hug from Holland, Marit #2
Your stamp storage is great! I admire all the work you put in to it.
Wish I wasn´t so lazy… 🙂
Thanks for reminding me how healthy the blackberrys are. I have
some in my fridge.
Wish you happy weekend and stay safe!
Sussie nr 31
Shoshi, I’ve found another tutorial for the hidden spine using a piece of fabric instead of cardstock. This is actually what I did myself in my ‘cloned’ book. This is less rigid and better if you want a curved spine. https://www.youtube.com/watch?v=HD89ST0JKDA
Wow Shoshi those tiles look amazing! It’s definitely worth the effort to cut them all up and go through all the process to achieve that end result! What temperature do you “cook” them at?
I really like your puree attachment for the Kenwood, I wonder if there is one to fit mine, I must check that out. The blackberries look delicious, and free food is always good!
Speaking of frogs, I have disturbed so many in this last week and every time no camera on me! I had two
yesterday that were similar to yours but possibly greener, and then I had another two that were very large and slim, but yellowy-orange. I need to look those up as I thought they might be newts from the pond. I haven’t seen them for a while and these disappeared too quickly for me to check if they had tails or not.
I am so late this week, almost didn’t make it as I’ve been busy in the garden while the weather is still good, and then being too tired to do anything else but eat and sleep. I still haven’t taken photos of my storage, I really must try and do that soon. I hope your radiotherapy goes well and you are comfortable on that couch! Happy belated WOYWW! Elle #13, EOTC
You have good things this week. To share! Mosaic looks excellent with dark grout. It makes the design good, and the broken DVD art is fantastic! I have to admit that your unique stamp collection is also impressive. You can see everything clearly.