What’s On Your Workdesk this Wednesday?
More patchwork cards
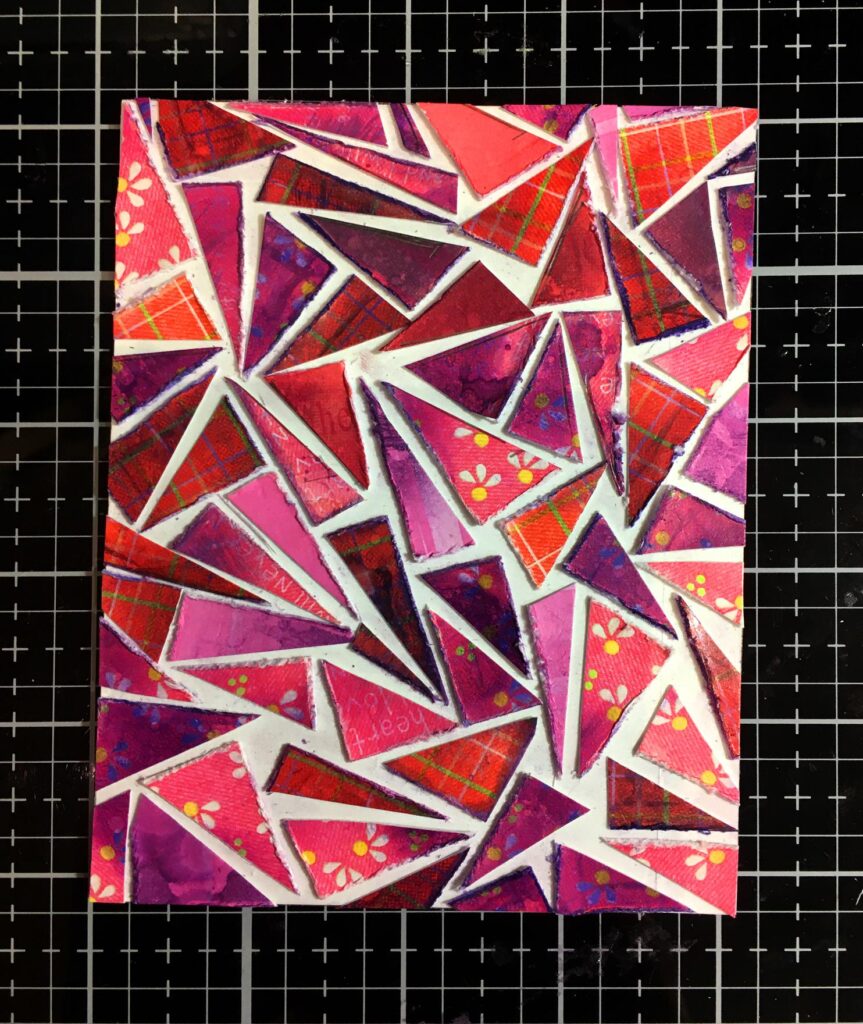
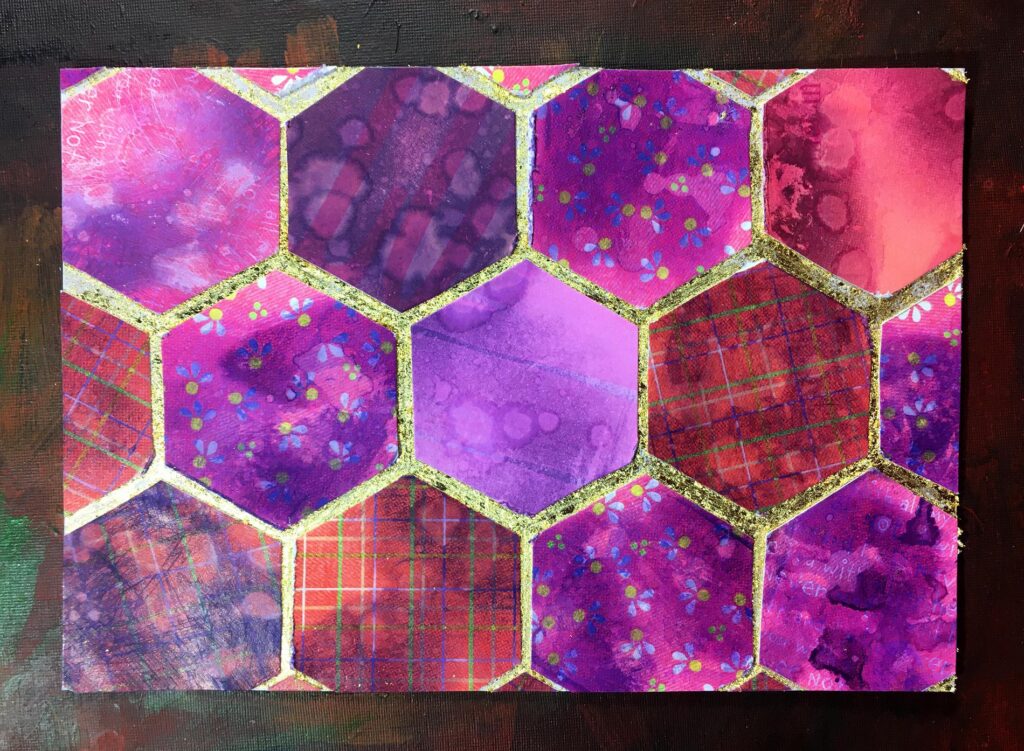
I have been making some more pachwork cards. I had cut a lot of squares, and I made a hexagon template to cut them down into this new shape, concentrating on the reds and purples. I liked the inked squares I’d done before, so I decided to ink them all this time. The trouble is, the paper is quite shiny and the ink tends to bead up. I tried sanding the surface a bit but that didn’t make too much difference. Smooshing didn’t work properly, so I applied the ink with my blending brush and heat set it before spattering it with water and blotting it off. The results were variable, but the general impression was OK once the shapes were all together.
I came across a great tutorial on YouTube during the week and decided to try this for a different look.
I covered the whole surface of the card mat with double-sided adhesive paper and arranged my hexagons on top, laying them down very lightly till I was happy with the arrangement, and then pressing them down firmly.
![]()
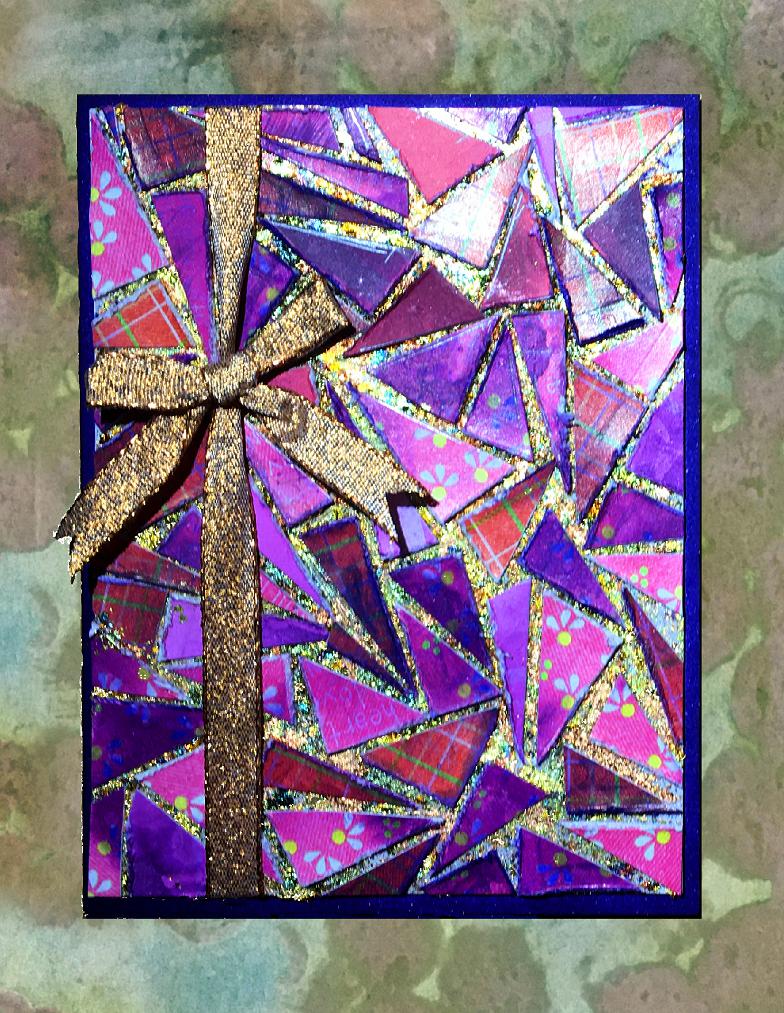
When I cut down the squares to form hexagons, the desk was littered with little triangular pieces, and it seemed a shame to waste them, so I took a smaller card mat and covered that with the double-sided adhesive paper as well, and and arranged these little pieces randomly all over the surface.
I then dug out my gilding flakes. I had very little of the variegated copper left, so I used that on the smaller piece.
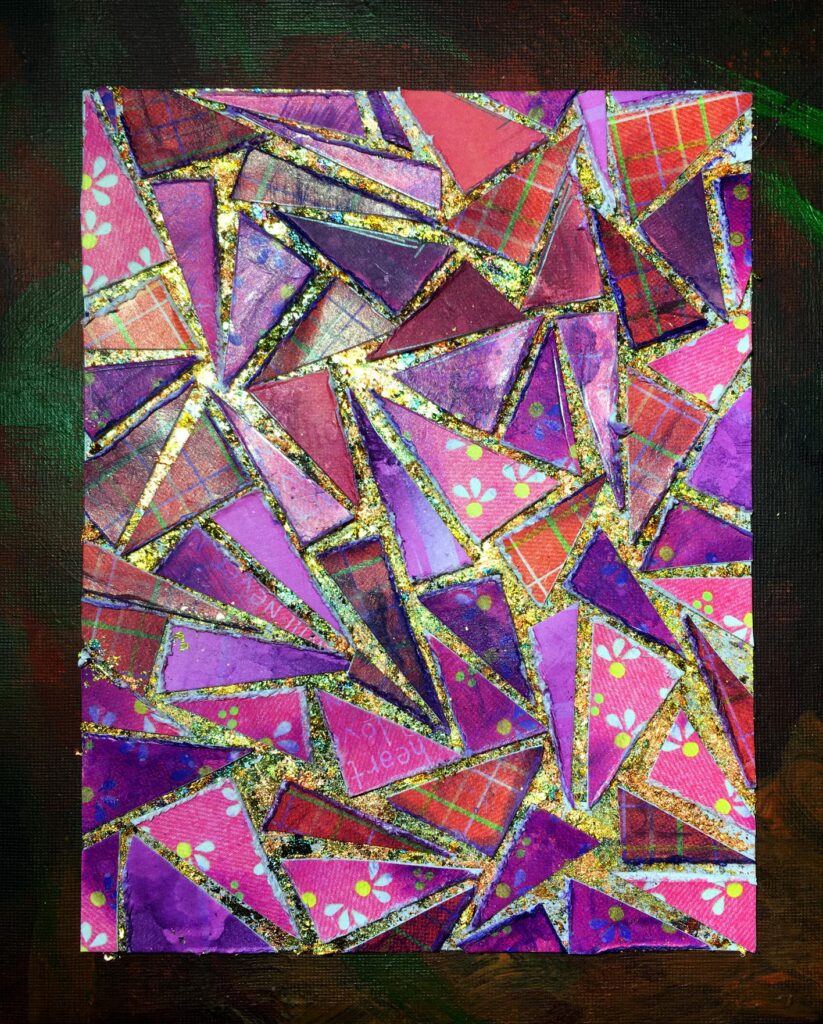
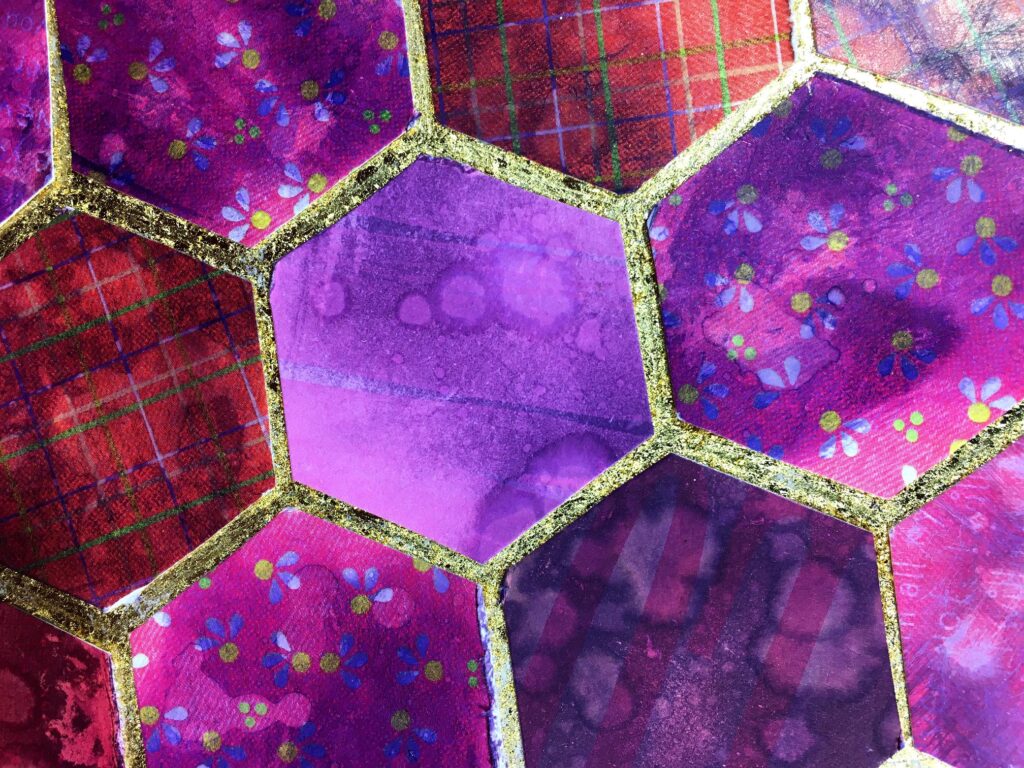
Something odd happened with the colour on these pictures – the ones without the gilding flakes look much more red, and those with, more purple. The truth is somewhere between! I sprinkled the gilding flakes on, having put the piece on a sheet of scrap paper to catch the excess, but of course there were loads of flakes all over the desk straight away! These things have a life of their own, and woe betide you if you sneeze!! Anyway, I managed to tame them eventually, and pressed them into the gaps between the shapes, using a stencil brush, and then shaking the excess back onto the scrap paper before returning it to the box. I used a ball embossing tool to run over all the gaps between the patchwork pieces to make sure the gilding flakes were fully adhered.
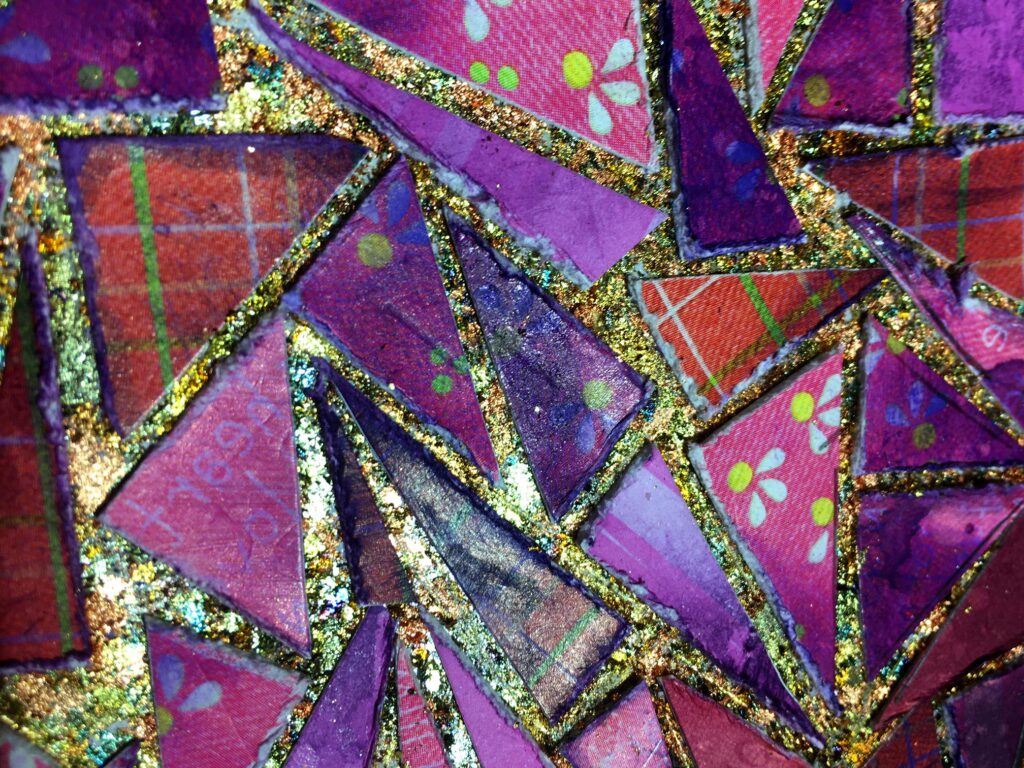
Here’s a detail shot of the crazy patchwork piece.
I used my gold gilding flakes for the hexagon piece.
Here’s the detail shot.
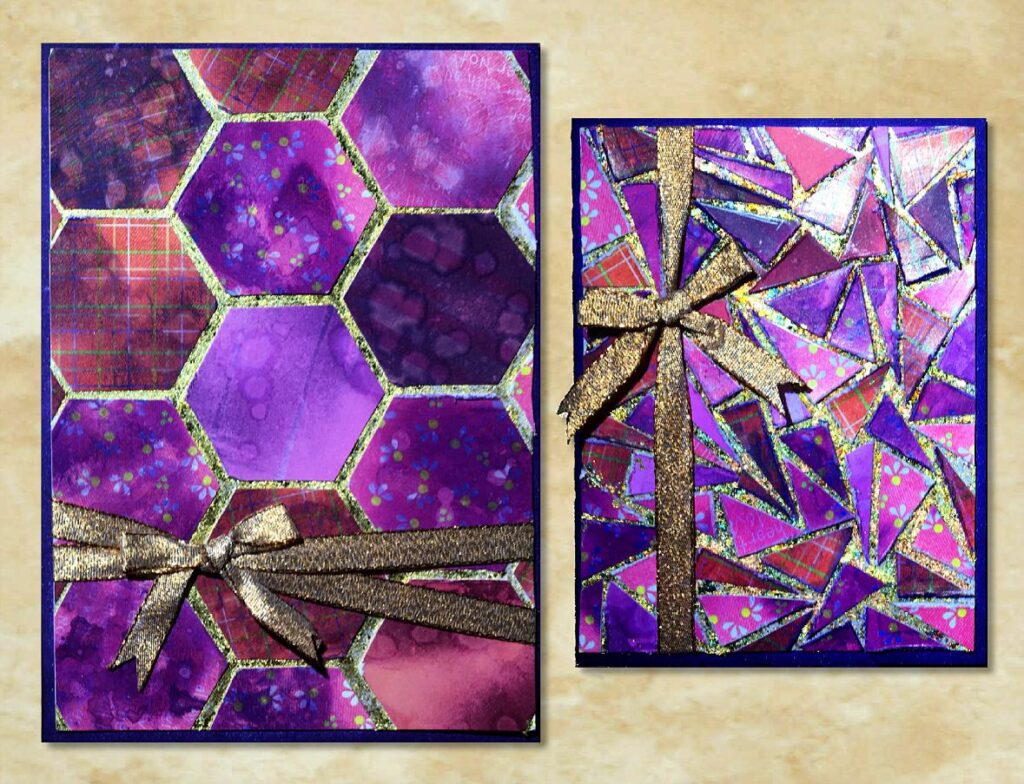
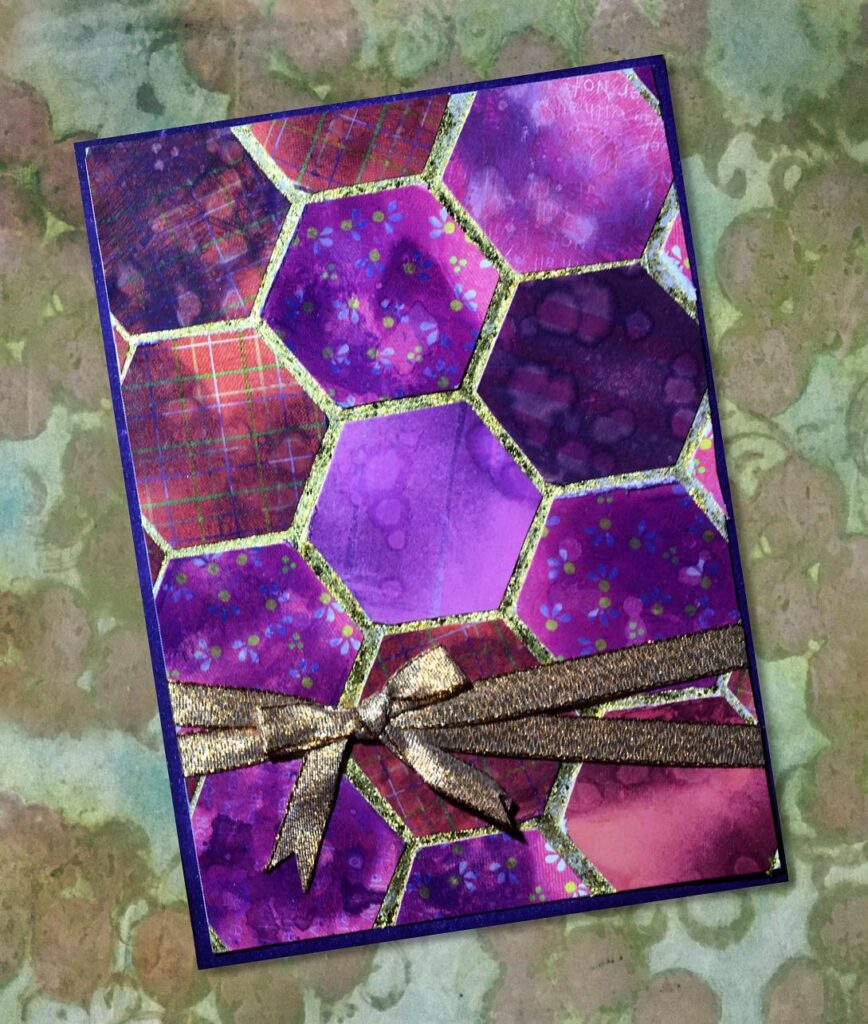
The two pieces together. Of course, in real life, they are a lot more gold and shimmery than in the photos.

This is a really fun technique to do, and it gives such a rich result, especially if you start out with rich dark colours. Silver gilding flakes would look nice with a cool blue colour scheme, perhaps.
I began by inking the pieces with Dusty Concord Distress Ink as I had done before, but halfway through I switched to the new Royal Purple shade which arrived the previous day with the rest of my new stash. I love this rich dark purple – a true, regal colour!
Making up the cards, I inked the card bases around the edges heavily with the new Royal Purple and then adhered the card mats, and finally added some gold metallic ribbon to each one. I can add a sentiment if necessary at a later date.
New stash
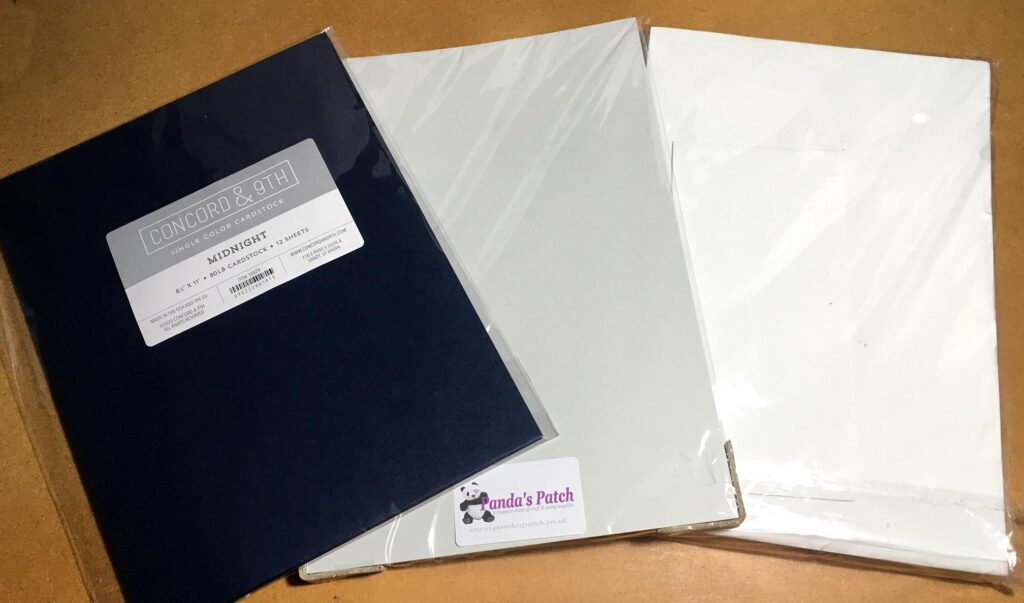
All my new stash apart from one stamp has now arrived.
Navy cardstock, pale grey cardstock, and a pack of white fun foam.
I have cut an 8 x 8 inch piece of the foam to fit in my stamping platform, to replace the small green piece. I have found that having a foam mat in the stamping platform definitely improves the quality of my stamped images. If I wish, I can put the sticky mat on top of the foam, either sticky or non-sticky side up, and make use of the grid on it.
Now for the fun stuff!
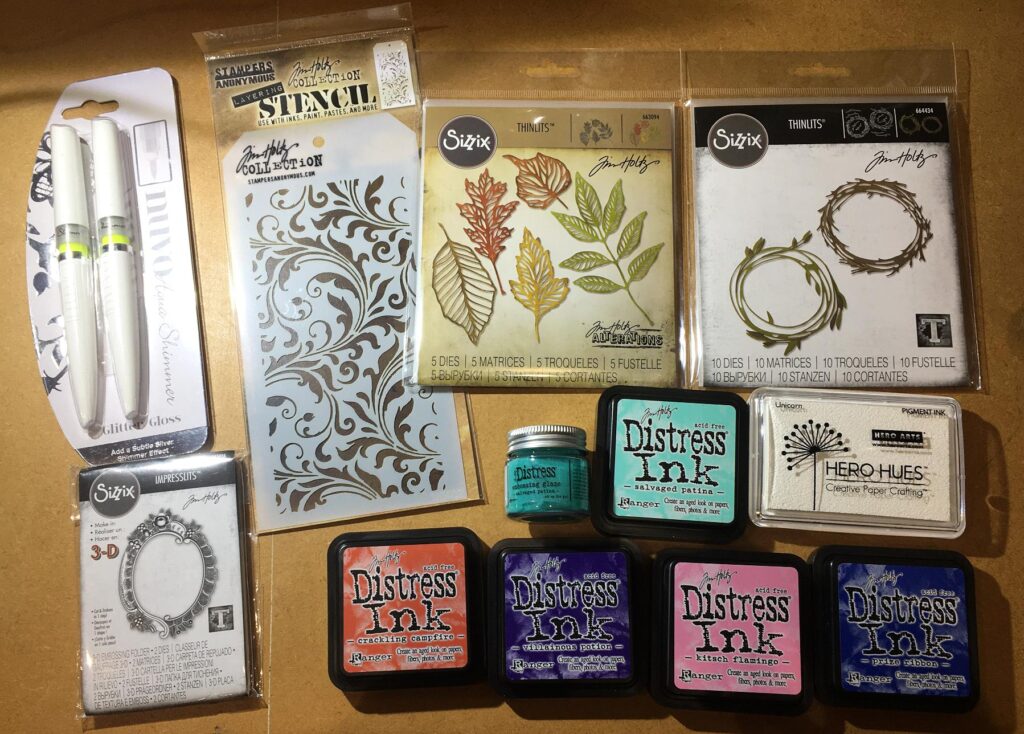
The pens on the left are aqua shimmer pens to add a bit of glittery shimmer to my projects. On the right is a white pigment stamp pad (the one recommended by Jennifer McGuire), and everything else is Tim Holtz. Plenty to play with here!
I recently showed you the new die set I got from the USA:
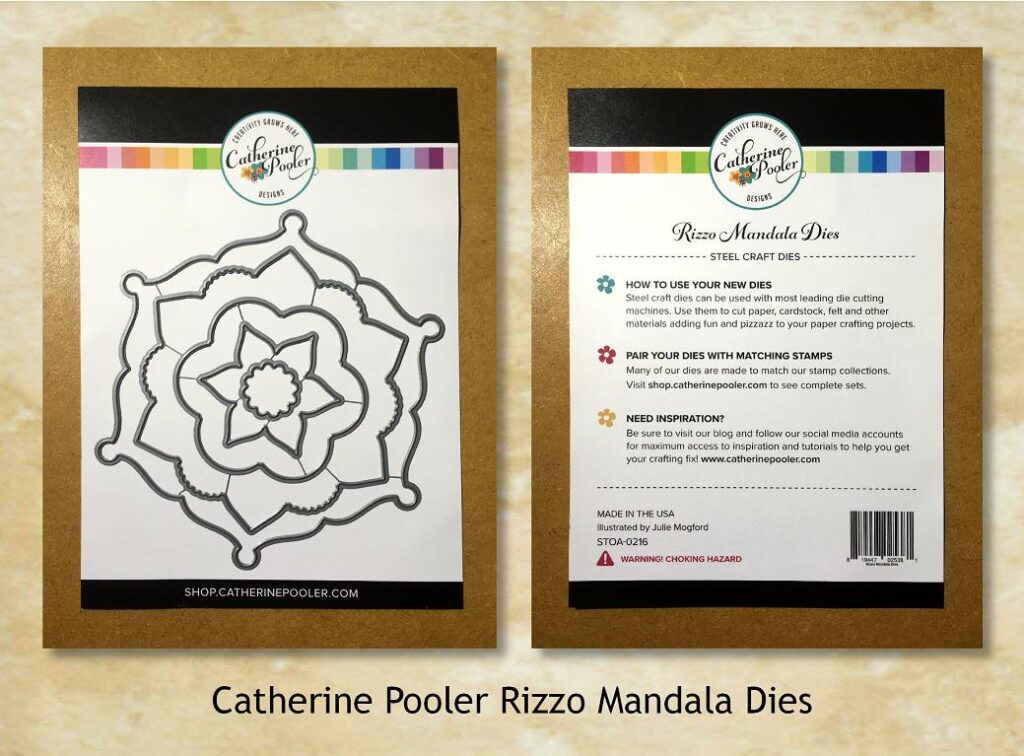
and mentioned that the co-ordinating stamp was out of stock. I had an email the other day informing me that it was now back in stock, so I have ordered it, and hope it will come in the coming week. Working together, this co-ordinating stamp and die set produces fabulous results and I can’t wait to try it.
In the meantime, I have cut a piece of chipboard with the dies (without separating them) in order to use the pieces as masks when the stamp arrives. I ruled a line down through all the pieces in order to line them up correctly. I find that seemingly absolutely symmetrical dies and shapes don’t always fit in every orientation and you need to turn them till you find the exact match.
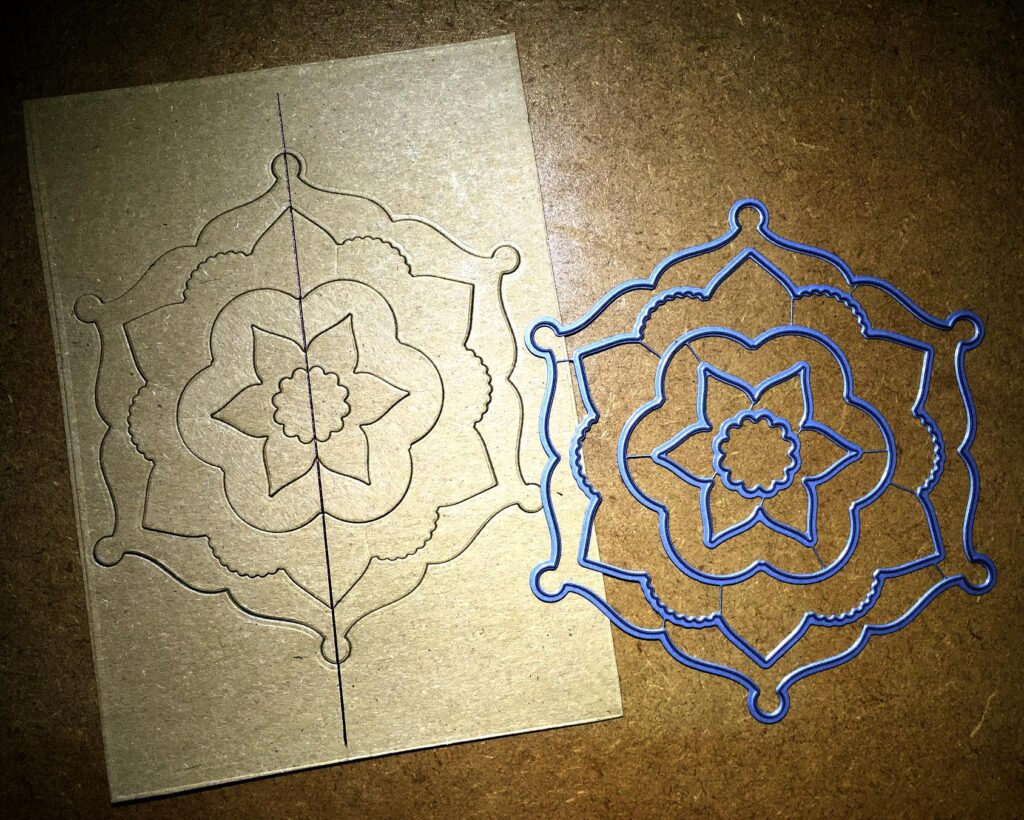
I have wrapped this set of masks in some Press ‘n Seal and put it in the Avery Elle Pouch with the dies.
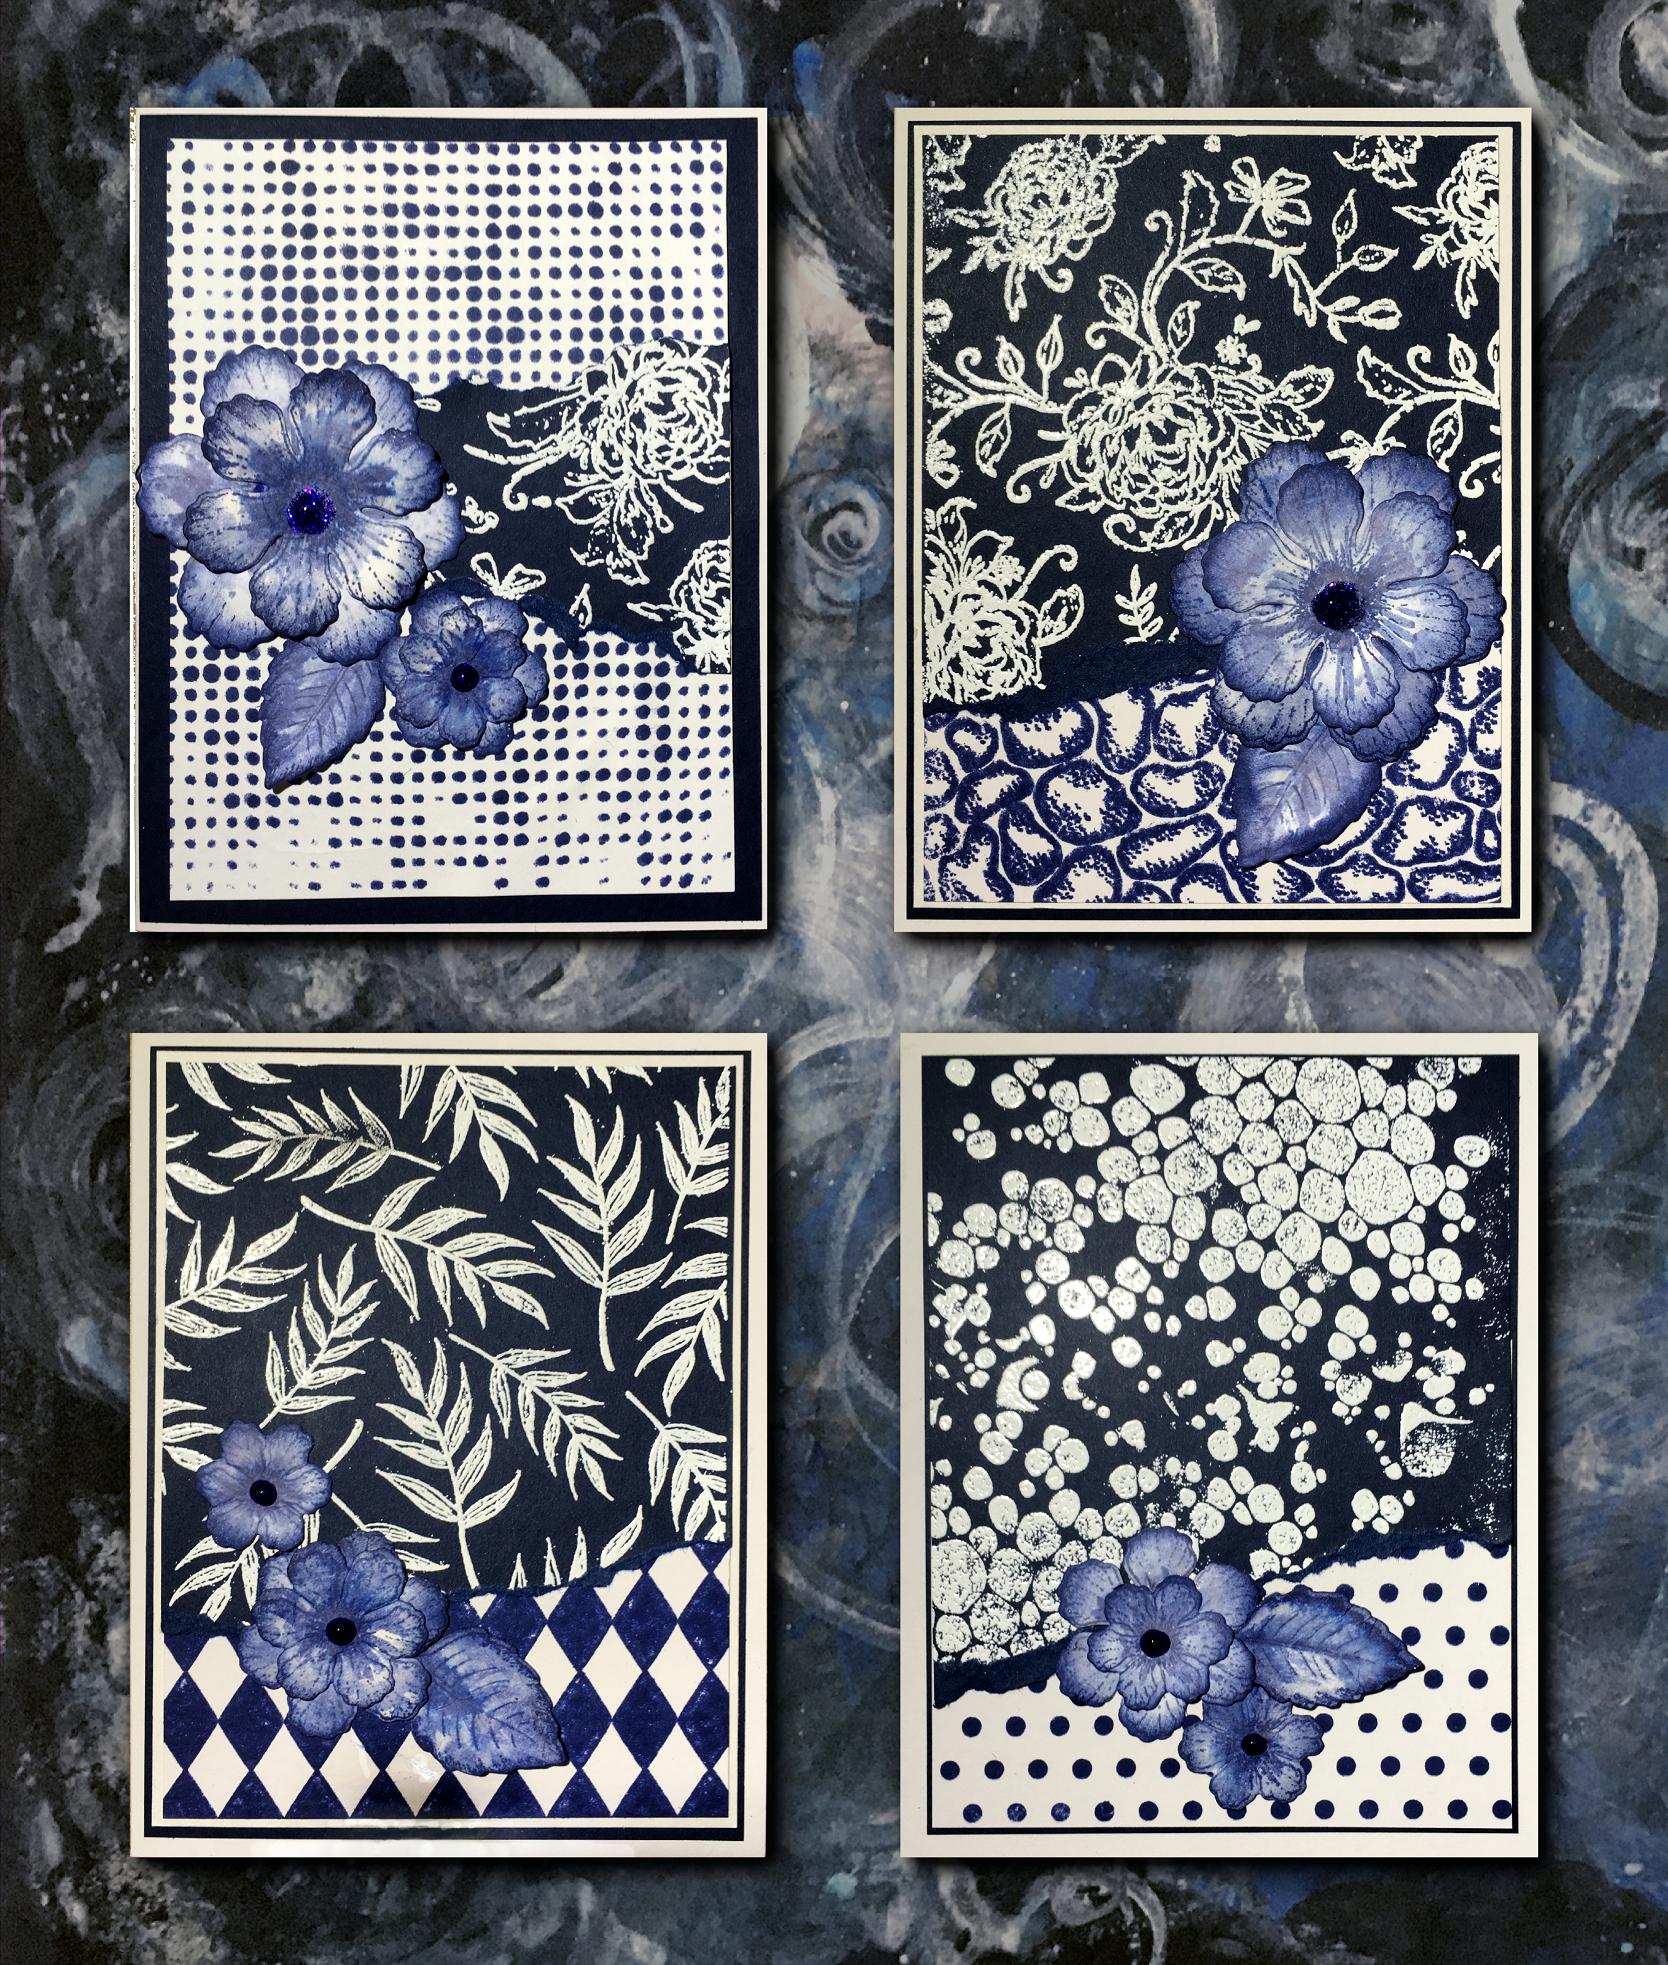
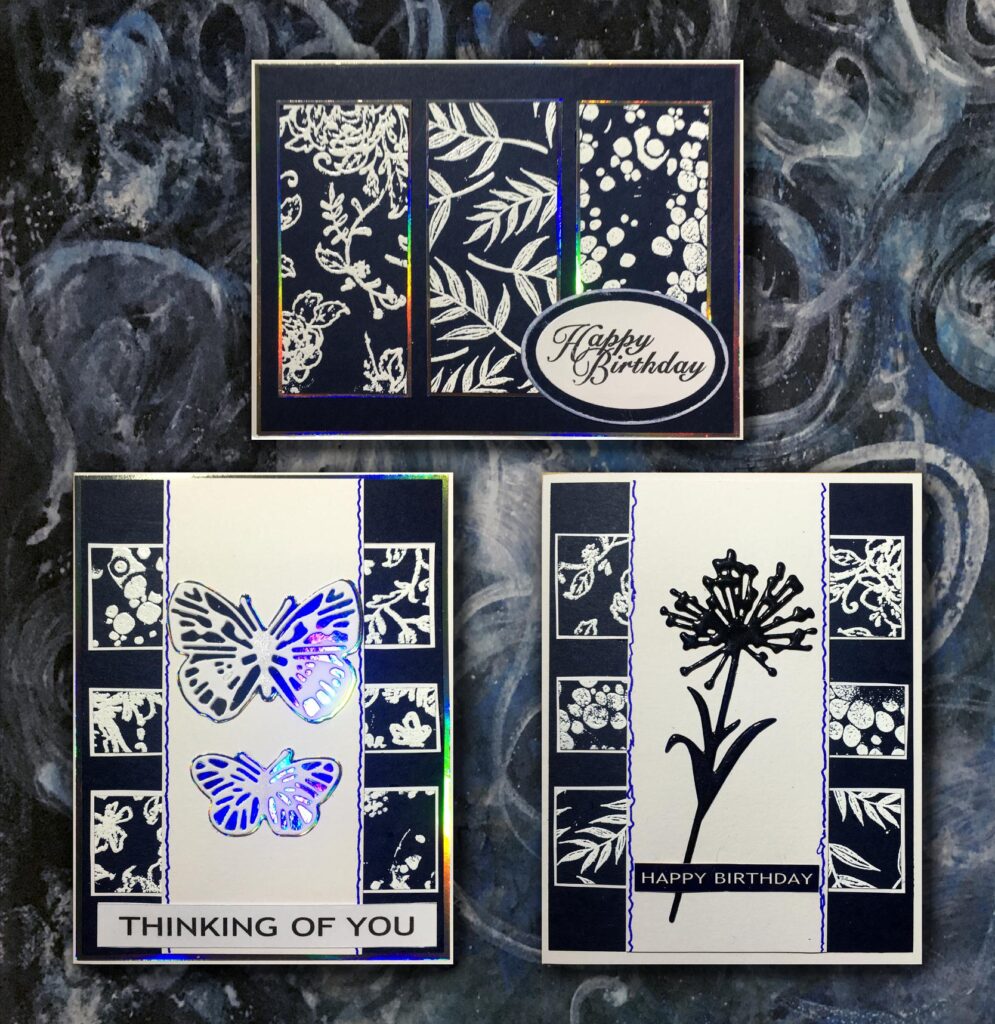
Monochrome Cards in Navy and White
I found a lovely video on YouTube recently where someone was demonstrating how to use a pack of Stampin’ Up 6 x 6 papers with a navy and white theme. With my newly acquired navy card I thought I’d have a go, creating my own background papers using background stamps, stencils and white heat embossing in three designs. Fortunately the 6 x 6 pieces get cut down because most of my background stamps aren’t big enough to cover this size in one go, and there were some rather messy bits of embossing around the edges. If I do this again, I shan’t bother to work with the initial 6 x 6 format but simply cut and decorate the individual pieces. It’s a really good way to use up your scraps.
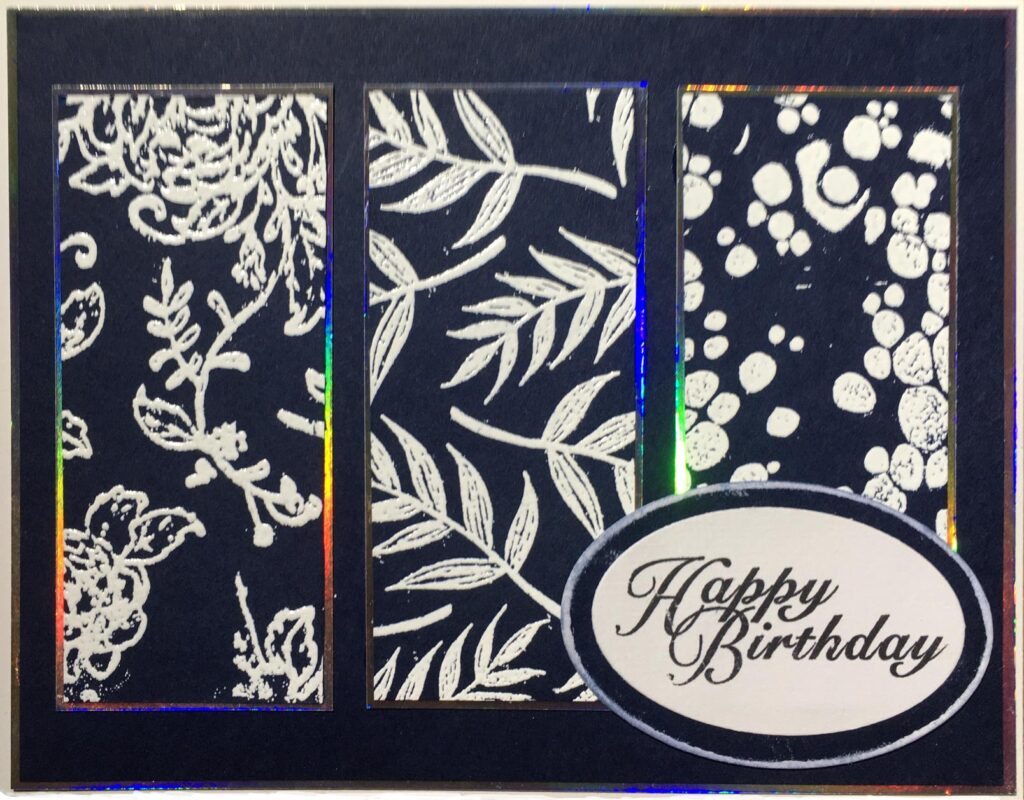
The first one I made was utilising some of the smaller pieces resulting from the cutting template she showed. Three small panels on a 4 1/4 x 5 1/2 in tent-fold card, each with a different white background heat embossed design, and matted throughout with a 1/16 in layer of holographic card, which I thought came out pretty stylish! As always, the holographic card is horrible to photograph – in real life it doesn’t show these garish colours, but is much more subtle and silver.
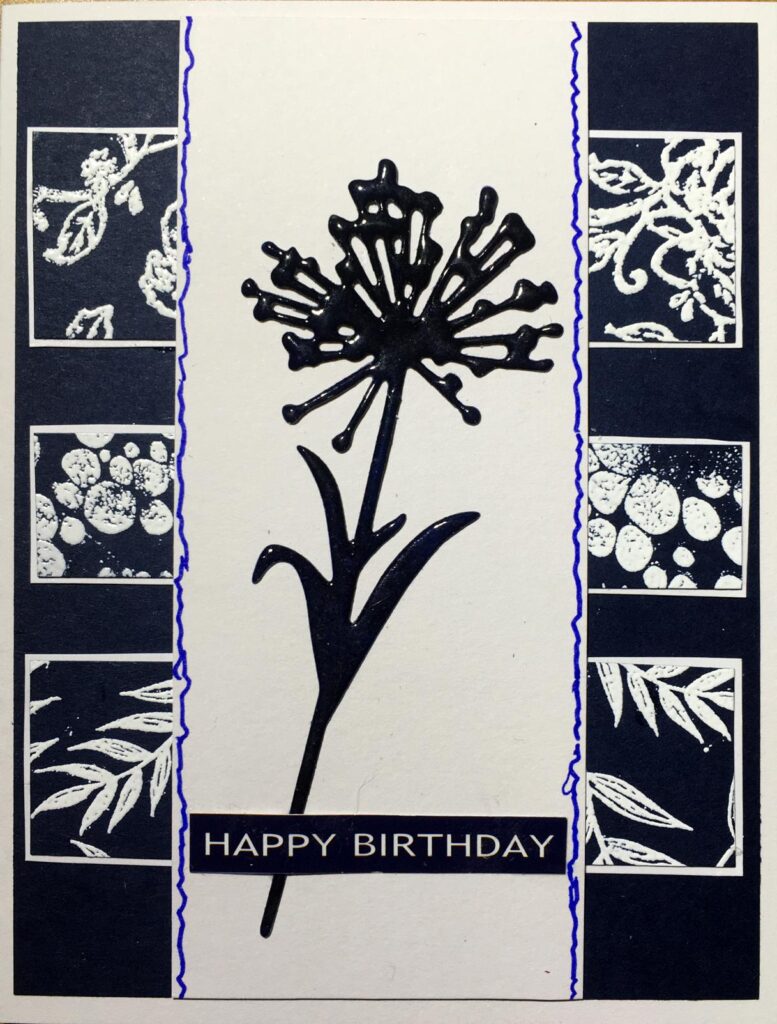
Most of the cards were made by tearing the larger pieces across diagonally, and mixing and matching the pieces. I made four floral ones, and two butterfly ones.
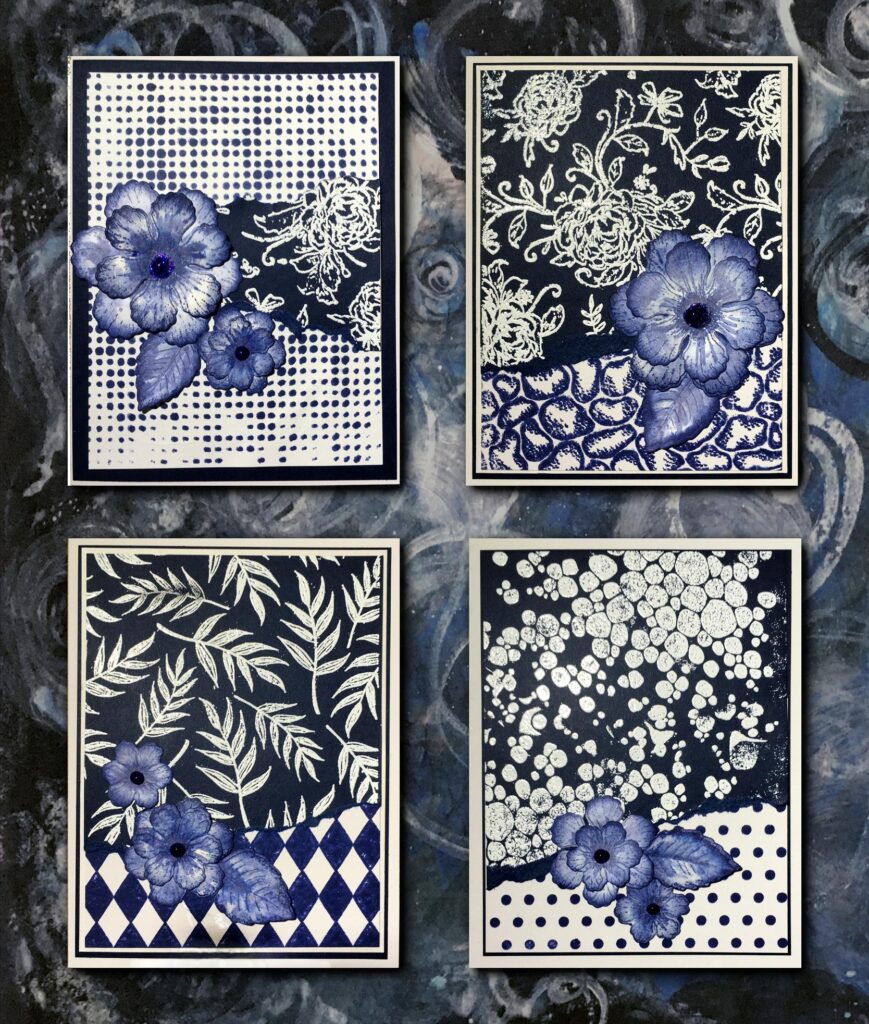
The flowers are from the Heartfelt Creations Botanical Wings dies and the co-ordinating Botanical Rose stamp set. I coloured them with Chipped Sapphire Distress Ink and hand-embossed them. The centres are dark blue Stickles glitter glue with a dome of Glossy Accents over the top. I don’t have any Nuvo drops and this is a good compromise. Stickles dry flat, but Glossy Accents give them the dimension I like.
The stencils and background stamps are from a variety of sources. I used white embossing powder, and Chipped Sapphire Distress Ink for stamping and stencilling on white card. I used a variety of matting and layering, and in some cases used some holographic card.
Here are the butterfly cards.
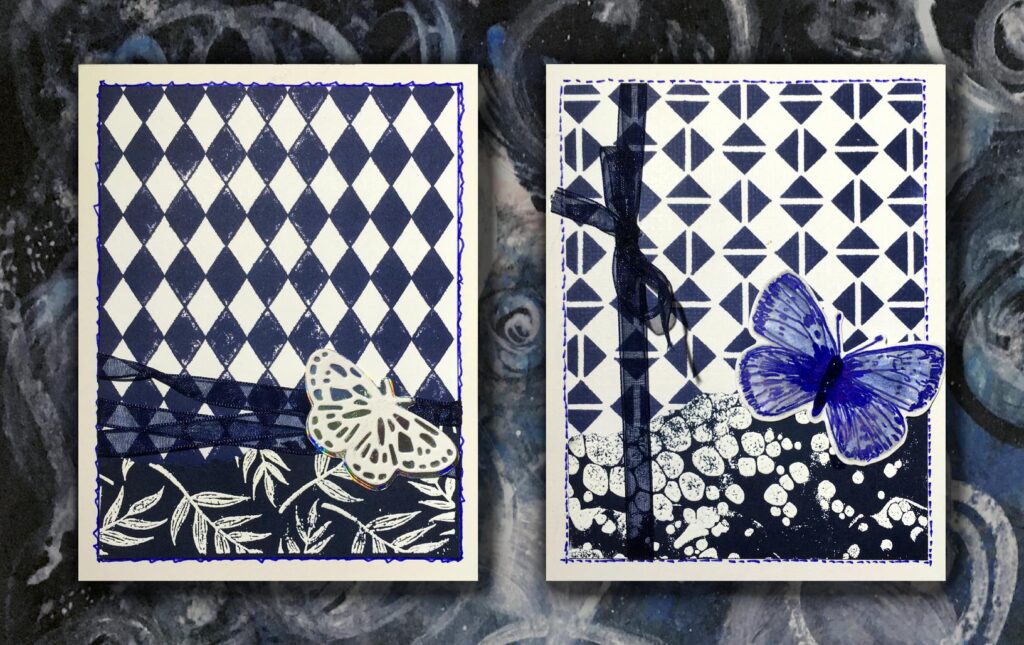
The butterflies were from the stamp and die set I got recently, and I added some navy organza ribbon to these cards.
The remaining cards were the first one I showed at the top, and two more using tiny scraps left over from cutting the 6 x 6 template. These little rectangles go underneath the edge of the front panel and do not extend the whole way across.
Individual photos of the cards.
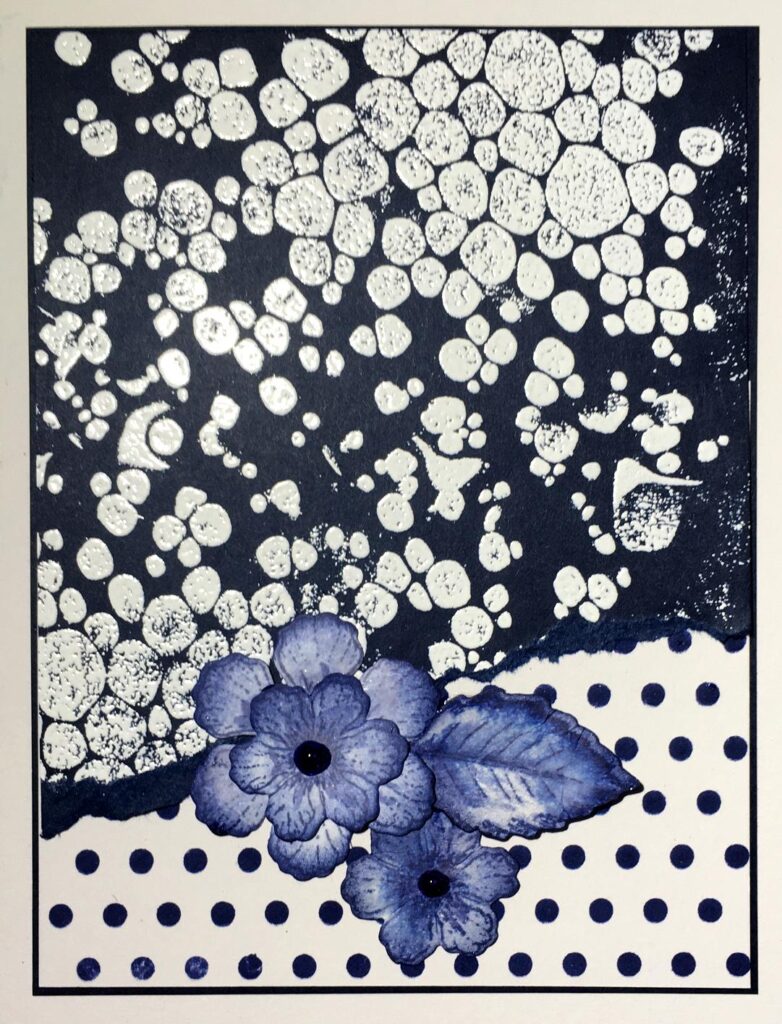
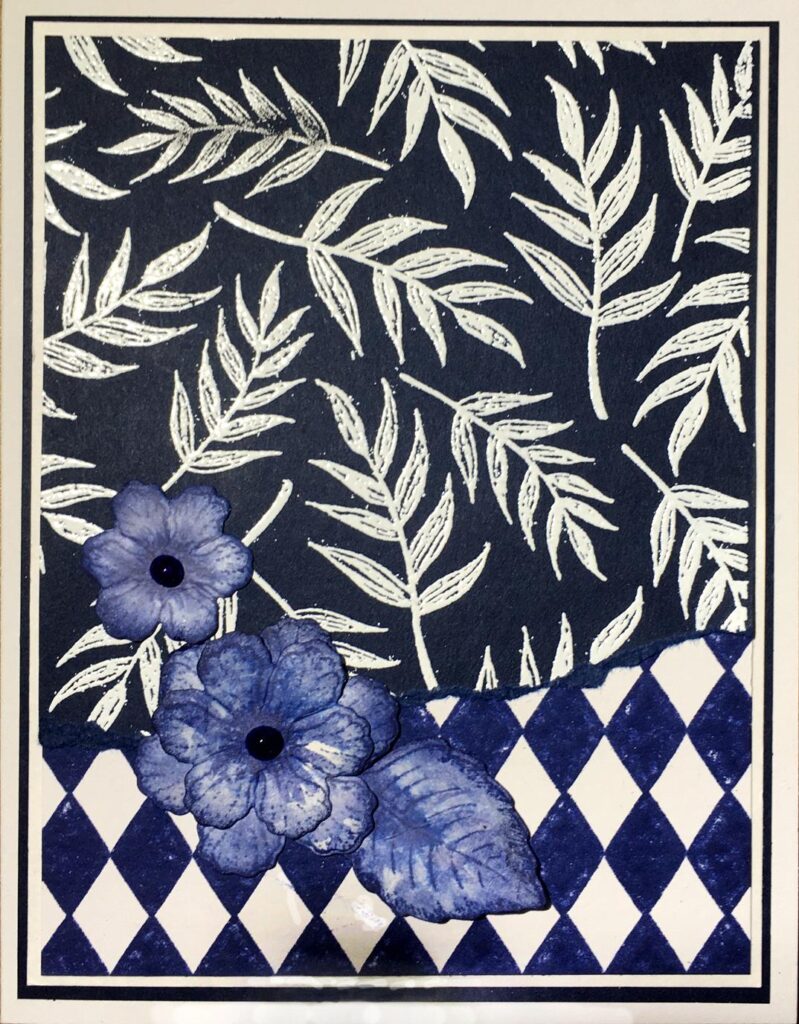

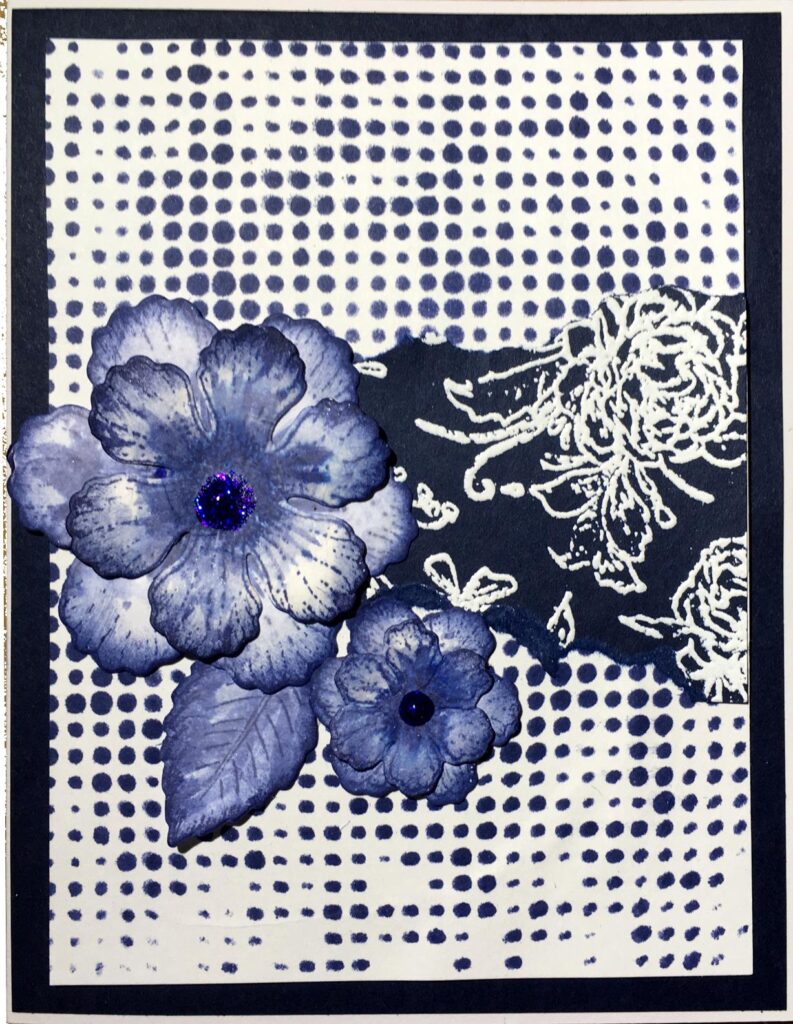
I particularly like this last one, with ripping on both sides of the smaller piece, which is placed across the centre of the card. The background is an old Tim Holtz stencil I’ve had for years. It’s got a damaged bit in the middle which creates a larger blob of colour, but I was able to cover this up with the topper.
Faux stitching added onto this one with a fine liner marker. The butterfly is coloured with Chipped Sapphire Distress Ink and the same fine liner, and a Sharpie in the centre.

Again, fine liner around the edges. The butterfly is matted onto holographic card, and I twisted three pieces of organza ribbon for added texture.
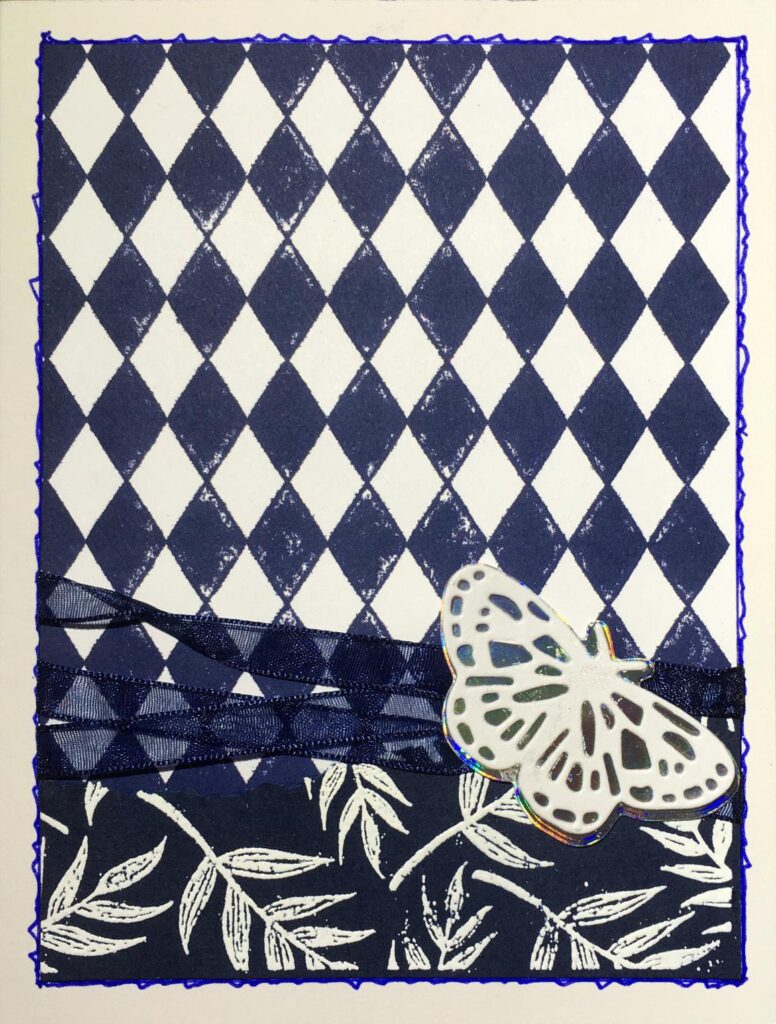
Holographic card details, and fine liner additions, with a simple sentiment strip printed on the computer. The bodies of the butterflies are embellished with some of my new aqua shimmer pen but it doesn’t show up on the photo unfortunately.
![]()
The floral focal point is a white die cut inked with Chipped Sapphire Distress Ink direct to paper, and then triple heat-embossed with clear embossing powder. The sentiment strip is one of a series printed on the computer using glossy photo paper. More fine liner detailing.
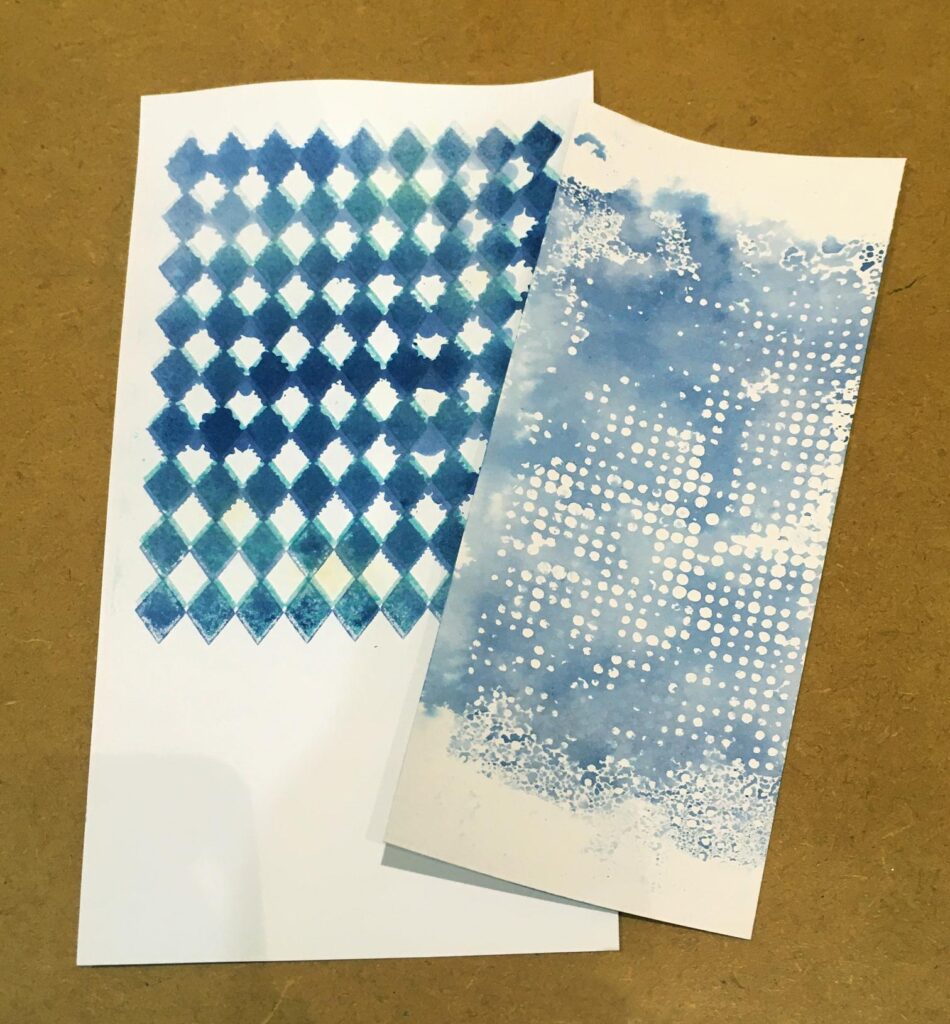
I spritzed one of the stencils and the diamond background stamp with water and blotted off the excess ink onto scraps of card – it seemed a shame to waste all that gorgeous ink, and I produced the potential for some more backgrounds. I stamped the diamond one with embossing ink and heat-embossed it with my new Salvaged Patina Embossing Glaze.
On Sunday evening I got my stamping platform out and set up the personalised stamping rig, and stamped them all on the back with the “Handmade by…” stamp in Chipped Sapphire Distress Ink. I also did the two latest patchwork ones, stamping in purple for those.
I have decided that for me, cards are the ideal vehicle for trying different techniques, and mixing and matching materials, techniques and ideas. I know a lot of people use tags for this but cards are ultimately more useful because of being able to personalise them for sending for special occasions etc. I may get into tags as well one day, who knows.
Kitties
Colder weather = cuddling up!
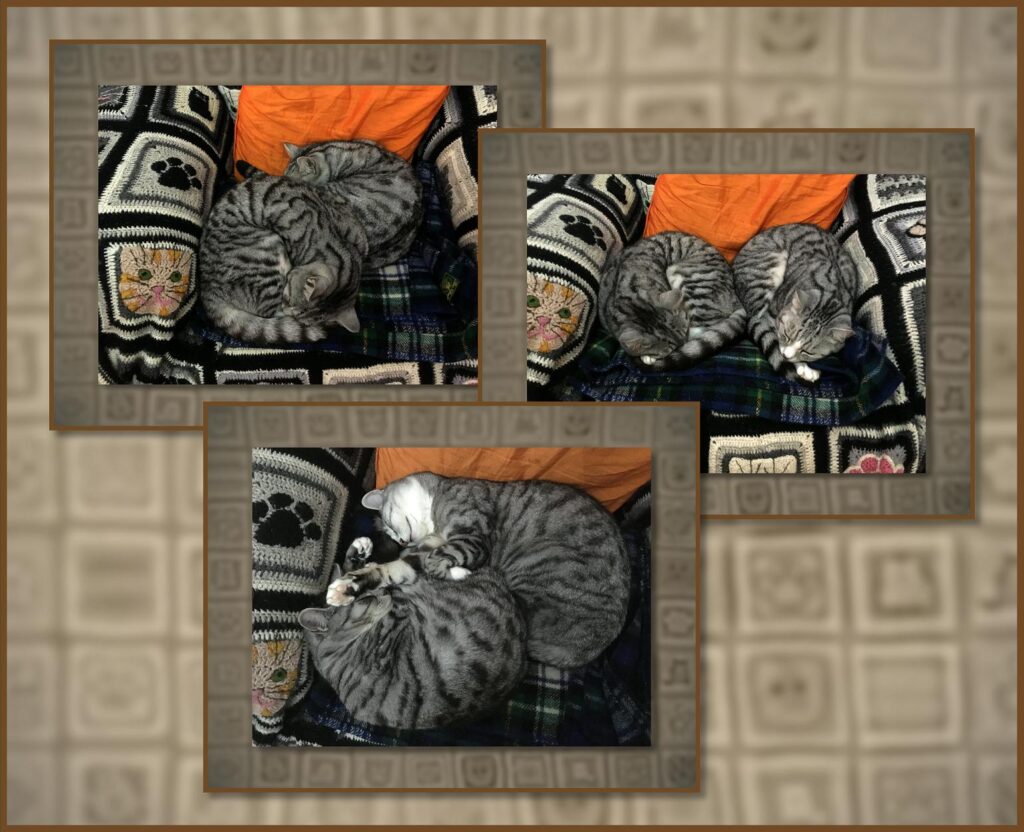
In the third photo, Ruby has got her paws all over Lily, covering her face. Fortunately once Lily is asleep she’s out for the count and probably wouldn’t notice anyway. (I had some fun with this montage – I decided to create a background by manipulating a photo I took of the completed Kitty Throw.)
Health update
My hubby – not me this time! He had his endoscopy but they couldn’t get far enough in to make a proper examination so he’s got to have a colonoscopy before the end of the month. I think this is what they should have done in the first place but I suppose they know best… The prep is awful as anyone who has been though this will know – although with the more recent drug Moviprep it doesn’t take as long as previously – I remember being confined to the bedroom with the en-suite bathroom within easy reach for two days! Moviprep always makes me think of getting ready to go to the cinema. Shame it’s not so entertaining.
As far as I am concerned, nothing new to report. I’ve done absolutely fine and continue to do well. I’ve had a couple of days of worse fatigue but that’s because I’ve been so busy lately. On Monday I had a good day’s rest and didn’t push myself at all. No studio time, just watching TV and picking up my Persian Tiles throw crochet again after a long break. Lovely.
Those hexagon patchwork backgrounds are fab and work so well but it’s the mad crazy triangles that I really love – using the glittery stuff was inspired and the purple edging really brings it together. But I love the navy cards just as much, it’s very elegant and unusual too!
Hugs LLJ 5 xxx
Superb cards! Love all the differences you have achieved.
Sending a hug to hubby – not nice!
Glad you’re feeling ok, I think a project like these cards helps to take our minds off things.
Have a good week
Christine #19
Hope the colonoscopy goes well, I’ve had more than my share of those and don’t want any more as the last time I had a student and boy did he hurt me. They do them much less cruelly in Oz according to Shaz.
Love the kittie photos, pity Lynne(crafts) two are not as friendly as yours to one another.
I have that TH stencil – and it is one of my favourites, I use bits of it, and very lightly coloured bits in lots of my work. Have fun – great purchases.
My, you have been busy, what a lot of cards. The navy and white ones are my favourites, some gorgeous designs there – I love how you used the large paper up.
Hugs, Neet 12 xx
What a cracking array of cards! All of them so lovely and your detailed share of where you got the inspiration and how they came about is always so helpful. Lovely, lovely LOVELY.
Moviprep! LOL! Well not for him but the name is silly, as are so many drug names. It would only be worse if it was called something like…Poopsaway 😀 Sorry you have been tired. I threw my back out yesterday and the whole desk visit thing is about all I can do – sitting here pressing my poor aching back to the structured support cushion with the lumbar curve helps about as much as anything (other than Neurofen+ ) so here I sit, at least for a bit longer…
Rest up and crochet away….
Happy WOYWW
Mary Anne (1)
Your journal page is lovely, Mary Anne – love the colours, and your postage stamps are a great idea. Thank you for your visit and your comment about Moviprep/Poopsaway really mde me laugh! I think your name is much better! I’m very sorry to hear about your back, and I hope it is better soon – so limiting not being able to move without pain. Those lumbar support pillows are very good though. I’m feeling tired again today but had a busy day yesterday with my Tesco delivery. I’m so glad you like all my cards, and thank you for such a lovely comment about them. I like to give full details of sources of inspiration and what I did, as much for my own benefit as for anyone else’s, as I often want to look back and remind myself what I did.
Happy WOYWW,
Shoshi #18
Oh my what an amazing lot of craft work. Love the blue monochrome cards and how the patchwork with gilding flakes worked out. Must check out the new Tim Holtz stuff too.
Nice to be back at my desk after the trauma of hand surgery, not completely fixed as my wrist is jolly sore and my thumb isn’t moving fully yet, could be a few more months but I can do most things again just need to be jolly careful. BJ#15
Wow Shoshi – what a stunning collection of cards – as you probably noticed I am a huge fan of blue and white so those are right up my street I also love the hexagonal ones, especially the way you’ve added the gilding flakes – really spectacular and eye catching.
Hope all goes well with your hubby’s procedure, how frustrating that the first test wasn’t enough.
Love the kitties – they look like they are synchronised sleeping – love the patterns and shapes they are making with their bodies – it almost looks planned!!
Hope you have a lovely week
Diana xx #9
Leaving a comment and hoping it gets through as none of my comments seem to be published since mid September – weird! Love the patchwork cards, especially the triangles. I don’t care much for that Hero Arts white pigment pad, I know Jennifer M recommends it but I found it to be – not great. Happy WOYWW! Elle #21 this week
Some fab cards there Shoshi, love the ‘gutters’ filled with the gilding flakes..I think it was Shari at Hero Arts who showed me that technique way back when I was a demonstrator. I keep my flakes in a zip lock bag that’s big enough to get the card inside it, or I’d be gilded from head to foot!
Hi Shoshi! What lovely cards! I really like the gold on the quilt cards, much better than the white, and the colours make them very elegant! I also really like the blue cards you did, my favourite is the one with the flower in the middle. I love the torn paper look of the flower and butterfly cards as well. You really have been a busy little bee! The kitty pics are so cute, makes me warm just looking at them. Inky and Mittsy have not discovered that sleeping side by side would be warmer, and probably never will! At the moment they are outside in this freezing weather, quite content on their separate outdoor chairs! Best of luck to hubby. They probably kept the colonoscopy aas a last resort, hoping not to have to do one. But it’s a good thing he has you to help him through it, as you have been there before. Have a lovely week, hugs and kitty kisses to Lily and Ruby! Lindart #23
what a stunning array of cards – I love the triangles (great use of “scraps”) and the blue and white ones are just gorgeous. Hope hubby’s colonoscopy goes ok. Happy WOYWW Helen #3
A brilliant collection of cards and loving the techniques too. Nice kitty pics. Wishing you a very happy and creative woyww, Angela x17x
Oh what beautiful cards and such a wide variety. Love those blue/holographic ones. I think of your new stash the white shimmer pens look really fun. Haven’t seen those yet. Best Wishes to your hubby on his medical issues and you too. Have a great week.
Love, love , love all the latest cards Shoshi, especially the triangular offcuts with the gilding flakes. The monochrome navy blues are gorgeous too. Hope your hubby’s colonoscopy goes well and isn’t too onerous for him with the new prepping techniques. Meow to the kitties. Thanks for the visit. Stay safe and Happy WOYWW. Sarah #4
I’m here! I think I keep commenting on the wrong post! (and the fact I’m still having trouble getting in to Julia’s. I love your cards and a great way to use up your scraps! And I love your sizzix dies too! Plus, yes, I do have those papers from last week, so I think I should use threm now! Have a great week! Stay safe! Happy WOYWW!? ((Lyn)) #24 last, as I didn’t get in til gone midnight!
Fabulous assortment of beautiful cards today. Those flakes take on a life of there own don’t they. Your poor husband, those tests are not nice, but then neither is breast surgery, so love to both of you and hoping for health improvements all round. Hugs to the kitties. Angela #14
A beautiful array of cards this week. Both the glittery triangles and the mono cards are very effective.
I hope your husband is ok
Take care
Lynnecrafts 13
What a stunning array of cards… all so good and all so different. Loving the glittery patchwork ones – the colours are stunning on them. Hope Hubbies colonoscopy goes well – not pleasant for him. Give the kitties a stroke for me – they look so cute cuddled up together. Happy Belated WOYWW. Take care and stay safe. With love & God bless, Caro xxx (#16)
I’m just popping in to check last week’s photos – couldn’t help after seeing the thumbnail! All of these look gorgeous! The coloured ones and the monochrome as well! Two extremes on the colour spectrum but both have their merits! And the kitties look adorable curled up in a tight ball (well, each in their own) LOL!