GIFT SET FROM FUSED CEREAL BOX LINERS
Cereal box liners seem to be the thing in the mixed media community at the moment. You can fuse them with heat, and if you want, you can sandwich stuff between the layers and it is trapped there. Napkins are a favourite.
A gift for our neighbour
Our next-door-neighbour is a wonderful and very generous friend. She is a very keen gardener and produces far more than she can eat, so she is always coming over with gorgeous home-grown veg – tomatoes, courgettes, carrots… and raspberries when in season. We do not grow much in the way of edible produce but we have an extremely productive apple tree (this year is a bumper crop) and she always appreciates as many apples as we can give her. It is lovely to be able to reciprocate with gifts for this lovely friend.
She also saves her cereal boxes and liners for me as she knows they are useful in the studio. I thought it was time I made her a little gift from these.

An evening’s work
To fuse napkins with cereal box liners, you first have to separate the napkin’s two or three layers. You only need the top, printed layer, but the middle layer (usually a ghost print) and the bottom layer should not be thrown away as they can be used in different ways. You sandwich the printed layer between two layers of cereal box liner and iron them with a hot iron between sheets of baking parchment. The cereal box liner will crinkle up a bit. I’m not sure if it’s because my small craft iron isn’t as hot as a normal domestic iron, but I had to do a lot of ironing before I could get it to fuse well.
I folded the result into three and cut the pointed flap. I machine stitched along the front opening and then around the sides and flap to form the pouch.
This pouch used 1 1/2 napkins so I had some offcuts. From these I made a mini-purse and a little notebook.
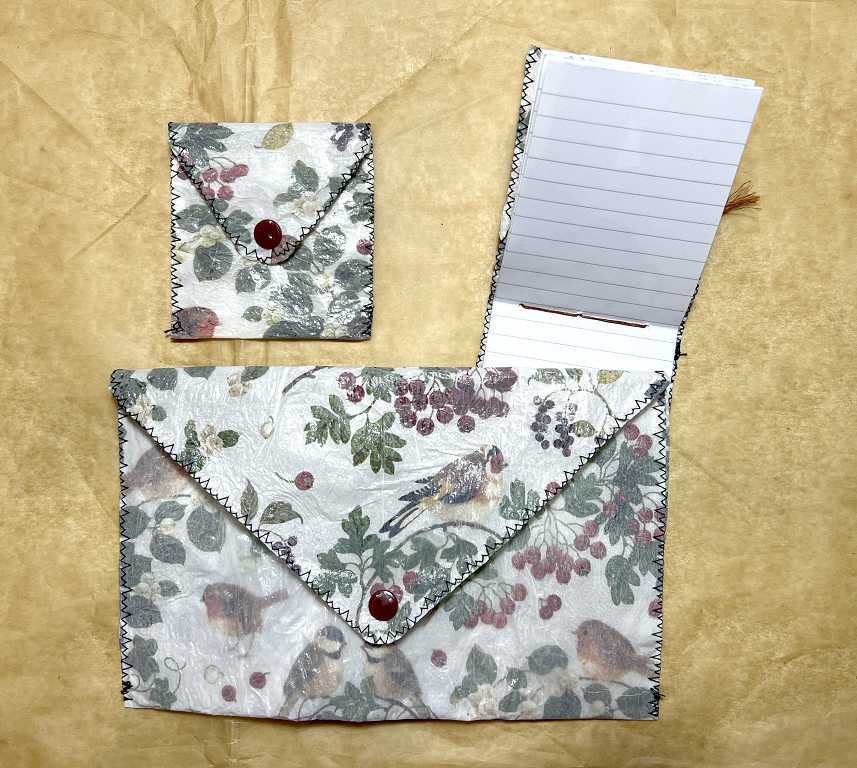
The notebook contained lined paper taken from a larger pad. I stitched all around a long rectangle of fused cereal box liner and folded it in the centre, binding the sheets with a three-hole pamphlet stitch, using waxed thread. I began on the outside so that the ends would be there, and I attached several beads to them for decoration.
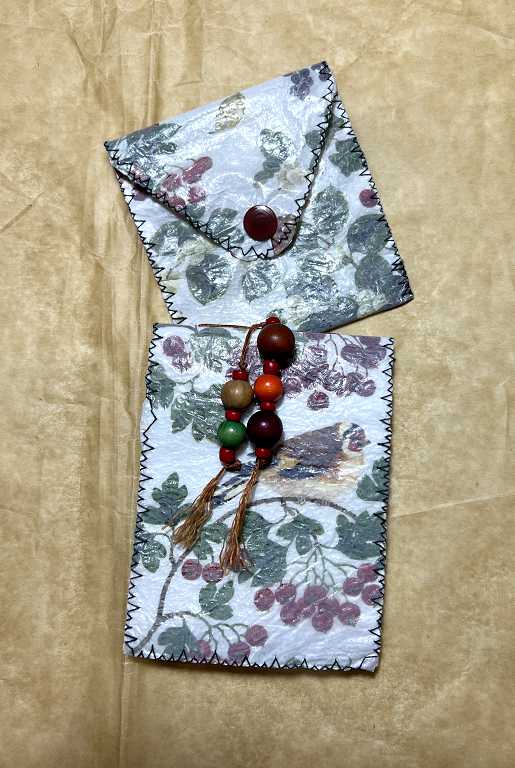
The pouch and mini-purse both have plastic snap button closures. They are a bit stiff to work at the moment, but with use they should get easier.
I have also designed a card for her, which will go in the pouch with the purse and notebook. I shall be posting about that separately. It’s a fun digital montage celebrating one of her more eccentrically shaped courgettes!