ONLINE ART COURSE – COMPLETION OF THE CHARCOAL MODULE
At last! I’ve finished this module of the course. I have to say I have not enjoyed working with charcoal at all. It is very messy and imprecise, and smudges terribly, and often it looks a bit dirty. When I had completed the rhino drawing, which was the project for week 3 of the module, I was tempted not to go ahead and work the final project, which was the self-directed challenge. However, I believe that when one signs up for something, one should press ahead regardless of one’s personal feelings about it, as it would all be good practice, especially in observation if nothing else. So I went ahead, and I am now very glad that I did, because I have a real sense of achievement that I would not have had otherwise.
Warm up
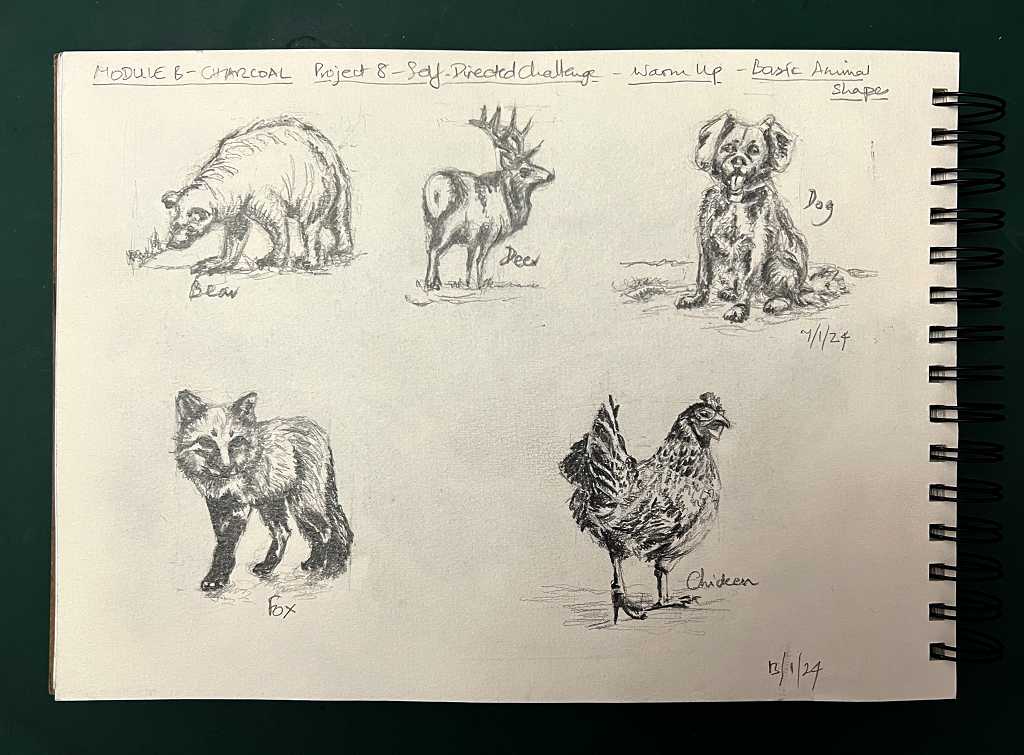
The first part of the challenge was the warm up, which was a series of basic animal shapes, as we did for the rhino project. This time there was quite a large selection of different animal photographs to choose from, and Phil, the teacher, recommended that we chose three, which I did, but after completing the main drawing, I added a couple more, to fill the page. They were all delightful creatures. I did not work these in charcoal, as the aim was not to practise charcoal drawing skills, but as an exercise in observation, to get the animals’ proportions and measurements correct. I therefore used graphite pencils, first HB, then adding the dark values with 8B and the medium ones with 3B.
The first one, the bear, was quite sketchily drawn, as directed by Phil. The idea was just to practise the basic shapes. However, as I progressed, I felt the need to add some shading, and the drawings got progressively more detailed.
The main drawing
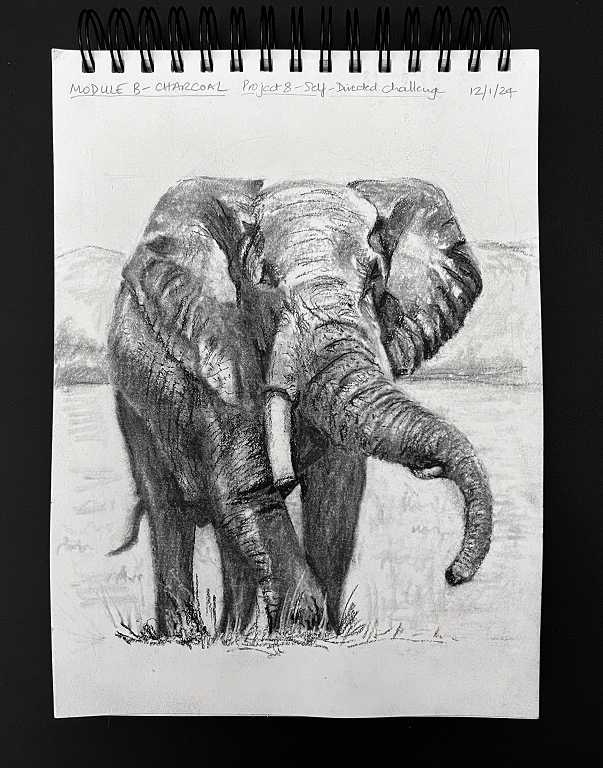
This was of an elephant, in much the same pose as the rhino – coming out of the picture towards the viewer. It was also similar in that the skin of the animal had an interesting texture. The two drawings make a nice pair.

I had a lot of difficulty in getting the proportions right to start with – my usual problem, despite resorting to the proportional dividers to help. I got there in the end, but this was by far the most difficult part of the project.
Once I had got my basic shapes and outlines in place, it was quite a presentable sketch of an elephant. When I started adding the charcoal, it rapidly developed into a mess and I was ready to despair at that point! However, I persevered, and as I worked on the charcoal with the blending stump, I was able to pull it back to some semblance of reality!
The next stage of the drawing, once the basic values had been blocked in, was to go in with the kneaded eraser and blending stump, to blend out any harsh lines and to remove charcoal where necessary. I also added more charcoal here and there, and refined the shading throughout. It was definitely starting to look a lot better by this stage.
The final stage was to add the fine detailing with the charcoal pencil, and it was interesting working on the wrinkles and fine lines of the elephant’s skin. I continued to pick out the highlights with the kneaded eraser, and with my electric eraser in places. I got to the stage when I couldn’t stop fiddling, and thought I really should bring this to a close, as it was quite presentable enough! The final step was to add a little background detail to give my elephant a place in the world, and then it was done.
Since this final drawing in the module was of an elephant, I thought it would be interesting to compare it with the drawing I did when I first followed Phil’s introductory free tutorial video, linked from his YouTube ad. I did this drawing on 14th November, almost exactly two months ago.
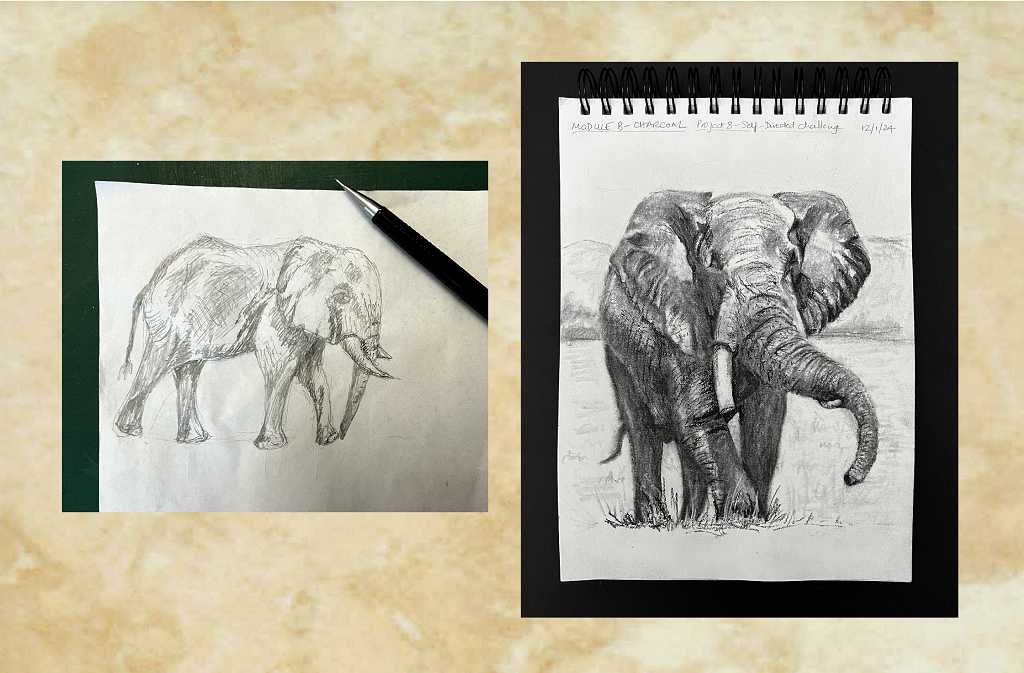
I drew this elephant at the beginning of the video, as instructed, before I knew what I was doing. Phil didn’t really want us to add any shading but I made an attempt at this. The proportions of the drawing weren’t quite correct, and I didn’t follow the method I have subsequently learnt, of beginning with the basic shapes (circles, ovals, rectangles), checking the proportions before adding any detail. I don’t think I made too bad a fist of it, as a compete beginner, but I can now identify all the things that are wrong with it! It’s very amateurish to begin with an outline, and also there isn’t nearly enough variation in the values, to give the image real depth.
I am very grateful to Phil and his wonderful course, for all that he is teaching us. I think I have made great progress in the past two months – it’s good practice to look back on earlier work to keep track of one’s progress – and I look forward to further developments as we move on in the course.
Charcoal AWAAAYYY!
Almost as a symbolic gesture, I removed my tin of willow charoal and the box of charcoal pencils from my art course box, and put them in my spare art supplies box in the studio. Out of sight, out of mind! I cannot tell you how relieved I am to have finished this module! I have achieved everything we set out to do, and I feel a good sense of achievement as a result, and I have continued to learn, and above all, to get plenty of practice working on proportions and measurements and observation. This is all to the good, and on balance, despite not enjoying the process of working with this medium, I am very glad to have done it. But No More, thank you very much! Drawing with a burnt stick is not my idea of fun.
Cleaning my kneaded eraser
My kneaded eraser was black by the time this module was completed. I watched several YouTube videos on how to clean it, and washed it in warm soapy water. It is definitely lighter in colour now, but still a pretty dark grey! Some people said it took several attempts to clean it thoroughly so I may have another go. You can knead the eraser in the water, and as long as you repeatedly blot it off on a cloth, it won’t absorb water into itself and stop working. Apparently these erasers are made of non-vulcanised rubber (not sure what the process of vulcanisation involves, but I know it hardens the latex) and it is very malleable and soft. It is fabulous to use because you can mould it to any shape you want, including quite a fine point, for removing medium from a drawing, using it as a drawing implement in its own right, and not just as a tool for removing mistakes. The great advantage of it is that it removes the medium without leaving any residue to be brushed away, and it does not damage the surface of the paper. If you look after it, a kneaded eraser can last a decade or more. I have tried mine again since its wash, and it seems to be working fine, despite being a darker colour than originally. I shan’t worry about its appearance too much.
Rest week
We have a rest week to complete this month’s module, and I have watched the short video, which doesn’t involve any challenge. As before, we can literally take a rest, or follow some suggestions by Phil to keep our hands in, perhaps reworking one or more of the projects. A couple of other suggestions he made were to experiment with our pens in advance of Module C, which I have already been doing, or to follow his short free course on Composition in Art, which I downloaded at the very start of this course. As recommended by Phil at the time, I did not watch it at that stage, but held it in reserve until he suggested a good time to watch it. He is very wise with his directions, helping us not to get overwhelmed, especially at the beginning.
I shall definitely not be doing any more charcoal drawing during this week, anyway. I intend pursuing some ink drawings, using better paper this time. I will need to start a new sketchbook for this, and I already have a couple of A5 sized ones of the same variety as the A4 one I have been using for the course. If I find the ink bleeds through (which I don’t think it will) I shall prepare the paper first with some Golden Satin Glazing Liquid, and perhaps confine any shading to graphite and coloured pencils rather than watercolour, although I do want to explore the freedom and fluidness of watercolour. I might also make myself another little sketchbook using scrap watercolour paper from my hubby. Some time ago he threw away a whole lot of “failed” paintings, and I rescued them out of the bin because he never thought to work on the back of them, and the paper is good, not to mention expensive! I have already used some of it in mixed media projects. I shall probably also watch the composition video.
I’ve had a busy time recently, so alternatively, and if I get time and have the energy, I may spend a few hours in my much-neglected studio, initially tidying up. As usual when I am not using it regularly, it becomes a dumping ground, and the whole room is a total tip at the moment! I would also like to do a bit more work on my Oriental-Style Album and perhaps complete that project, as it has been hanging around for months. I only have two or three pages left to do before it is finished. It has been a long time since I’ve done any mixed media or working on books and albums, and generally messing about with paper.
I also have hardly touched my embroidery for several weeks. My eyesight is not too good at present, being in the interim period between my two cataract operations, but with the aid of my clip-on magnifying lamp I should be able to manage OK.
Looking ahead to the next module
The next module in the course is Module C: Ink Pens. This is going to be fun. I have always enjoyed working with fineliner marker pens, and staying with monochrome, we shall be adding shading with a black watercolour wash. Having visited several artists working in this medium recently, I am feeling prepared to start the module, and am really looking forward to it. My hubby has provided me with a new watercolour pad – we’ve been recommended to use this as the drawing sketchbook paper will not hold up so well once we start adding the washes.
This is going to be a lot less messy, more precise and intricate, and far more to my taste! I am hoping to learn a lot through this module.
Oh my goodness Shoshi, you’re a born artist, How beautiful are all these sketches? Your tutor must be so pleased. They are absolutely stunning! You have a real gift, and you capture the beauty and character of the species. I love them all so much. Well done. Looks forward to seeing more.