MINI SEWING MACHINE
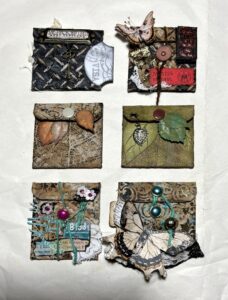
One of my favourite YouTubers is Natasha from Treasure Books. She makes amazing journals with interactive elements, as well as creating her own papers and other creative things. One of her signature techniques is the use of the sewing machine in her paper projects, and this certainly adds an interesting element. I have recently been using this technique a bit myself.
My sewing machine history
For my 21st birthday, my parents gave me a Pfaff sewing machine, and it served me faithfully for forty years, with only two or three visits to the sewing machine repair shop during that time. Almost to the day of its 40th anniversary it broke down, and the repair shop told me that a small part had failed, and they could not find a replacement as the machine was so old. They asked me if I wanted them to scrap it, and I rashly agreed, and went on to regret this decision.
I had to tell my Mum that the machine had come to the end of its life and how sad I was, especially as it was my best 21st birthday present. She immediately offered to buy me a new machine, and to choose whatever I wanted. This was such a generous offer, and I chose a modern electronic Brother machine. This machine is, of course, first class, but it is terribly complicated and I usually have to get the book out to find out how to do things! It has a lot of fancy stitches, some of which are very pretty indeed, and it also has about four different varieties of buttonholes (who needs this?!).
I was browsing on YouTube a little while later and came across a Pfaff for sale, that was identical to my original one. The seller said that it wasn’t working but perhaps could be repaired. It wasn’t too expensive but was still quite a bit to pay if it really wasn’t able to be fixed, and my hubby said go for it. I did so, and the few small problems were easily fixed by the sewing machine repair shop, and the major sewing problem the seller had mentioned was merely the tension not being correctly set.
It was like a dream come true, getting my old machine back! After a number of years’ absence, the first time I threaded it, it was if I’d done it yesterday. I’ve been using the machine since then as my preferred one, although I have been reluctant to get rid of the posh new Brother.
Natasha’s favourite stitch
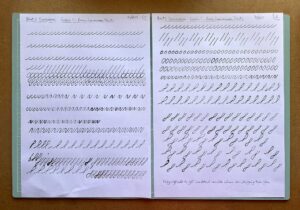
Natasha almost always uses the same very attractive stitch which is a basic zig-zag with a larger stitch placed at regular intervals. Neither of my machines would do this stitch, much to my frustration. The other day, someone asked Natasha what the stitch was, and what sewing machine she used. I think there are a lot of people out there who admire this particular finish to her work and like me, would like to emulate it! She said that she had an Elna, a basic low-budget model. I did an online search, and while there were quite a few budget Elnas, they were certainly more expensive than I’d be prepared to pay for a single stitch (around £300), and I couldn’t find one that had this stitch anyway. Her machine may no longer be available.
Basic mini-machines
Then, on Amazon, I came across a mini-sewing machine by Brother. Everyone was raving about it in the reviews, and definitely putting people off buying cheap Chinese mini-machines which were barely better than toys and would be bound to cause frustration. This machine, though, has a metal chassis and does all the basic functions, and has a three-year warranty
The price? Unbelievable! £89! All the other basic sewing machines I looked at had a starting price of three figures and most were over £300.
Does it have “the Stitch”? YES!
I bought it.
Here’s the latest arrival in my little family of sewing machines:
The arrival of a baby Brother!
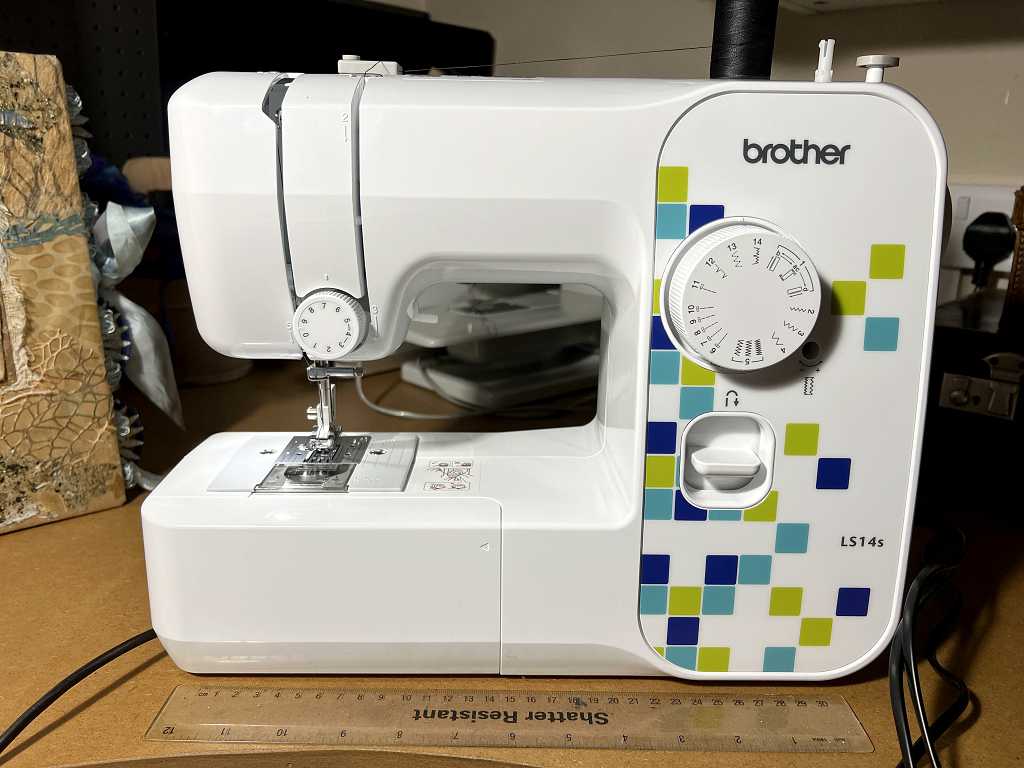
It is the Brother LS14s. I have put a 12-inch ruler in front of it to show just how dinky it is.
It has a selection of different lengths of straight stitch, several varieties of zig-zag, buttonhole stitching, and a few fancy stitches, including the one I am after.
It has a reverse stitch facility for fastening off, upper tension adjustment, and the front panel at the bottom pulls off to enable you to stitch around cylindrical things like sleeves. Bobbin winding and placement, and threading instructions, are printed on the machine itself. It came with a few bobbins (I suspect that my existing Brother bobbins will fit too), some machine needles, a screwdriver and a zipper foot. According to the accompanying leaflet, other accessories such as hemming feet and a walking foot, are also available to purchase separately. It also came with a DVD but I haven’t got round to watching that yet.
The instructions are on a very large sheet folded up. This is not easy to navigate around, and I’d much prefer it in book form, but actually there isn’t that much to learn, especially if one is used to using other sewing machines.
Further pictures
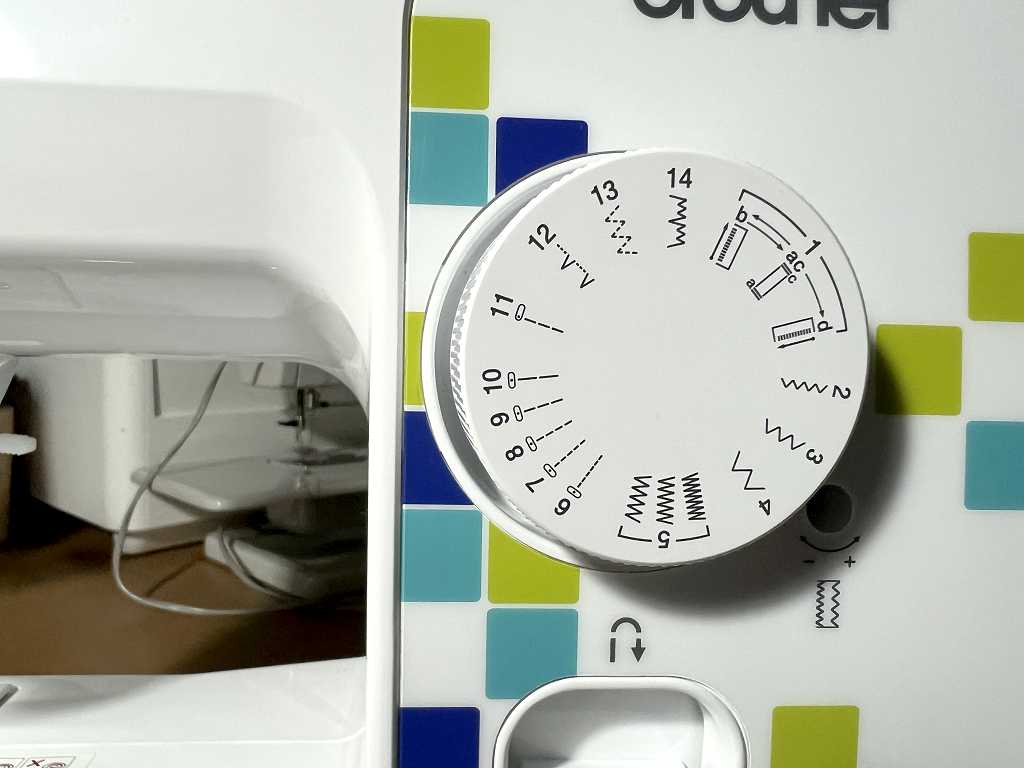
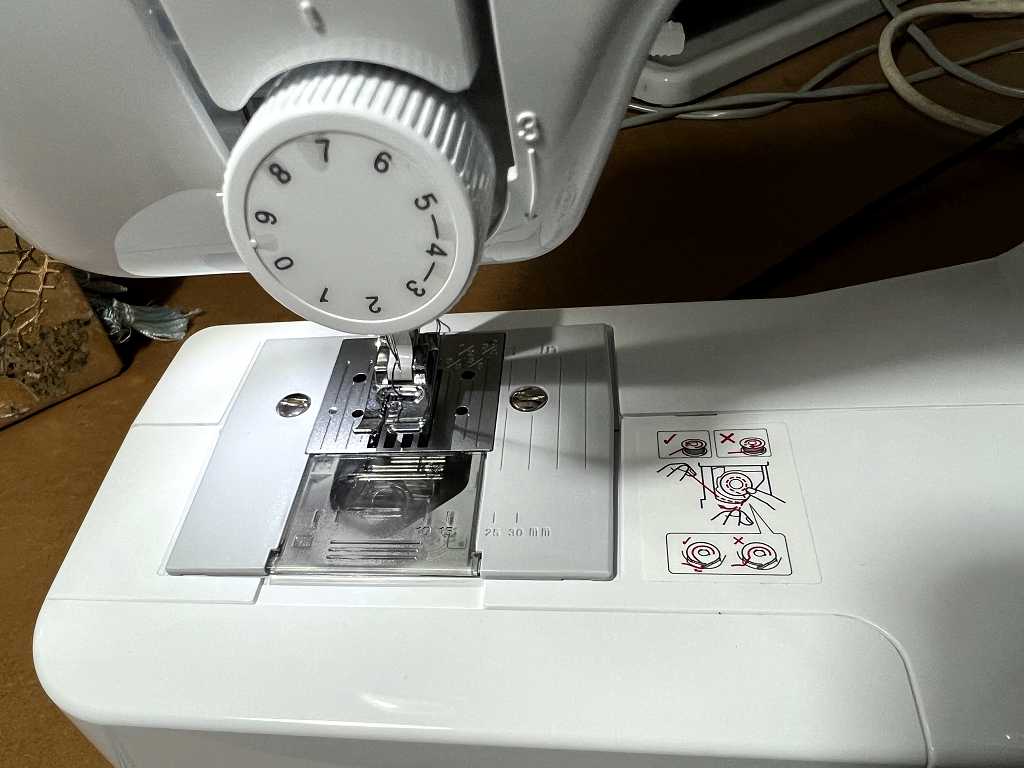
This is the stitch selector dial. The stitch I was so keen to get is No. 14, in this case at the top. The other fancy stitches are numbers 12 and 13, with buttonholes to the right of No. 14. The rest is self-explanatory.
The top of the machine, showing bobbin winding and machine threading instructions.

The top tension dial and the base plate, showing the transparent plastic cover which you remove to insert the bobbin (printed instructions to the right, on the machine itself). On a basic machine like this, there is no automatic needle threading, and this is always a bit of a pain. My big Brother does have this and it’s a great help. However, I should be used to manual threading after 40 years’ experience with my original Pfaff!
Testing the stitches
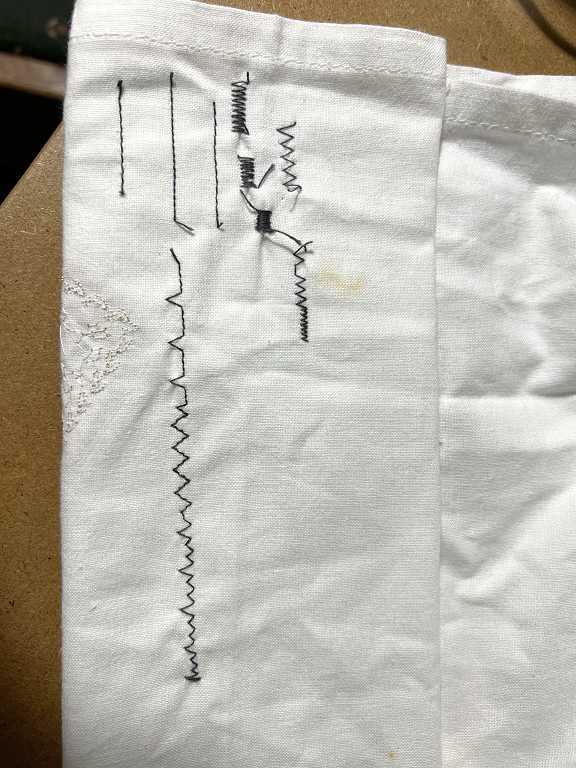
My first attempts at trying out the machine. I had to mess around for a while getting the tension right, as the top tension was too low, but I eventually found what seemed to work best, which was No. 7 on the dial. The long sample stitching shows the three fancy stitches, with the three-step zig-zag in the middle, and my favourite stitch at the bottom. The foot pedal controller is very easy to use. The one which came with my replacement Pfaff is awful, and not like my original one – how I wish I’d saved that machine because I could have used a second-hand replacement for parts. You live and learn. I’ve searched for the same foot control model as my original one, and did find one on Ebay once, but it was so ridiculously expensive that I couldn’t even consider it.
Conclusion
This is described as an entry-level machine and is accordingly very basic, but it does everything you need for making garments and for using with crafts. For those who travel to craft get-togethers this is ideal, because it’s so small and compact. There is no carrying case supplied but you could slip it into a bag easily enough.
I am probably going to keep this one exclusively for sewing paper, and will continue to use my Pfaff and occasionally the big Brother, for my normal sewing projects, because they have more facilities. I am not sure that this little machine would be robust enough for sewing heavy duty fabrics like denim or heavy furnishing fabrics but I wouldn’t want to use it for that anyway.
At this bargain price, how can you go wrong? This is a really fun, dinky little machine with more grown-up power under its bonnet than you’d expect for the price, and a tried and tested brand name and excellent warranty. For me, buying this was a no-brainer, especially as it has the stitch I want.
Here’s the unboxing video my hubby and I made on Saturday when the machine arrived.