I’ve been busy this week!
Highlighting magic
As I mentioned in my previous post, I discovered a brilliant new tip for highlighting drawings and paintings recently. In common with many others, I have struggled for years with this because most white pens don’t live up to expectations – they are either too watery and don’t give good enough coverage, or they reactivate what is underneath and mix with it, dulling their brightness, or they don’t flow properly – either nothing comes out at all, or you get a great blob that ruins your work. Also, in my experience, a lot of these white pens simply wipe off. It also depends what surface you are adding the hightlight to – some media leave a slick surface that the highlighter pen won’t adhere to. Another problem is that if you are going to use acrylic paint, you need to apply it with a brush which isn’t always ideal, as it is a lot more difficult to control for fine detail than a pen, and I find it impossible if you want to add white text to a project.
The artist on Color my World has come up with the answer, in this video (starting about half way through the video) using white gouache and a Tombow blender pen.
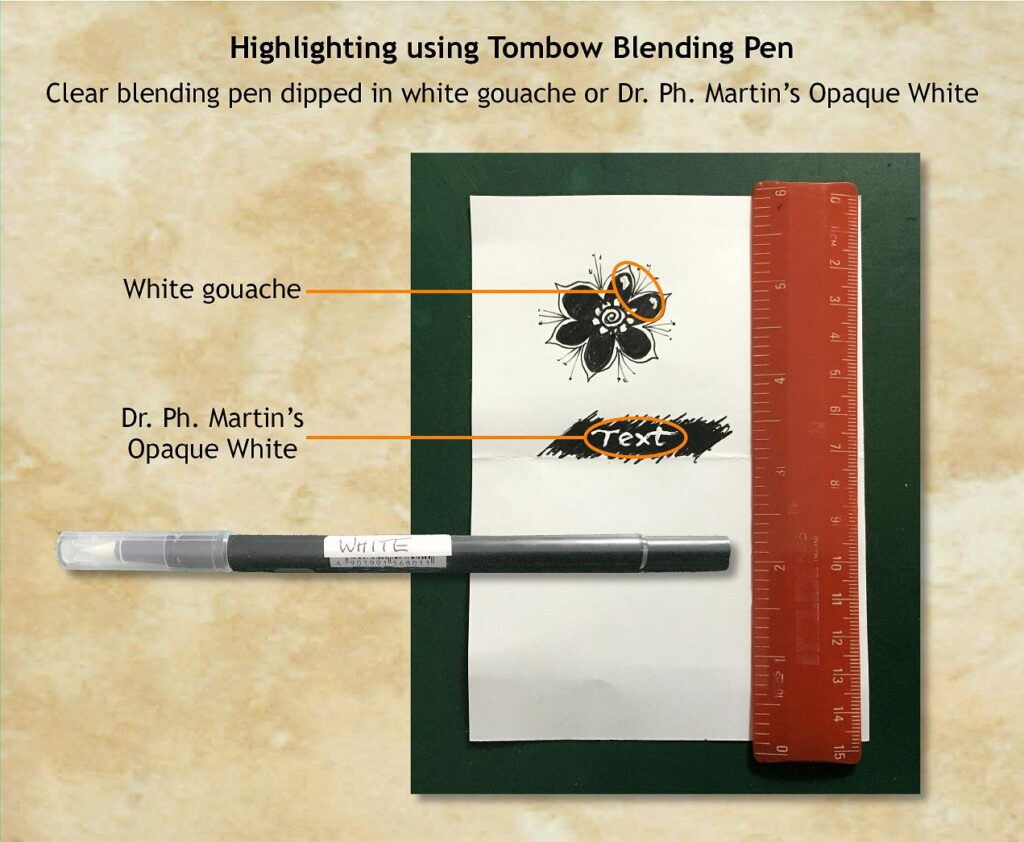
The brush tip of the blender pen isn’t a brush in the strictest sense of the word – handled carefully, it will retain a nice point. The blender pen brush tip is actually harder than those of the coloured Dual Brush Markers and is ideal for this technique. By carefully applying the paint, you can achieve the tiniest dot or the finest line – something very difficult to achieve with paint on an ordinary brush, however fine it may be.
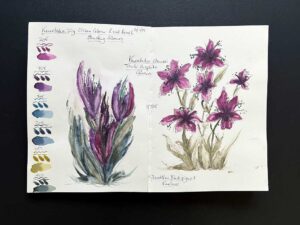
In my sample above, I experimented both with white gouache (kindly lent by my hubby) and Dr. Ph. Martin’s Opaque White, which is a fantastic water-based paint which is very bright and opaque. I found this worked just as well as the gouache. In the first example, I doodled the flower and filled in the petals with permanent black marker, and added a couple of highlights with this method, using gouache. The lower example is using the Opaque White.
You can add coloured pencil over the top of this white highlighting if you want, resulting in a lighter, more vibrant colour. This would work particularly well with coloured pencil on darker coloured paper, or for toning down a bright white highlight with the colour in question.
When you have dipped the tip of the pen into the paint, the blending solution in the nib keeps the paint moist. There will always be some residue left on it even after you wipe it off after use, so it is best to keep a blender pen dedicated just for this purpose. I recently bought a pack of six of these blender pens and have labelled them for use in this way.
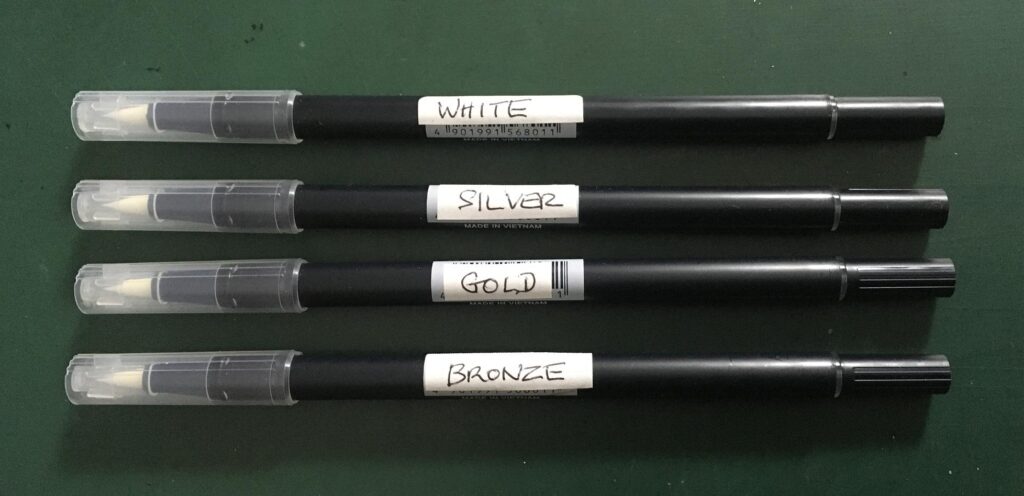
I have my original blender pen in the case with my Tombow Dual Brush markers. I have found this blender pen to be a perfect blender for coloured pencils and also my Stabilo Woodies (wax crayons). The two spares from the set of six have gone into the box where I store my spare new pens.
Other new stash
In addition to these blender pens, I also bought some other bits and pieces this week, including a nice little set of Russian manufacture metallic gouache paints. The box was broken on arrival (now mended). There are two golds, two silvers, a copper and a bronze. These will be very useful for adding highlights and embellishments to art work, using the same Tombow blending brush method as with the white.
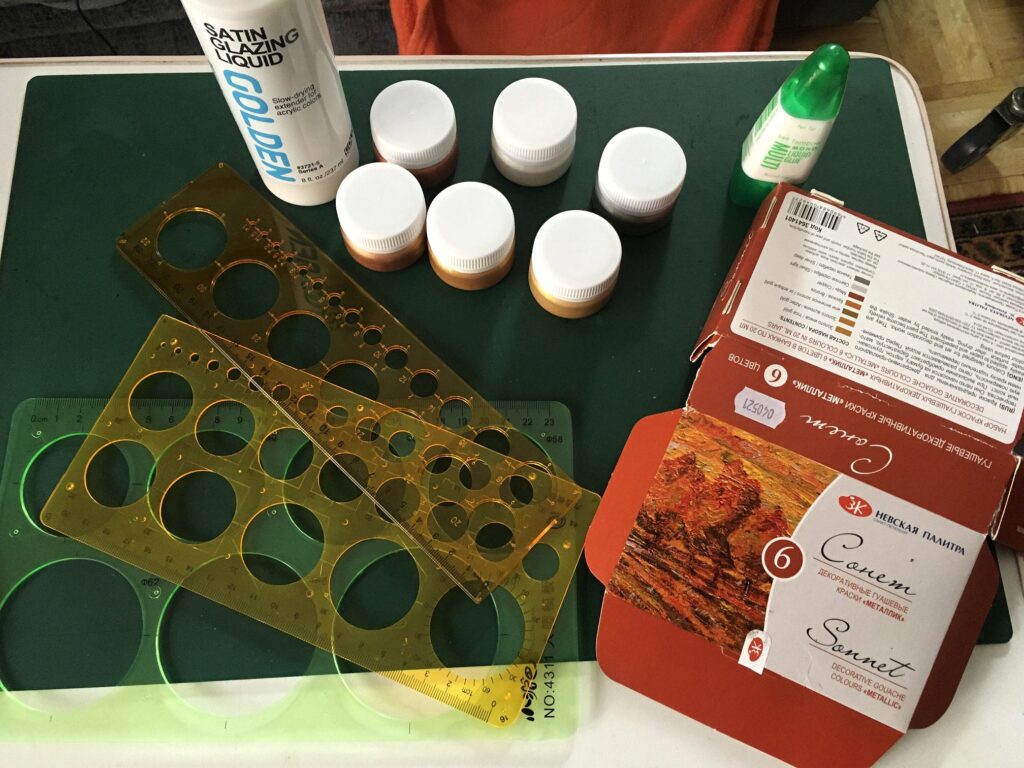
Also included in this little collection of new stash is a set of three circle templates for my drawings – it’s really hard finding exactly the right sized round object to draw around at times, and I don’t want to make a hole in the paper with a compass point. Each circle is marked at the quarters for lining up – very helpful if one wants to draw concentric circles. I also bought a pot of Tombow mono glue which has a fine tip at one end and a broad one at the other end. If you apply this glue and immediately stick the two surfaces together, the bond is strong and permanent. If you apply the glue and let it dry, it becomes repositionable, like the glue on post-it notes. I think this will be a useful addition to my sticking arsenal! Finally, on the advice of another YouTuber, regarding priming the pages of adult colouring books, I bought a bottle of Golden Satin Glazing Liquid. I rarely do adult colouring but often like to draw, paint and colour cheap non-dedicated paper, which sometimes doesn’t stand up too well to the treatment I inflict upon it!
What I have done in the past is to prime the paper with gesso. The disadvantage of this is that if you use white gesso, this can damage the nib of the permanent black marker you draw with. Doing the drawing first and then adding the gesso, you obviously have to use clear gesso or your would cover up your drawing, and this is usually pretty gritty, which not only feels unpleasant, but can damage the nibs of Tombow Dual Brush markers, and will rapidly wear down coloured pencils. I have got round this by sanding the surface before adding the colour but it never comes out absolutely smooth. There is a chalky substance in gesso which is going to cause a lot of extra tooth which can be damaging to some of the colouring media we use.
Watching this very good review of various priming media and papers, as well as colouring media, the Satin Glazing Liquid definitely seemed the right way to go. I have yet to try it.
Experiments with Stabilo Woodies combined with other media
Some time ago I bought a set of these thick wax crayons. They go on really creamy, and you can blend them with water, or with a blending pen, or with your finger. The main disadvantage of anything waxy is that it has to be the last layer you put down. They work very well over ink or coloured pencil, but anything water-based applied on top is simply not going to stick, but will float or rub off. Because these crayons are really thick, it is hard to add any fine detail at the end, and after extensive searching online, I could find no way to seal the surface with something on which you could draw or paint with fine markers for detail, or add coloured pencil. Oil and water don’t mix! Another disadvantage is that the surface remains quite tacky, and I was worried that if I bound any drawings together in a book, the pages would stick together and the art work would be ruined. One YouTuber replied to my comment to this effect and said that you need to separate the pages of the book with some greaseproof paper, which would certainly work, but would do nothing to enhance the aesthetic of the book!
I was watching a Tim Holtz video today, on the Ranger Embossing Glazes and Distress Crayons. When I saw the title of the video it sparked off an idea in my brain, that perhaps if I heat embossed my Woody colourings with clear embossing powder, it would seal the surface. Obviously this would result in a shiny plastic surface which would also be very difficult to add any media to, but it occurred to me that this could be sanded with fine grit sandpaper to provide some tooth. I decided to give it a go and see what happened.
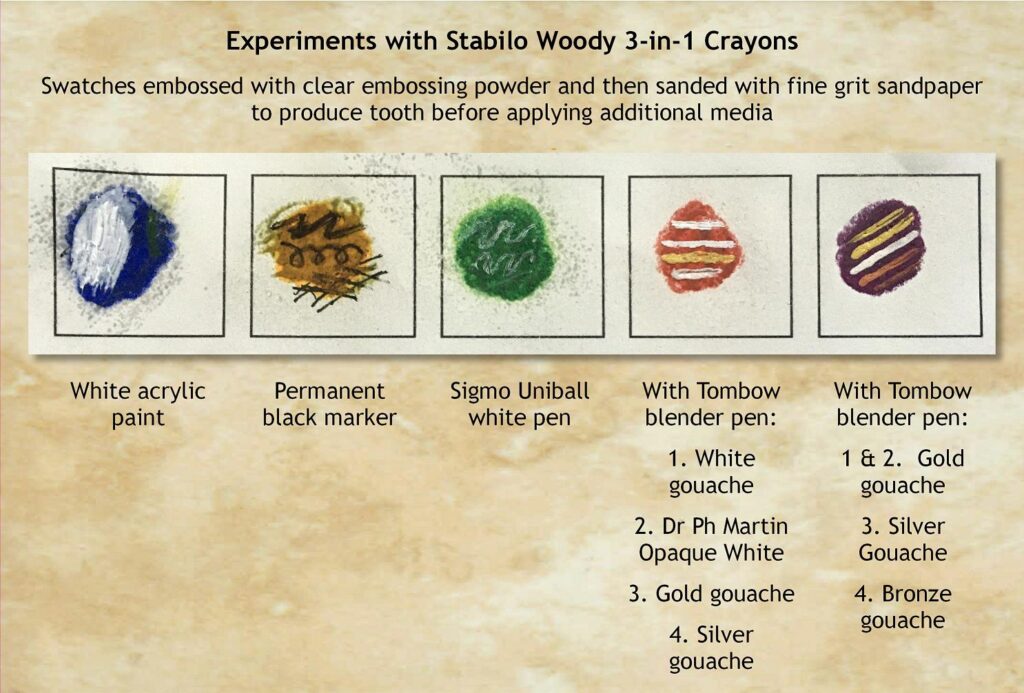
On second thoughts it would have been a lot easier to create larger samples initially, but I managed to do a few tests, some more successful than others. The clear embossing did definitely seal in the wax. This would mean that you could safely bind any pages in a book with no danger of their sticking together. Regarding the application of the embossing powder, I didn’t want to contaminate my embossing ink pad by applying it direct to paper, and trying with a brush just picked up the wax. In the end, I decided that the surface was tacky enough to retain the embossing powder if I just tipped it on and then tapped off the excess, which proved to be the case. After the first heating, if a second layer of embossing was required, the first layer had sealed the wax surface sufficiently that there was no transfer to the pad. One of Tim Holtz’s embossing ink dabbers would be useful for this, I think.
I sanded them until the surface looked more or less matte, and then proceeded to add my media. The acrylic paint went on with no problem. The permanent black marker was more problematic and I thought I had ruined the pen initially but scribbling with it on some scrap paper brought it back to life again. There may have been some residue remaining on the sample. The lines didn’t come out as defined and clean-looking as I had hoped, but as in all these samples, maybe further sanding would solve the problem.
The Sigmo Uniball white pen was a total disaster. Not only did it fail to produce a decent line, but immediately after trying, the pen ceased to work altogether. Again, this may have been due to some sanding residue being left on the surface despite my wiping it as clean as possible. I don’t mind too much because I’ve never had any success with these horrible pens!
Finally, I tried with the Tombow blender pen and gouache combination, again using both my hubby’s white gouache and Dr. Ph. Martin’s Opaque White, and then I tried the new metallic gouache paints. All worked very successfully. I didn’t risk rubbing them until I was convinced they were fully dry. I am hoping they will remain durable. If I want to add black detail lines to a Woody drawing, I shall use this method with black gouache.
With the amount of sanding I was able to achieve, there still wasn’t nearly enough tooth to be able to use coloured pencils on this surface.
With a bit more experimentation with embossing powder and sanding to get the best finish that I can achieve, I think I have found the solution to sealing the surface of these problematic crayons and also the ability to add fine detail to finish a drawing.
Watching the Tim Holtz video, he mentioned a product they have, called Frosted Crystal Embossing Powder. This leaves a surface with some tooth, and might be an easier solution than ordinary clear embossing powder which requires sanding. It’s definitely worth a try, next time I’m doing some online shopping.
Another drawing in my book
Last night I completed a new drawing in my new Rhodia book – a floral fest! I used one of my circle templates to map out the position of all the flowers and to help me keep their sizes consistent throughout, and once I had drawn the initial shape of each flower, I was able to erase the pencil marks and proceed with a permanent black marker. I am very pleased with how this one turned out. For this drawing I decided to keep the flowers all the same, and the black background makes them stand out. I added some shading with a grey coloured pencil from my Derwent Coloursoft set to add a little dimension.
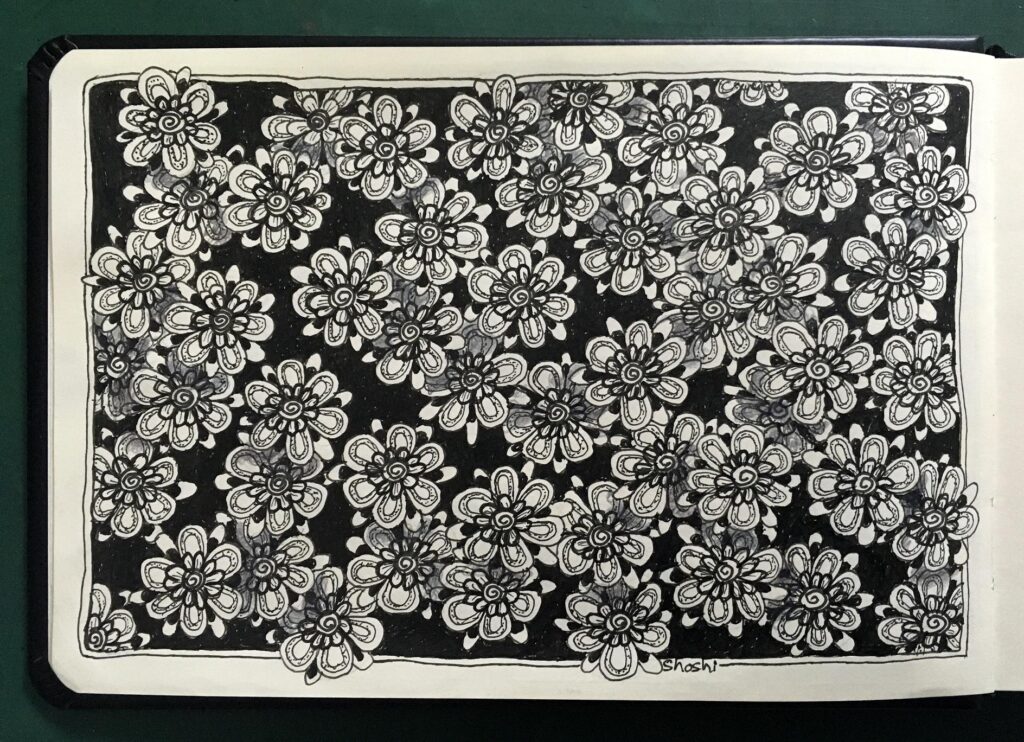
Of all the motifs I like to draw, I think flowers are my favourite.
Teabag doodles
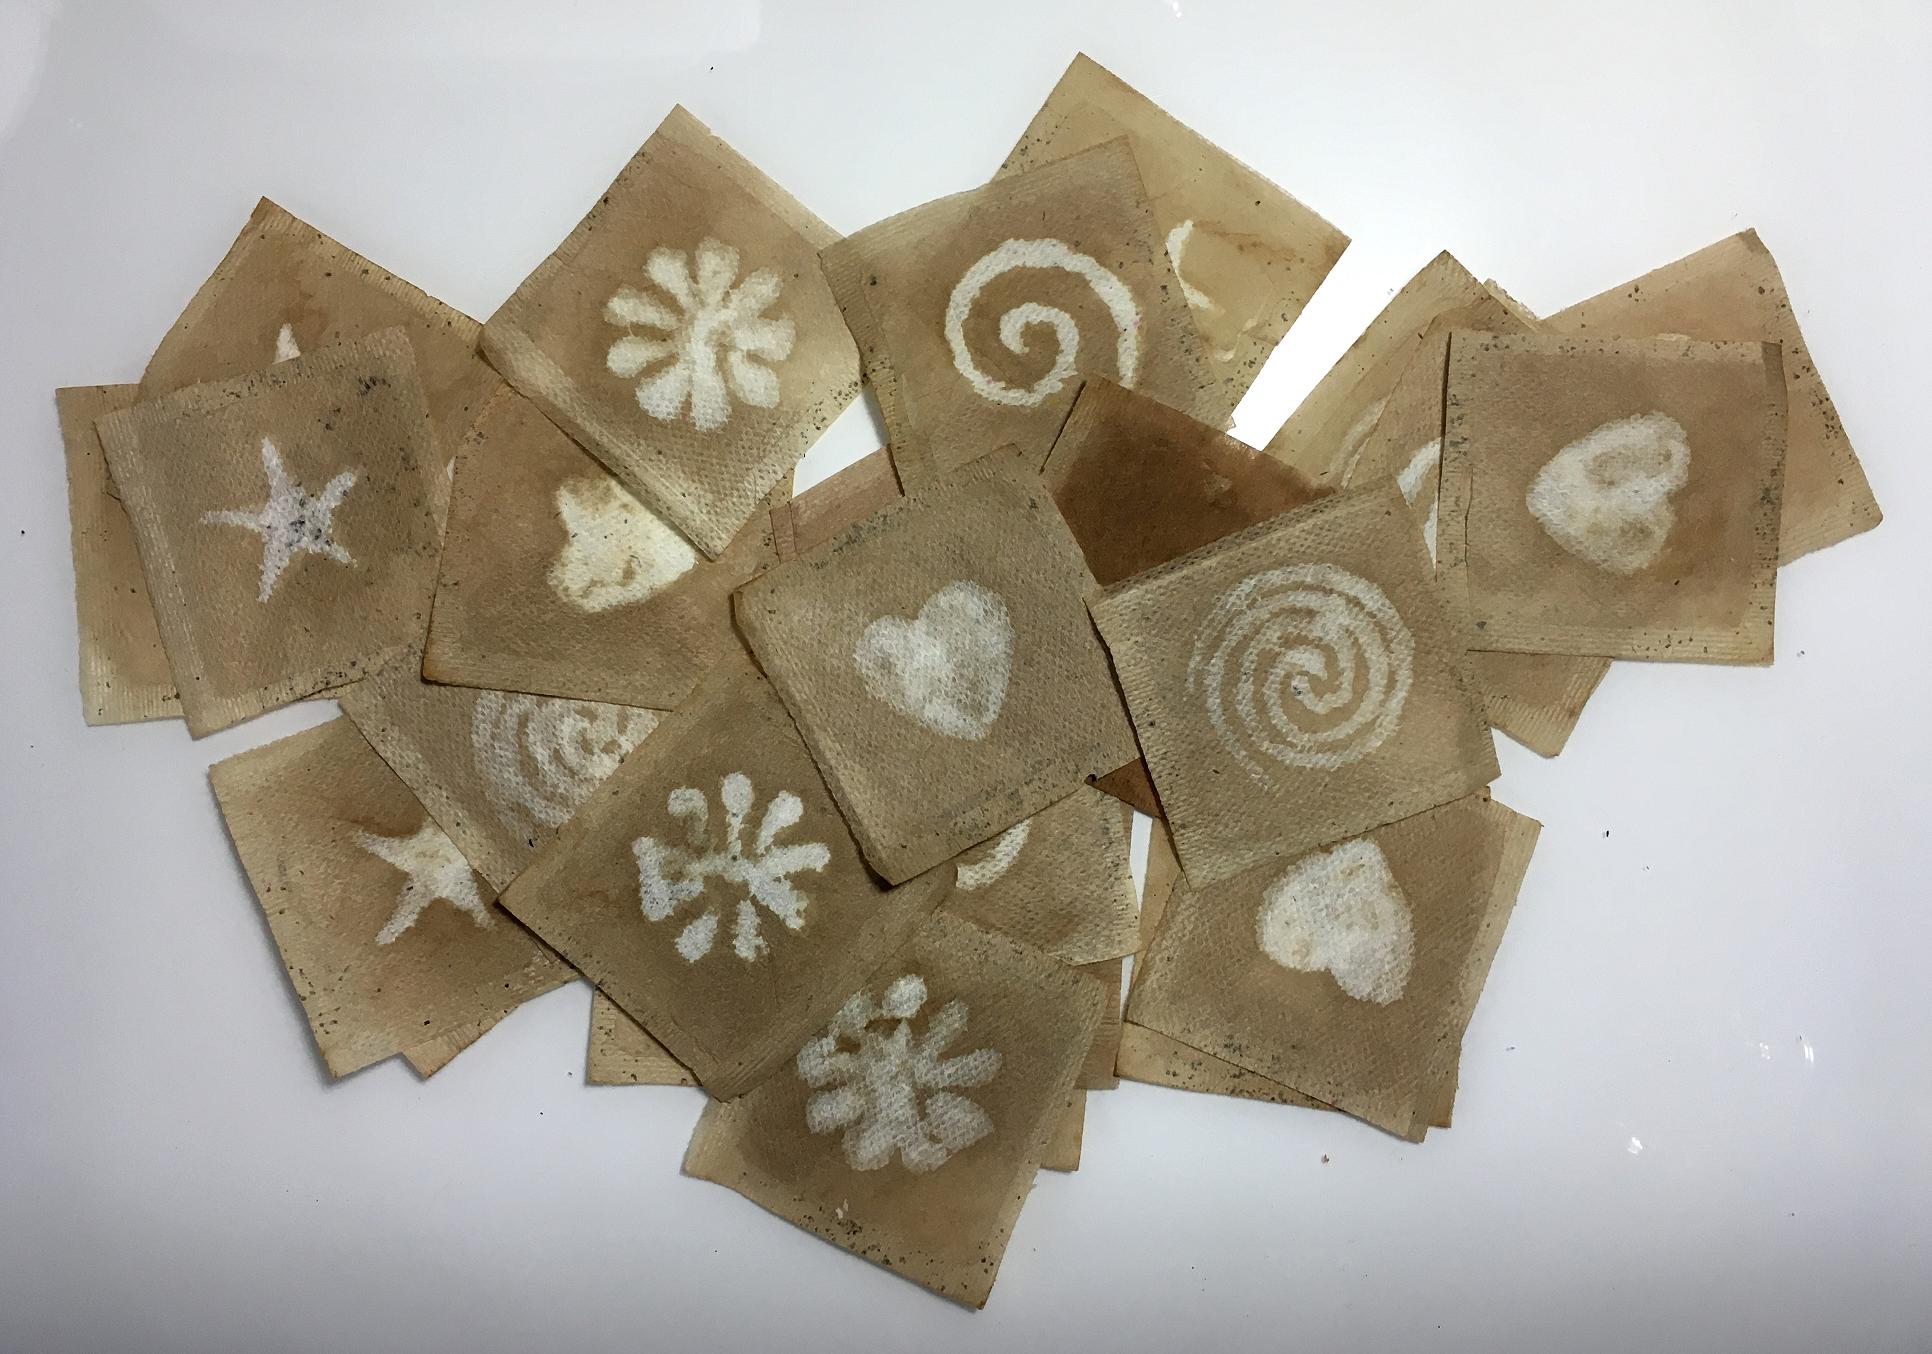
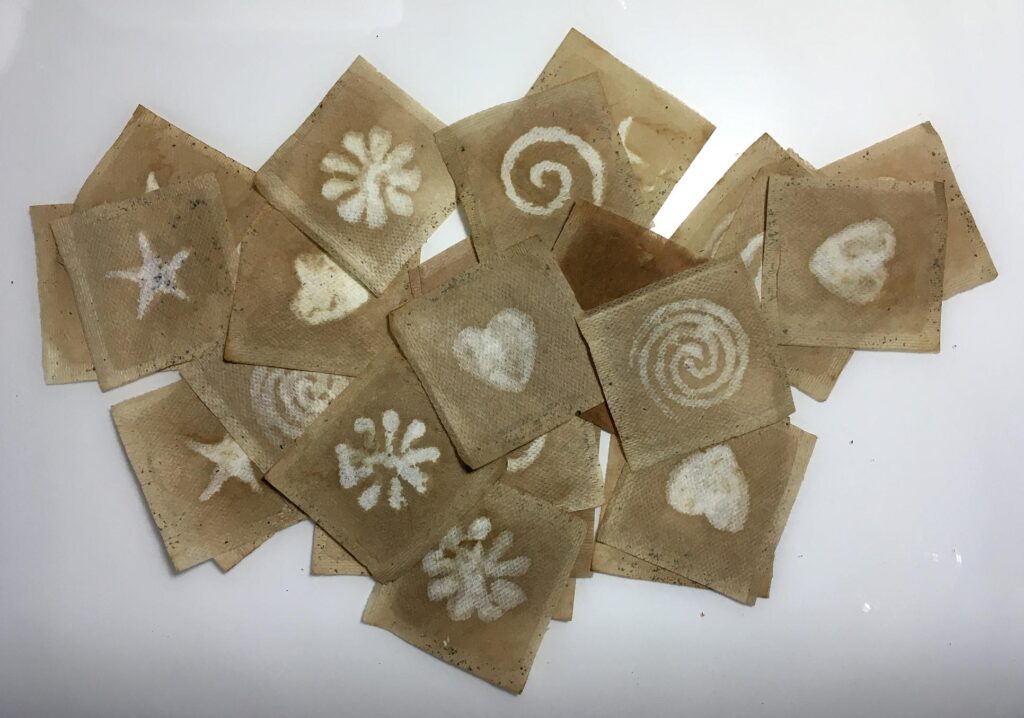
Yesterday I also returned to my teabags. I have more of these than you could shake a fist at. Ages ago I attempted to add designs to them by stamping with bleach, mostly using Indian carved wooden printing blocks, with a surprising lack of success, so I rather abandoned the idea. I was disappointed because I thought the bleach would produce a better effect than paint. This time I decided to paint the bleach on direct, with a brush. I took one of the sheets I printed out a while back for practising cutting shapes with my Gyrocut blade, to use as templates for the designs.
I set up my light panel with the cheat sheet under my sticky mat, onto which I laid each teabag. The design showed through sufficiently for tracing. I tipped a little liquid bleach into a plastic cup and used a paintbrush to apply it to the teabags.
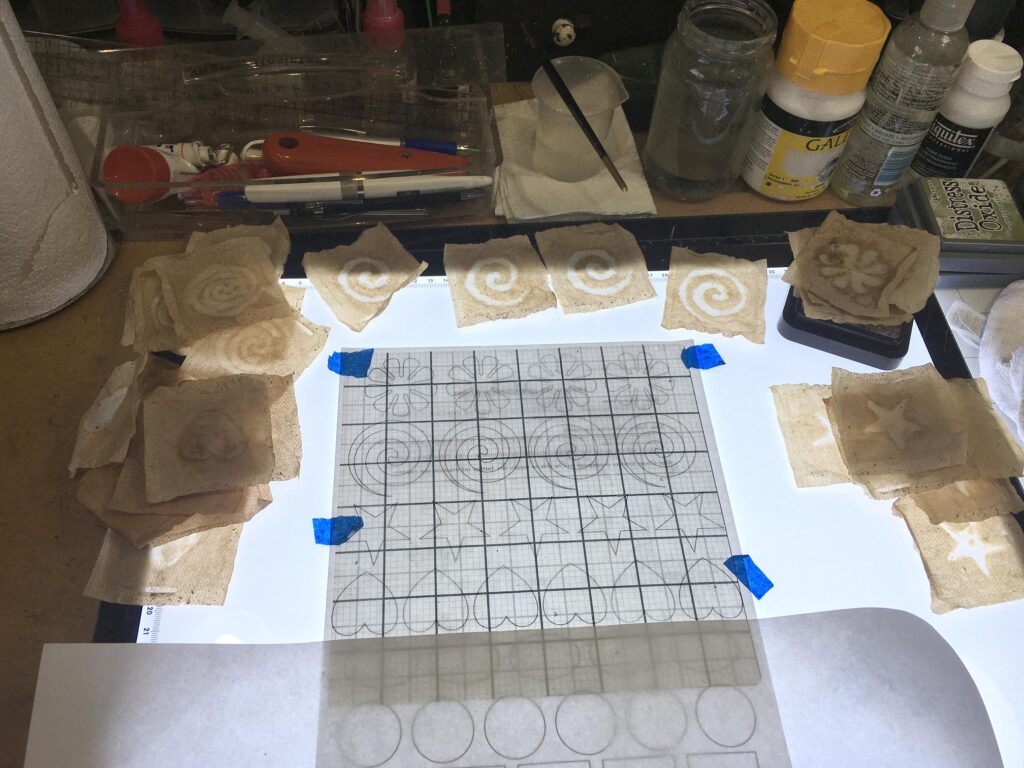
I laid a piece of freezer paper over the sticky mat to rest my hand on while I was painting.
The teabags immediately after bleaching. The designs have come out beautifully. The process didn’t work so well on the very darkly stained teabags.
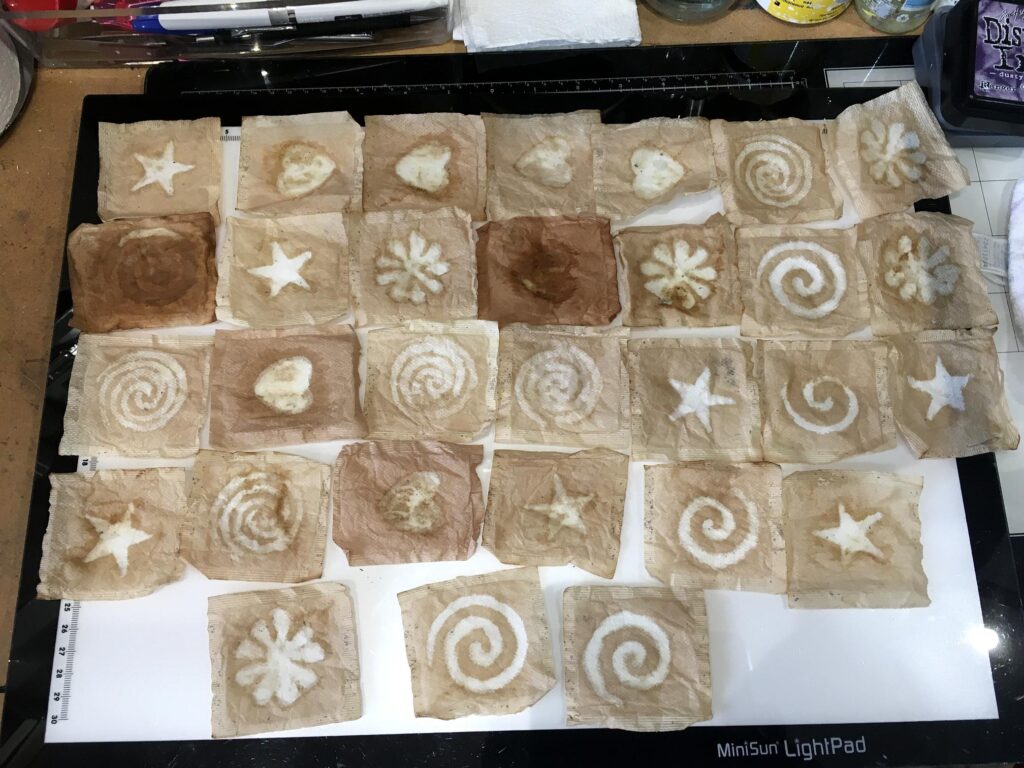
I left them to dry completely, so that the bleach would continue to do its work, and once they were dry, I washed them out thoroughly, and then ironed them with my craft iron under a cloth to stop them moving around.
Doodling on the first batch. I used a combination of sepia and sanguine permanent markers. I could also do some watercolour ones, and maybe add some embellishment with my new metallic gouache paints. Embroidery and beadwork is also a possibility. There is really no limit to how one could embellish them.
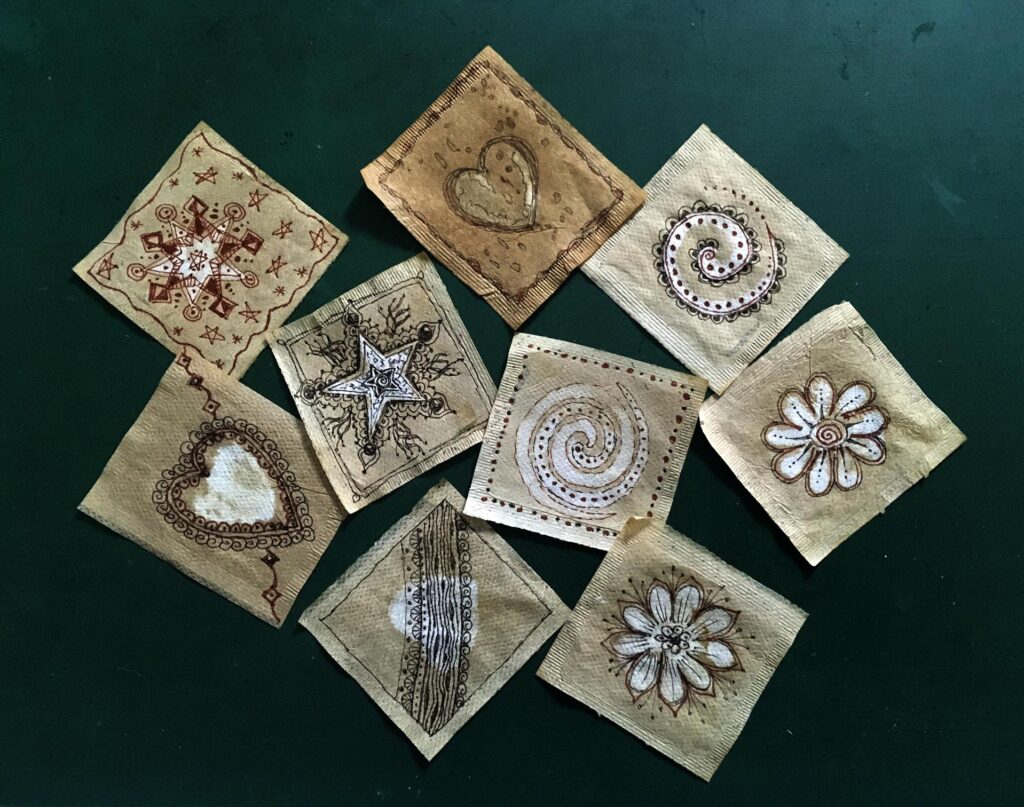
Once they are all done, I think I am going to stick them down onto card which I will have inked, and bind them into a tiny teabag album. They would also make excellent card toppers.
The bleaching technique works well as a starting point. It is hard to get defined, fine detail with it, but the basic shapes you can achieve can be further refined with pens, paints and other forms of embellishment.
Kitties
I couldn’t resist taking a picture of Lily on the cat tree. She has recently started going on it, after not taking any interest in it at all for months. It is normally considered to by Ruby’s territory, especially the top level!
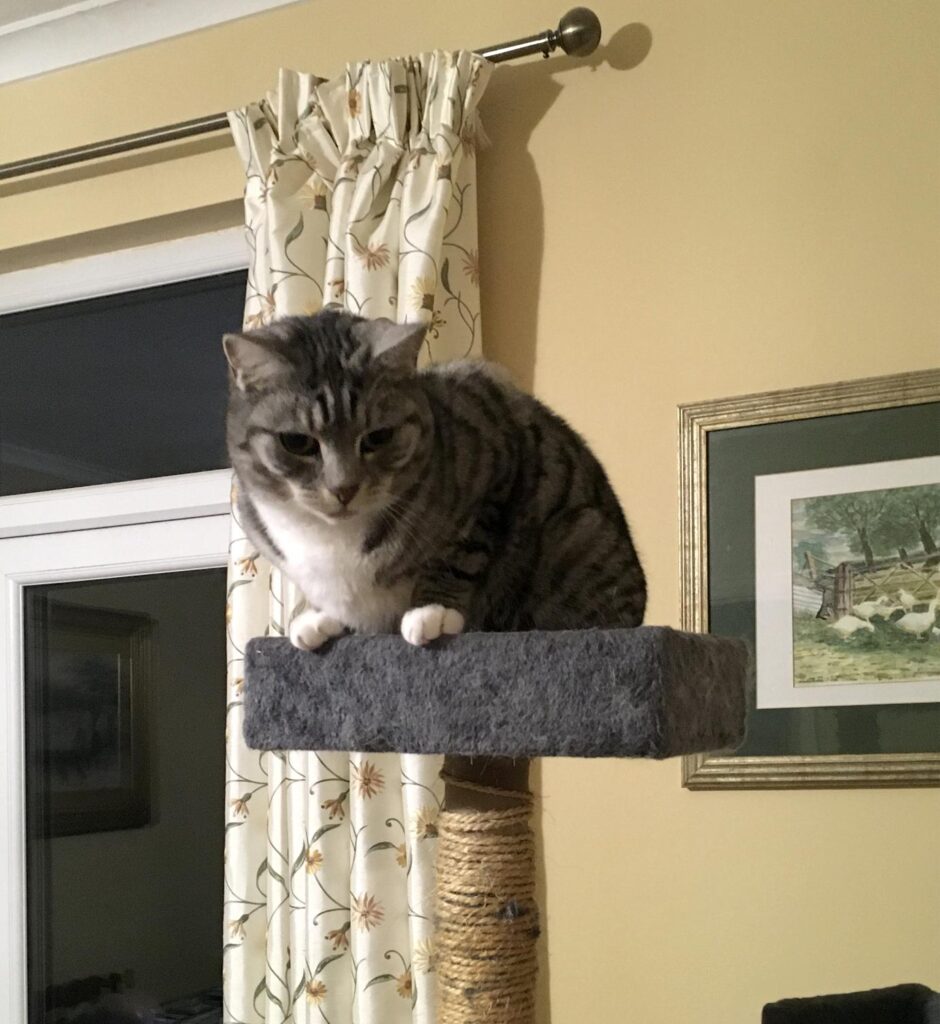
I love those little white paws!
Kitties will have their little whims. They have a favourite place which they will stick to for weeks or even months, and then suddenly, for no apparent reason, they will go completely off it, and find somewhere else! As we are always saying, “There’s no accounting for kitties.”
Doodly neurographic art and blodle art! Found them. Going to relax with some pen and ink noodling and doodling this evening.
The tea bags look interesting! You are certainly inventive with your creative media!
Love your kitty pics. My Charlie chops gets very stressed… in-joke… he loves sprawling on his back, legs akimbo, or stretched out in his superman pose. Nothing disturbs him. Vacuum cleaner… might open an eye… briefly… sudden crash because I’ve dropped something… might stir him into lifting his head up to see what’s going on with a decidely half awake foggy look… Charlie is the epitome of anti-stress.
Better get a wiggle on and get up. That pot of tea won’t make itself! In fairness, my lovely hub might beat me to it… happy Sunday, (again)!
Another lovely comment, Elly! Thanks. Glad you managed to find the bits you were looking for. I’m really looking forward to seeing your doodly efforts! Last night when my friend in Brazil was on the phone with me on Telegram, I had the speaker phone on, and made some backgrounds and then did some doodles while we chatted. I was then able to put the video on and show her what I’d done! I’m making backgrounds for the pages for some little mini-albums I’m making for the teabags. I’ll be blogging about that in a day or two.
I was so amused at your description of your Charlie that I had to read it to my hubby! Quite a difference between Charlie and our Ruby, who hides behind the fridge in the flat when the hoover is on! Lily is a lot more laid back. She often lies exposing all her private bits – what I call her shameless hussy mode! If you search back through my blog you’re sure to find some pictures of her at it.
Happy Sunday to you too!
Shoshi x
Ha ha! He also bought another knife, a sankuto, also Robert Welch. He, like you, appreciates the quality of them in the real sense of the word and thinks they’re worth every penny. Me, bleh! I’d slice a tomato with a rusty bread knife… quelle horreur! No class…
I’ve seen your ruby and lily in their moments of abandonment! Love them! Cats have such hauteur, can be so imperious… then, ha ha, roll around on the floor with no sense of modesty.
Thanks for sharing the white highlighting tip. And the detailed explanation. I love the way you organise. Labelling swatches, cataloguing… totally amazing.
Also, the way you share your reviews of any product you get! Unpacking, product specs, ease of assembly, performance evaluation…. so thorough! Pros, cons, extras…. You’re like a one-woman “Which” user guide!
Turns out my blog is with me for another year… despite cancelling with WPand cancelling PayPal… both reinstated and drew down the funds. Annoying. Wanted new blog, new name…. three bees in my bonnet….tchuh!
So must make time to post… might share an old sideboard makeover…bought for €50. Painted and embellished with decorative paper napkins and mod podge.
Happy Monday. Mine extra happy as I have today off but back ‘in’ tomorrow. Wfh… 🙂
Thanks Elly! Very interesting that your hubby also changed one of the knives in the set. I don’t like the method employed with the santoku knife – up and down. I prefer the rock-and-slide of the Western style chef’s knife – you have a lot more control even if it isn’t as fast. I can’t see how you could chop nuts with the santoku – they’d end up all over the kitchen haha! Thank you for all your kind words about my art etc. A lot of what I write about products and organising etc. is to help me because if I don’t write it down I’d forget it! My blog is a source of information for me to look back at if I need to. It also helps me remember when I did certain things – I don’t know about you but these days the days rush by so rapidly that I think it was last month that I did something, and it turns out to be a year ago!!! Also I’m hopeless at remembering.
Sorry about your blogging woes. I’ve just had a terrifyingly big bill for mine but broken down per month over a 3 year period it isn’t so bad, I suppose. Just a shock all at once! I would absolutely love to see your sideboard makeover. I’ve got a couple of cabinets on the landing which need doing and I don’t think I’m ever going to get round to it…
I’ve just posted another blog post about my teabag stuff. I’m on a roll!
Happy Tuesday, as it now is – I never go to bed until it’s tomorrow. Shoshi x
Love it all Shoshi!! Well done, the tea bags look amazing, how incredible!!! I never would have thought they would be such a creative medium. Beautiful. I particularly loved all the flower sin your book – truly amazing work!
Thanks so much, Dawn! Teabag art is very popular. These humble little squares (or rounds) of paper are fabulous for miniature art! Glad you liked my flower drawing too. I’ve just uploaded a fishy one
Shoshi x
Thank you for sharing this Shoshi – my pen and the Blled Proof White has arrived from Amazon and I can’t wait to try it out soon! I’ll have to practice with it first, but it looks absolutely perfect for what i need to bring light into my drawing.